
1. Introduzione
This manual provides detailed instructions for the installation, operation, and maintenance of your IIWEY C4 PRO 4-Channel Dash Cam and its accompanying hardwire kit. The C4 PRO system is designed to provide comprehensive video surveillance for your vehicle, offering multi-channel recording and advanced parking monitoring features.
2. Contenuto della confezione
Si prega di verificare che tutti gli articoli elencati di seguito siano inclusi nel pacchetto:
- C4 PRO Dash Cam Set (Main unit with front, interior, and rear cameras)
- Kit di cablaggio porta tipo C
- Installazione Crowbar
- 8 x Fuse Tap Cables (various types: LP, Mini, ATO, Micro2)
- 4 x clip per nascondere i cavi

Image: Contents of the hardwire kit, including the main cable, various fuse taps, and a pry tool.
3. Configurazione e installazione
3.1 Installazione della dash cam
- Montaggio dell'unità principale: Scegli una posizione adatta sul parabrezza, in genere dietro la parte posterioreview specchio, che non ostruisca il tuo viewPulire accuratamente l'area prima di fissare il supporto della dash cam.
- Collegamento delle telecamere: Connect the interior and rear cameras to the main unit. Ensure cables are routed neatly and securely, using the provided cable hiding clips.
- Collegamento elettrico: For continuous power and parking mode functionality, connect the dash cam to the hardwire kit.

Immagine: Oltreview of the IIWEY C4 PRO dash cam system, illustrating its multi-camera setup and connectivity.
3.2 Installazione del kit di cablaggio
The hardwire kit enables 24-hour parking surveillance and protects your vehicle's battery from draining.
- Identificare la scatola dei fusibili: Locate your vehicle's fuse box, typically found under the dashboard or in the engine bay.
- Collegare i fili: The hardwire kit has three wires:
- Red (BAT): Connect to a constant power fuse (always on, even when the ignition is off).
- Yellow (ACC): Connect to an accessory power fuse (on only when the ignition is on).
- Nero (GND): Connect to a metal bolt or screw on the vehicle's chassis for ground.
- Use Fuse Taps: Select the appropriate fuse tap cable (LP/Mini/ATO/Micro2) that matches your vehicle's fuse type. Insert the original fuse into the lower slot of the tap, and a new fuse (same amperage) for the dash cam into the upper slot.
- Cavi del percorso: Use the installation crowbar to neatly tuck the cables along the vehicle's trim and headliner to conceal them.

Immagine: dettagliata view of the hardwire kit's ACC, GND, and BAT wires for proper connection.

Image: Illustration of different fuse tap types and a typical hardwire kit installation in a vehicle's fuse box.
4. Istruzioni per l'uso
4.1 Funzionamento di base
Once properly installed and powered, the dash cam will typically power on and begin recording automatically when your vehicle starts. It will power off shortly after the vehicle is turned off, unless parking mode is active via the hardwire kit.
4.2 Parking Modes (with Hardwire Kit)
The hardwire kit enables 24-hour surveillance with two distinct parking modes:
- Modalità parcheggio time-lapse: La dash cam registra footage at a low frame rate (e.g., 1 frame per second) to conserve memory while continuously monitoring your parked vehicle. This allows for extended recording periods.
- Modalità parcheggio rilevamento collisione: The dash cam remains in standby mode and automatically activates to record and lock video footage upon detecting a significant impact or collision.

Image: Explanation of 24-hour parking modes, including time-lapse and collision detection.
4.3 Multi-Channel Recording
The C4 PRO supports various recording configurations:
| Modalità | Fotocamera frontale | Fotocamera destra | Fotocamera sinistra | Telecamera posteriore |
|---|---|---|---|---|
| 4-Canale | Risoluzione 2.7K (1440P) | 1080P | 1080P | 1440P |
| 3-Canale | 1944P | 1080P | / | 1440P |
| 2-Canale | 1944P | / | / | 1440P |
| Single Front | 1944P | / | / | / |
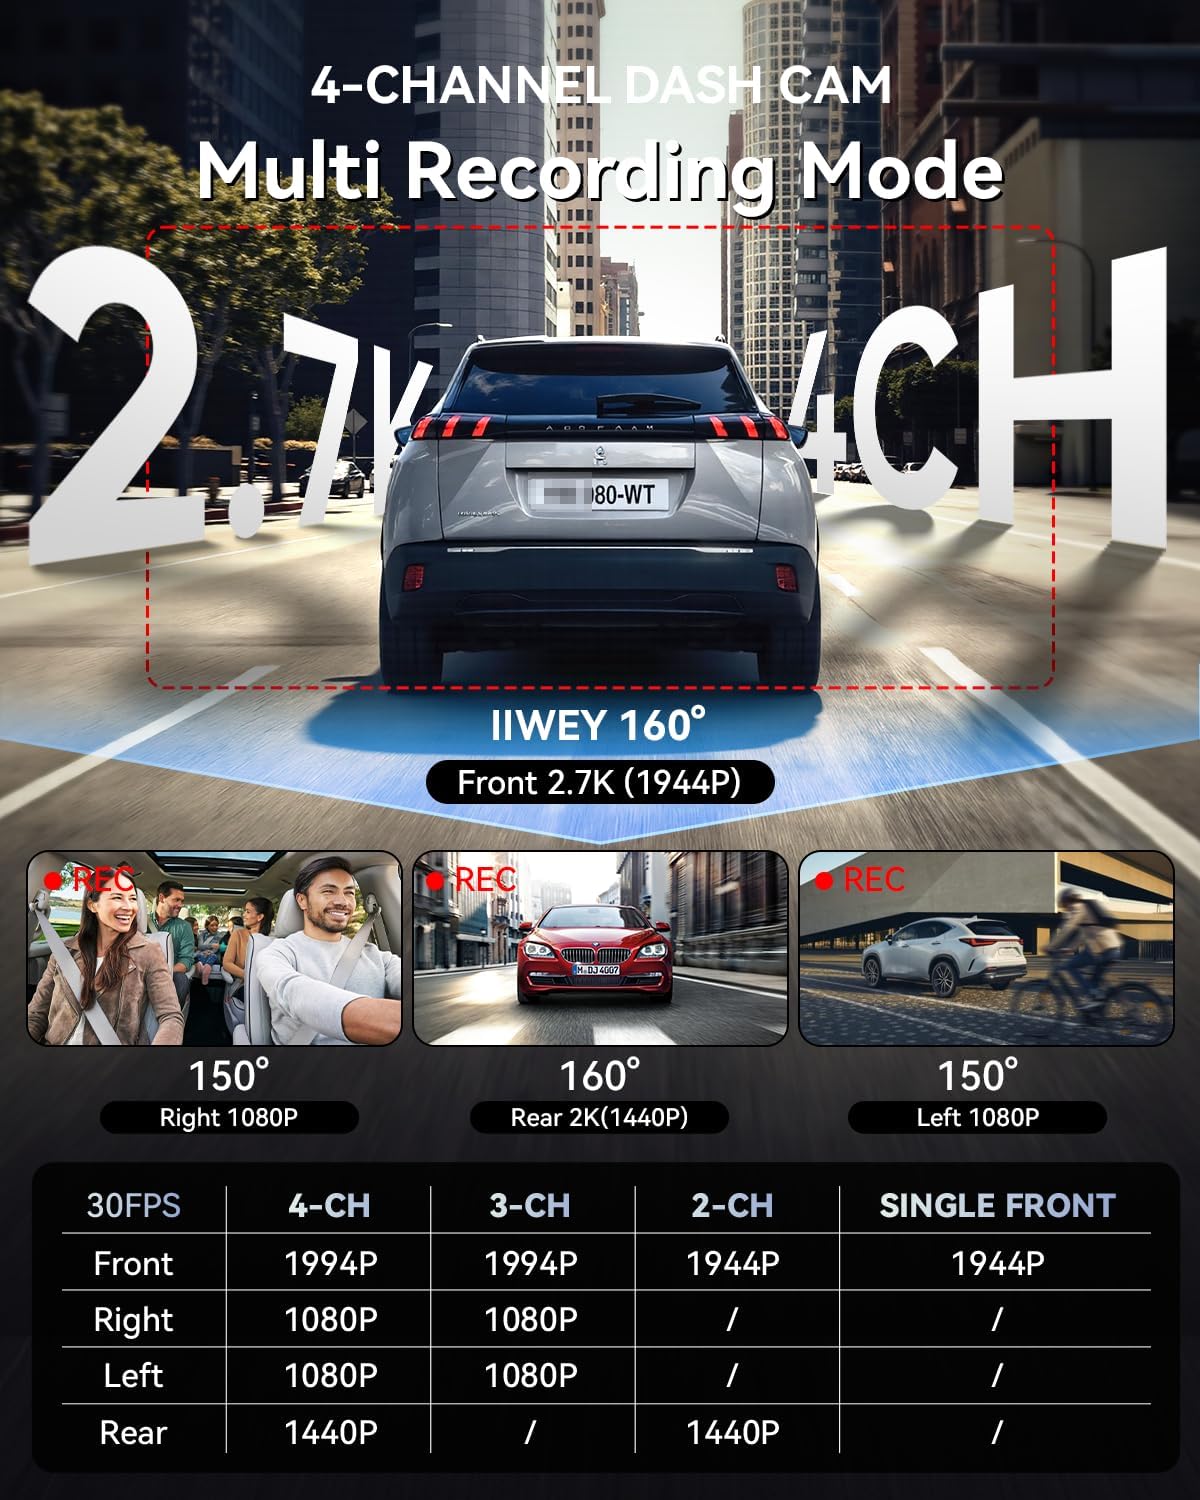
Image: Multi-recording mode options and corresponding resolutions for the C4 PRO dash cam.
4.4 Basso volumetage Protezione
The hardwire kit includes a smart power management chip that monitors your vehicle's battery voltage. Se il volumetage drops below 11.6V, the kit will automatically cut off power to the dash cam, ensuring sufficient power remains to start your engine.

Image: Illustration of the hardwire kit's low voltage protection mechanism.
5. Manutenzione
- Gestione della scheda SD: Regularly format the microSD card (at least once a month) to ensure optimal performance and prevent data corruption. Use a high-quality, high-endurance microSD card.
- Pulizia delle lenti: Keep camera lenses clean using a soft, lint-free cloth to ensure clear video recordings.
- Aggiornamenti del firmware: Controlla l'IIWEY ufficiale webperiodicamente per gli aggiornamenti del firmware, per migliorare le prestazioni e aggiungere nuove funzionalità.
6. Risoluzione Dei Problemi
- La Dash Cam non si accende:
- Check all power connections. Ensure the hardwire kit is correctly installed and receiving power from the fuse box. Verify the vehicle's battery voltage è al di sopra del volume bassotage protection threshold (11.6V).
- Parking Mode is not working:
- Confirm the hardwire kit is correctly installed with the ACC and BAT wires connected to their respective constant and accessory power sources. Ensure parking mode is enabled in the dash cam's settings.
- Video pippotage è sfocato o poco chiaro:
- Clean the camera lenses. Ensure the protective film has been removed from the lenses. Check if the dash cam is securely mounted and not vibrating.
- Errore della scheda SD:
- Format the microSD card. If the issue persists, try a different high-quality microSD card.
7. Specifiche
| Caratteristica | Dettaglio |
|---|---|
| Marca | IIWEY |
| Nome del modello | C4PRO |
| Risoluzione di acquisizione video | 2.7K 1440P (Front) |
| Frequenza dei fotogrammi | 30 fotogrammi al secondo |
| Caratteristiche speciali | Parking Assistant, Time Lapse, Low Voltage Protezione |
| Kit di ingresso cablato | 12V-24V |
| Uscita del kit cablato | 5V/3A |
| Basso volumetage Taglio | 11.6V |
| Tipo di veicolo compatibile | Auto, camion, furgone |
| Tipo di visualizzazione | LCD |
| Colore | Nero |
8. Garanzia e supporto
For warranty information, technical support, or any inquiries regarding your IIWEY C4 PRO Dash Cam, please refer to the contact information provided with your purchase or visit the official IIWEY websito. Conservare la ricevuta d'acquisto come prova d'acquisto per eventuali reclami in garanzia.
A video guide for installation may be available by scanning a QR code provided in the physical manual or on the product packaging.

Image: Reference to a video guide and manual for wiring the dash cam.


