1. Prodotto finitoview
The SUNER POWER 10 Amp 12V 24V Solar Charge Controller is a waterproof 10A solar panel regulator designed for various battery types, including Lead-Acid, AGM, Gel, Flooded, and Lithium LiFePO4 batteries. It features a dust-to-dawn load setting and an improved 3-stage charging algorithm to optimize battery life and performance. This controller ensures efficient and safe charging for your solar power system.
2. Informazioni sulla sicurezza
Si prega di leggere attentamente tutte le istruzioni di sicurezza prima dell'installazione e dell'uso. Il mancato rispetto di queste istruzioni può causare danni al controller, alla batteria o ai pannelli solari e causare lesioni personali.
- Prima di applicare l'alimentazione, assicurarsi che tutti i collegamenti siano corretti e sicuri.
- Non smontare o tentare di riparare il controller da soli. Contattare personale qualificato per l'assistenza.
- Installare il controller in un'area ben ventilata, lontano da materiali infiammabili.
- The controller is designed for 12V/24V systems. Verify your system voltage prima della connessione.
- Built-in multiple protections include over-charge, over-voltage, over-current, short circuit, reverse polarity, and over-temperature.
- The device is waterproof and spark-proof, rated IP65 for protection against dust and water jets.

Figure 1: Intelligent Solar Charge Controller with Built-in Protection System
3. Caratteristiche del prodotto
- Improved 3-Stage Algoritmo di ricarica: Massa, assorbimento e galleggiamentotages for effective 12-volt battery charging, ensuring safety and extending battery life.
- Protezioni di sicurezza complete: Include sovraccarico, sovratensionetage, over-current, short circuit, reverse polarity, and over-temperature protection.
- Design impermeabile IP65: Fully protected against dust ingress and water jets, suitable for various weather conditions.
- Versatile Load Modes: Three customizable load settings: continuous ON, dusk-to-dawn control, or dusk-to-dawn with a customizable timer.
- Ampia compatibilità della batteria: Supports Lead-Acid, AGM, Gel, Flooded, and Lithium LiFePO4 batteries.
- Ingresso FV: 15-35V, Max 120W at 12Volt.
4. Configurazione e installazione
Follow these steps for proper installation of your solar charge controller. Ensure all power sources are disconnected before making any connections.
4.1 Identificazione dei componenti

Figure 2: Controller Component Diagram
- Ingresso pannello solare: Connect your solar panel array here.
- Collegamento della batteria: Collegati alla tua batteria.
- Uscita di carico: Connect your DC loads (e.g., lights).
- Indicatore del pannello solare: Shows solar panel activity.
- Indicatore della batteria: Shows battery charge status.
- Indicatore di carico: Mostra lo stato dell'uscita del carico.
- Impostazione modalità: DIP switches for load control.
- Mount Holes: For securing the controller.
4.2 Collegamenti di cablaggio
Per evitare danni, collegare i componenti nel seguente ordine:
- Collegare la batteria: First, connect the battery to the charge controller. Ensure correct polarity (+ to + and - to -). The controller will detect the system voltage (12V o 24V) automaticamente.
- Collegare il pannello solare: Next, connect the solar panel to the charge controller. Ensure correct polarity.
- Collegare il carico: Finally, connect the DC load to the charge controller. Ensure correct polarity.

Figure 3: Wiring Polarity Diagram
Importante: quando si smonta il sistema, collegare sempre prima la batteria e scollegare prima il pannello solare.
4.3 Montaggio
Mount the controller using the provided mount holes (8) in a location that is protected from direct sunlight and excessive heat, but allows for adequate ventilation. Despite its waterproof rating, avoiding direct exposure to extreme elements can prolong its lifespan.
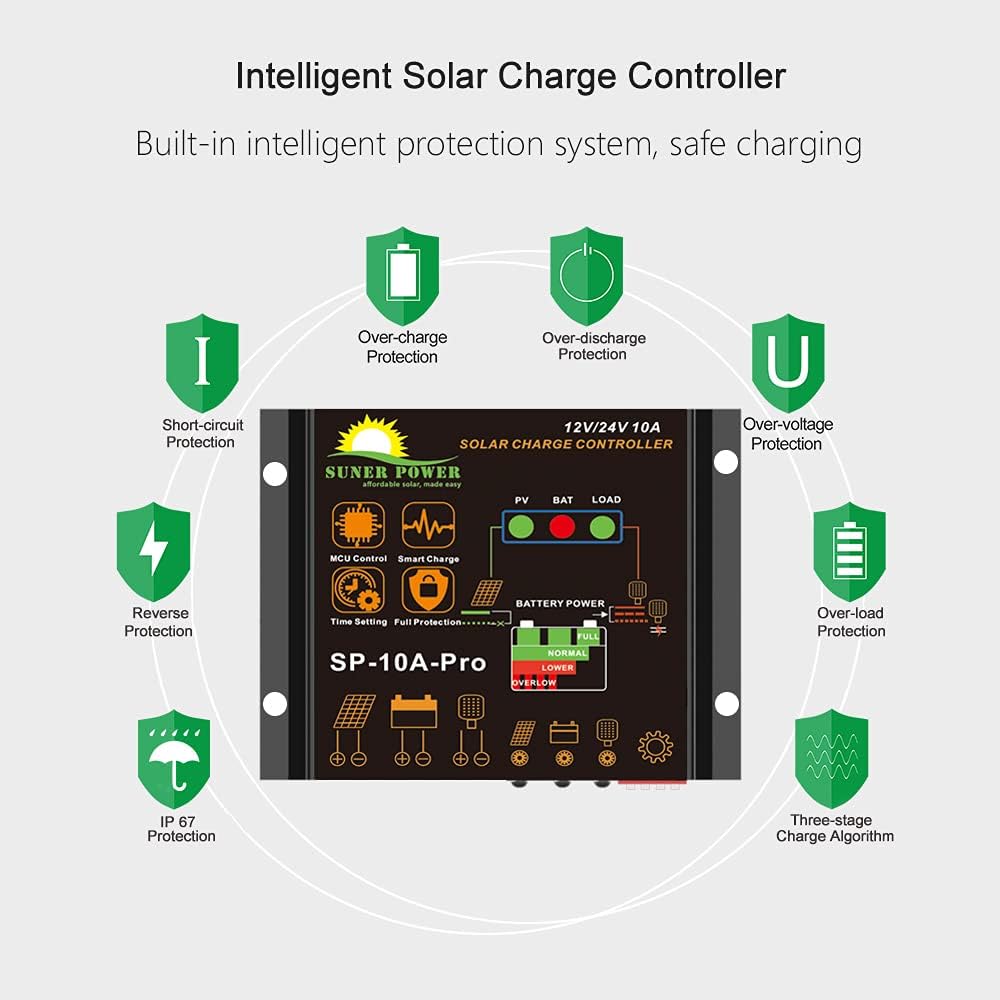
Figura 4: Design impermeabile IP65
5. Istruzioni per l'uso
The controller features a "Dust to Dawn Intelligent Controller" with three load working modes, configurable via DIP switches.
5.1 Load Working Mode Setting
The controller's load output can be customized using the DIP switches (Mode setting, item 7 in Figure 2). Refer to the diagram below for specific settings.
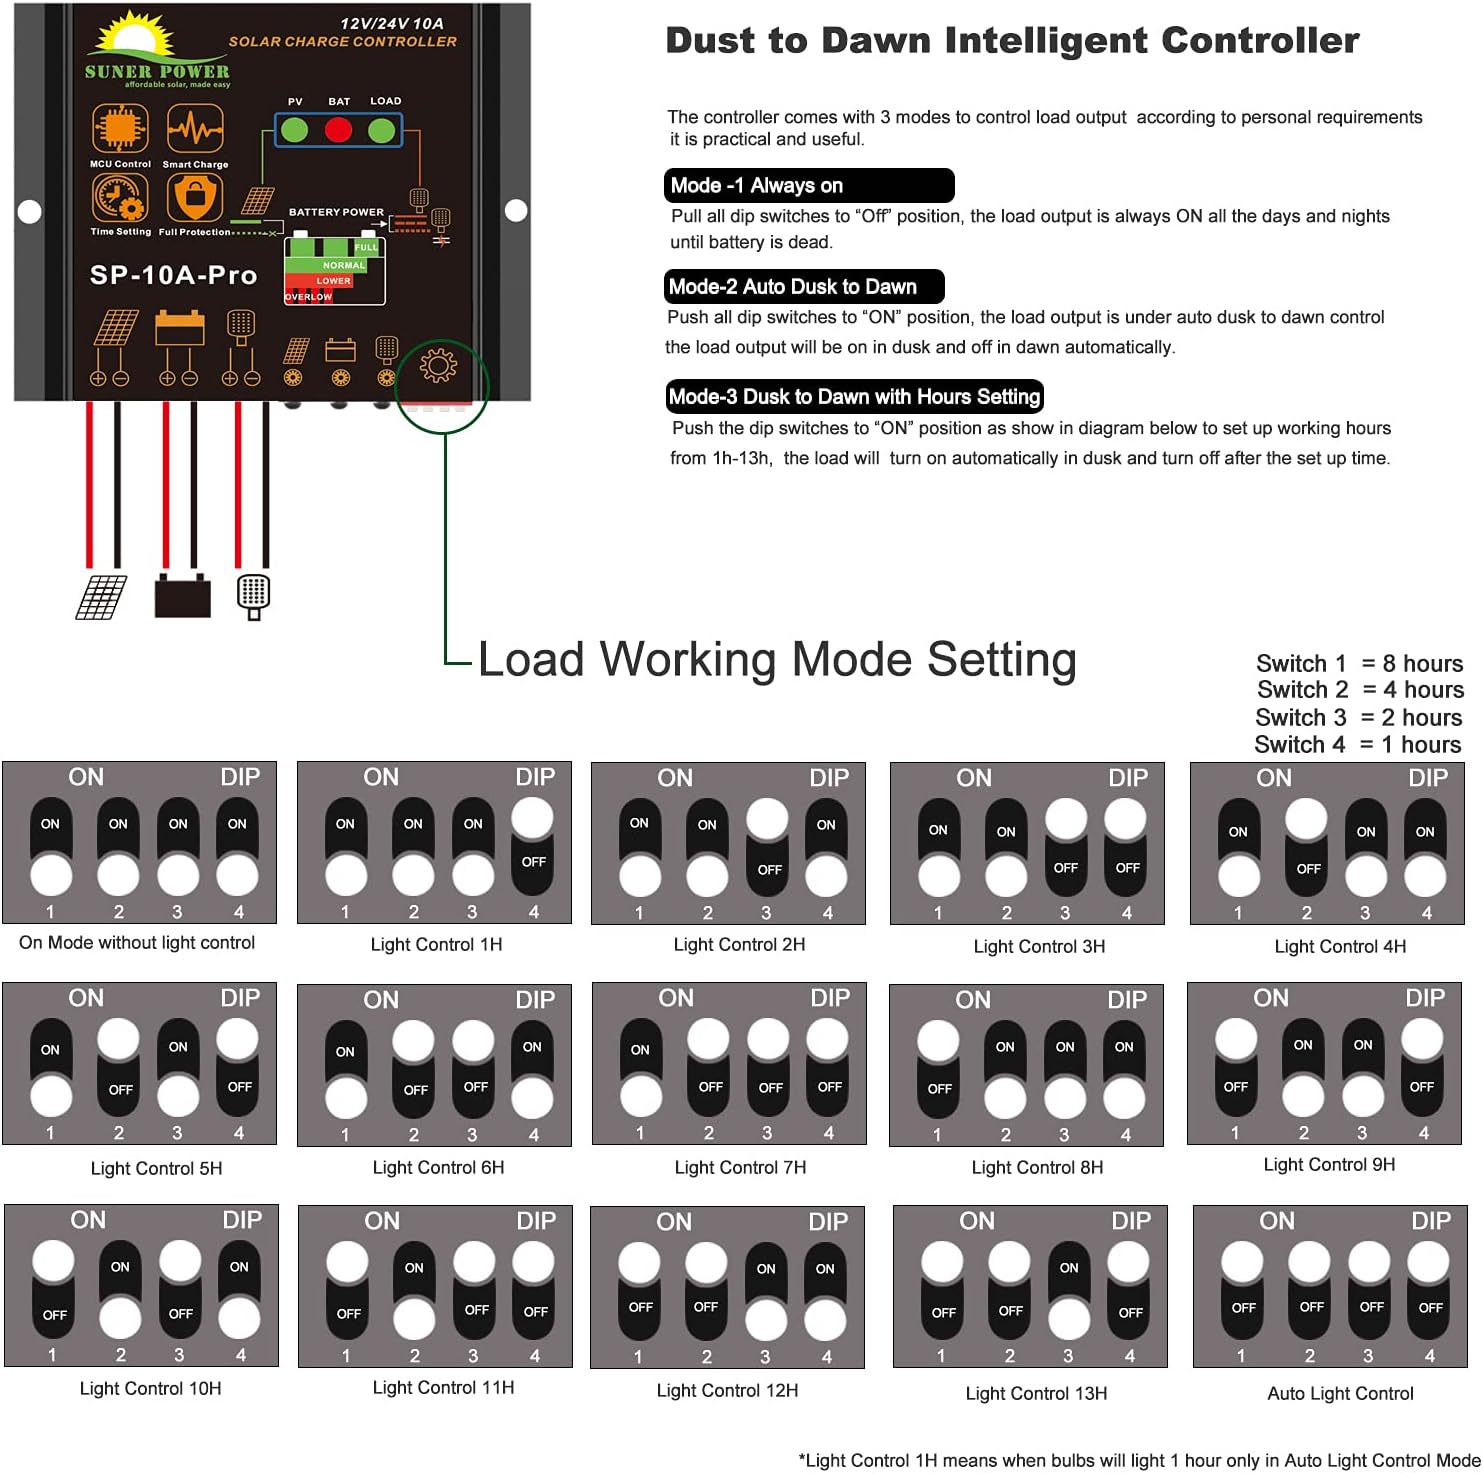
Figure 5: Load Working Mode DIP Switch Settings
- Mode 1: Always On
Pull all DIP switches to the "OFF" position. The load output will remain ON 24 hours a day, provided the battery has sufficient charge. - Mode 2: Auto Dusk to Dawn
Push all DIP switches to the "ON" position. The load output will automatically turn ON at dusk and turn OFF at dawn. - Mode 3: Dusk to Dawn with Hours Setting
Push the DIP switches to the "ON" position as shown in the diagram (Figure 5) to set up working hours from 1 hour to 14 hours. The load will turn ON automatically at dusk and turn OFF after the set time duration. For example, "Light Control 1H" means the lights will be on for 1 hour only in Auto Light Control Mode.
5.2 Indicatori
The controller features LED indicators to display the status of your solar system (refer to Figure 2 for locations):
- Solar Panel Indicator (4): Indicates solar panel activity and charging status.
- Battery Indicator (5): Shows the current charge level of the battery (e.g., FULL, NORMAL, LOWER, OVERLOW).
- Load Indicator (6): Indicates whether the load output is active.
6. Manutenzione
The SUNER POWER solar charge controller is designed for minimal maintenance. However, periodic checks can ensure optimal performance and longevity.
- Ispezionare le connessioni: Controllare periodicamente tutti i collegamenti elettrici per verificarne la tenuta e la corrosione. I collegamenti allentati possono causare voltagcadute e surriscaldamento.
- Controller pulito: Although waterproof, keep the controller's exterior clean from dust and debris. Use a soft, dry cloth. Do not use harsh chemicals or abrasive cleaners.
- Indicatori di controllo: Regularly observe the LED indicators to ensure the system is operating as expected.
- Stato della batteria: Monitor your battery's health and charge level. Ensure it is compatible with the controller's charging parameters.
7. Risoluzione Dei Problemi
Se riscontri problemi con il tuo regolatore di carica solare, fai riferimento ai seguenti problemi comuni e alle relative soluzioni:
| Problema | Possibile causa | Soluzione |
|---|---|---|
| Nessuna potenza da caricare |
|
|
| Batteria non in carica |
|
|
| Il controller non si accende |
|
|
If the problem persists after attempting these solutions, please contact SUNER POWER customer support.
8. Specifiche
| Modello | SP-PWM-10A |
| Marca | POTENZA SUNER |
| Corrente nominale | 10 Amp |
| Volume di sistematage | Rilevamento automatico 12V / 24V |
| Ingresso FV Voltage Gamma | 15-35 V |
| Massima potenza FV in ingresso | 120W (at 12V system) |
| Tipi di batteria supportati | Lead-Acid (AGM, Gel, Flooded), Lithium (LiFePO4) |
| Algoritmo di ricarica | 3-Stage (Bulk, Absorption, Float) |
| Modalità di caricamento | Continuous ON, Dusk-to-Dawn, Dusk-to-Dawn with Timer |
| Protezione | Over-charge, Over-voltage, Over-current, Short Circuit, Reverse Polarity, Over-temperature |
| Grado di impermeabilità | Grado di protezione IP65 |
| Materiale | Plastica |
| Peso dell'articolo | 0.14 chilogrammi |
| Indicatori | LED (Solar Panel, Battery, Load Status) |
9. Garanzia e supporto
The SUNER POWER 10 Amp 12V 24V PWM Solar Charge Controller comes with a Garanzia di 1 anno dalla data di acquisto, coprendo i difetti di materiali e di fabbricazione.
For technical support, warranty claims, or any questions regarding your product, please contact SUNER POWER customer service. Refer to your purchase documentation or the SUNER POWER official websito per i contatti.
Produttore: POTENZA SUNER