
1. Introduzione
This manual provides detailed instructions for the installation, operation, and maintenance of your VIKIO HOME 42 Inch Under Cabinet Range Hood, model VK-RC13-42. Please read this manual thoroughly before installation and use to ensure proper function and safety. Keep this manual for future reference.

Immagine 1.1: anteriore view of the VIKIO HOME 42 Inch Under Cabinet Range Hood with control panel and LED lights.
2. Informazioni sulla sicurezza
Quando si utilizzano apparecchi elettrici, seguire sempre le precauzioni di sicurezza di base per ridurre il rischio di incendi, scosse elettriche o lesioni.
- Assicurarsi che la cappa sia correttamente collegata a terra.
- Non azionare alcun ventilatore con un cavo o una spina danneggiati. Smaltire il ventilatore o riportarlo a un centro di assistenza autorizzato per l'esame e/o la riparazione.
- Non utilizzare questa unità con alcun dispositivo di controllo della velocità a stato solido.
- Pulire frequentemente i filtri antigrasso. Evitare che il grasso si accumuli sulla ventola o sul filtro.
- Non lasciare mai le unità di superficie incustodite con impostazioni elevate. I boilover causano il fumo e le fuoriuscite di grasso che possono incendiarsi.
- Accendere sempre la cappa quando si cucina ad alte temperature o quando si fiammeggiano i cibi.
- Use appropriate size cookware on each surface unit.
3. Contenuto della confezione
Verificare che tutti i componenti siano presenti e integri al momento del disimballaggio.
- VIKIO HOME 42 Inch Under Cabinet Range Hood (Model VK-RC13-42)
- 5-Layer Aluminum Grease Filters (Pre-installed)
- Hardware di installazione (viti, tasselli, ecc.)
- Cavo di alimentazione
- Manuale di istruzioni
4. Specifiche
| Caratteristica | Specificazione |
|---|---|
| Numero di modello | VK-RC13-42 |
| Marca | CASA VIKIO |
| Misurare | 42 pollici |
| Tipo di montaggio | Sotto l'armadio |
| Capacità del flusso d'aria | 900 piedi cubi al minuto (CFM) |
| Livello di rumore | 35 dBA (Low Speed) to 65 dBA (High Speed) |
| Materiale | Acciaio inossidabile |
| Voltage | 110 Volt |
| Peso dell'articolo | 27.7 libbre |
| Dimensioni del prodotto (P x L x A) | 19.68" x 41.3" x 6" |
| Filtri | 5-Layer Aluminum Mesh, Dishwasher Safe |
| Controlli | Touch/Gesture Control, 3-Speed Fan |
| Illuminazione | LED Lights (4000K, 3W, GU10) |
| Caratteristiche speciali | Dual-Motor, Noise Reduction |
5. Configurazione e installazione
This range hood is designed for under-cabinet mounting. Due to its size and weight, proper installation typically requires two people.
5.1 Lista di controllo pre-installazione
- Verify that the installation area meets the required dimensions (minimum 24 inches, recommended 24-30 inches above the stovetop).
- Ensure adequate electrical supply (110V).
- Confirm all necessary hardware is present.
- Review local building codes and regulations for range hood installation.
5.2 Passaggi di installazione
- Preparare il mobile: Measure and mark the mounting points on the underside of the cabinet according to the provided template (if included) or product dimensions.
- Fori di perforazione: Drill pilot holes for mounting screws and for the electrical wiring access. If ducting through the cabinet, cut the appropriate opening for the exhaust connector.
- Montare il cofano: Carefully lift the range hood into position and secure it to the cabinet using the provided mounting screws. Ensure it is level and firmly attached.
- Collegare i condotti: Attach the exhaust ducting to the range hood's exhaust connector. Ensure all connections are sealed to prevent air leaks. (Ducting and adapter not included).
- Collegamento elettrico: Connect the power cord to a grounded 110V outlet. If hardwiring, ensure connections are made by a qualified electrician.
- Installa filtri: Ensure the 5-layer aluminum filters are securely in place.
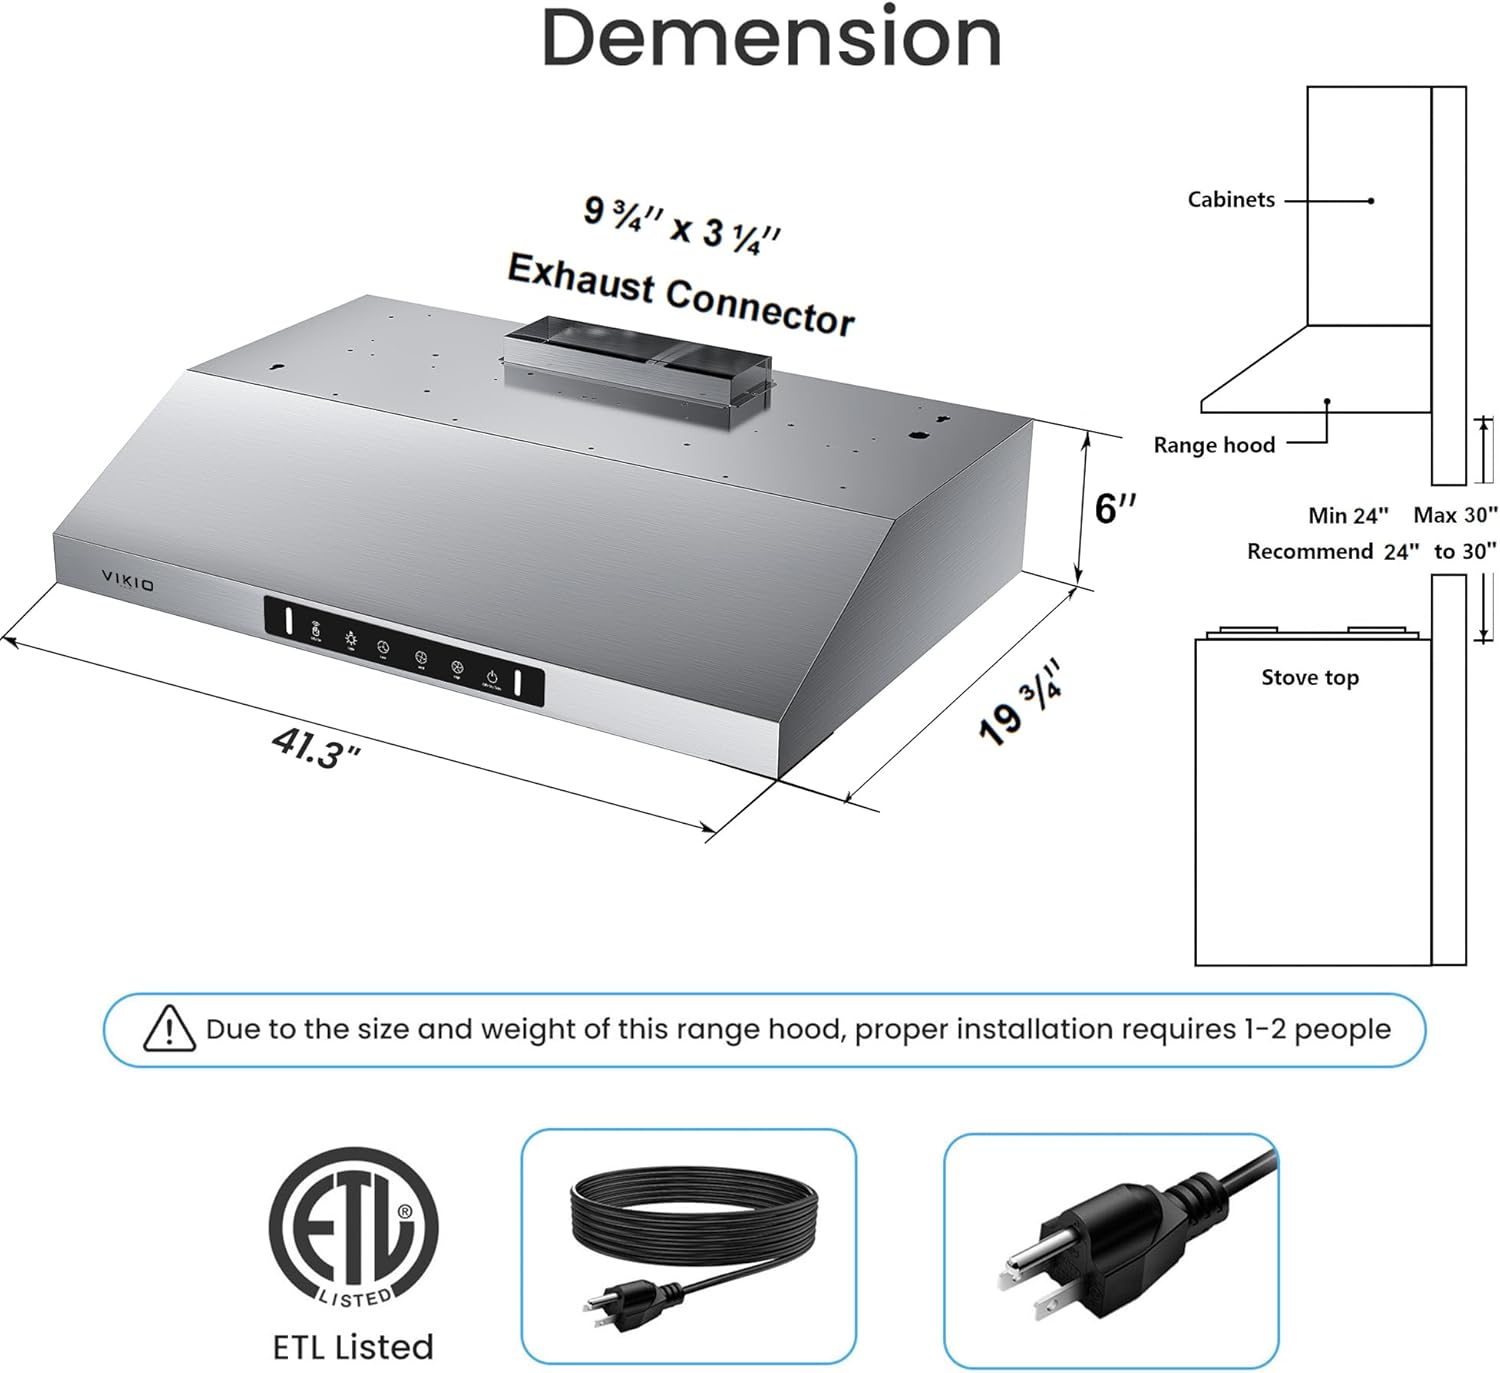
Image 5.1: Diagram showing product dimensions and recommended installation height above the stovetop. Note: Proper installation requires 1-2 people.

Immagine 5.2: Interno view illustrating the dual motor system and filter placement, highlighting the powerful airflow mechanism.
6. Istruzioni per l'uso
Your VIKIO HOME range hood features intuitive touch and gesture controls for ease of use.
6.1 Funzioni del pannello di controllo

Immagine 6.1: Dettagliata view of the touch control panel, indicating functions for lights, fan speeds, and power.
- Luce accesa/spenta: Touch the light icon to turn the LED lights on or off. The 4000K LED lights provide clear illumination for your cooking area.
- Controllo della velocità della ventola: Select from three fan speeds (Low, Medium, High) by touching the corresponding icons to adjust suction power.
- On/Off / 3S Delay Off: Touch the power icon to turn the unit on or off. Press and hold for 3 seconds to activate the delay-off function, which will continue ventilation for a short period before shutting down.
6.2 Controllo dei gesti
The range hood features responsive gesture-sensing technology for hands-free operation. Gesture control is activated when both sensing points are crossed.

Image 6.2: Illustration of gesture control, showing how to activate the fan by waving a hand across the sensing points.
- Gesto attivato/disattivato: Wave your hand across the designated sensing points to turn the fan on or off. This feature offers convenience, especially when your hands are occupied or soiled during cooking.
7. Manutenzione
Una manutenzione regolare garantisce prestazioni ottimali e prolunga la durata della cappa.
7.1 Pulizia dei filtri antigrasso
The 5-layer aluminum mesh filters efficiently trap grease and particles. Clean them regularly to maintain suction efficiency.
- Rimozione: Gently push the latch on each filter and pull downwards to remove.
- Pulizia: The filters are dishwasher-safe. Alternatively, wash them by hand with warm, soapy water. Ensure they are completely dry before reinstallation.
- Reinstallazione: Insert the dry filters back into their slots, ensuring they click securely into place.

Image 7.1: Visual guide demonstrating how to clean the aluminum grease filters, either by hand washing or using a dishwasher.
7.2 Pulizia dell'esterno
Wipe the stainless steel exterior with a soft cloth and a mild, non-abrasive cleaner. Avoid harsh chemicals or abrasive pads that could scratch the surface.
7.3 Sostituzione delle luci a LED
The range hood uses GU10 LED bulbs. If a bulb needs replacement, ensure the power is off before carefully twisting out the old bulb and inserting a new one.
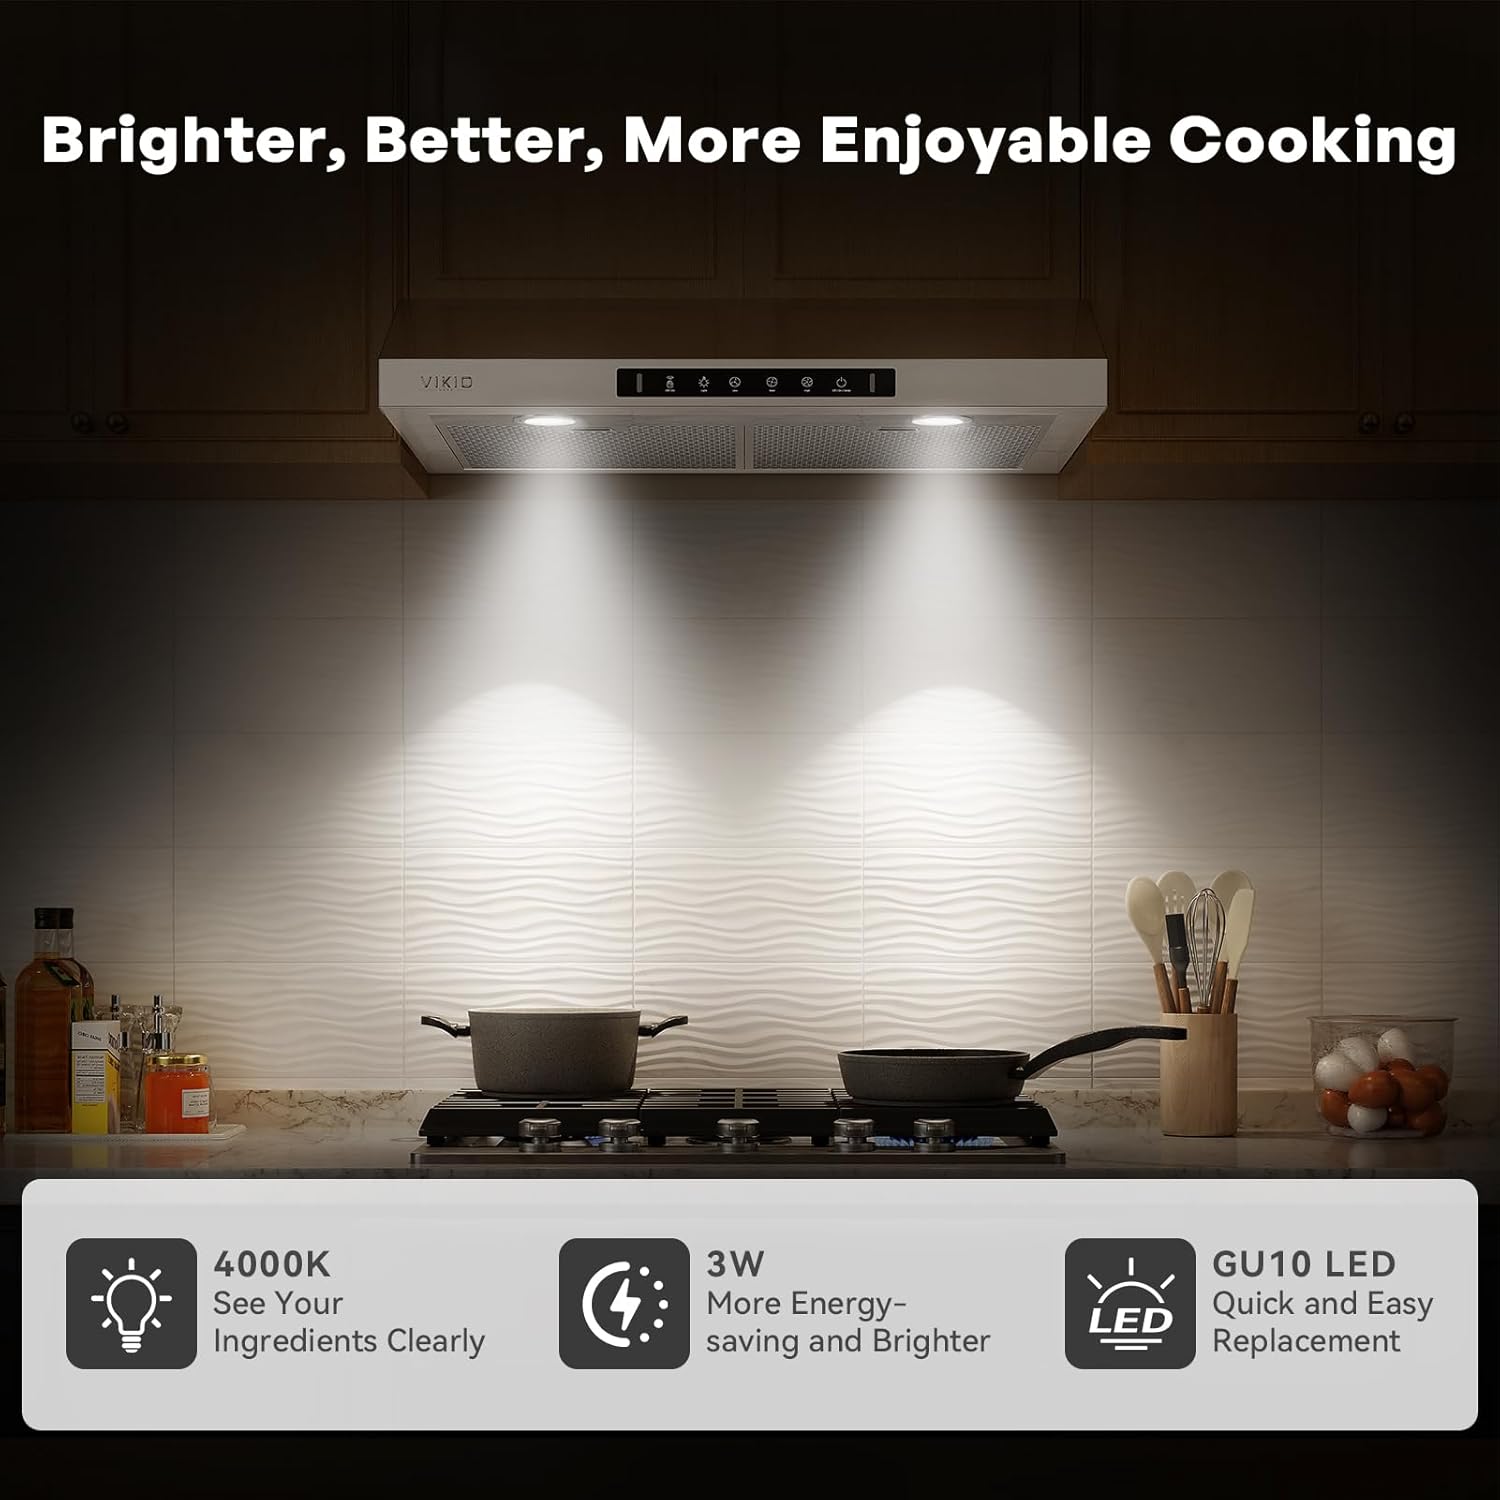
Image 7.2: The range hood's LED lights providing ample illumination for the cooking surface.
8. Risoluzione Dei Problemi
Fare riferimento a questa sezione per i problemi più comuni e le relative soluzioni.
| Problema | Possibile causa | Soluzione |
|---|---|---|
| La ventola non si accende | Nessuna alimentazione Problema del pannello di controllo | Controllare il collegamento del cavo di alimentazione e l'interruttore automatico. Se il pannello di controllo non risponde, contattare l'assistenza clienti. |
| Bassa potenza di aspirazione | Filtri antigrasso intasati Condotti non adeguati Problema al motore | Pulire o sostituire i filtri antigrasso. Check ductwork for obstructions or leaks. Contatta l'assistenza clienti. |
| Le luci non funzionano | Lampadina allentata o difettosa Problema di collegamento elettrico | Ensure bulbs are securely seated or replace them. Controllare i collegamenti elettrici. |
| Rumore eccessivo | Parti sciolte Squilibrio motorio Installazione non corretta | Check for and tighten any loose components. Ensure proper installation and contact customer support if noise persists. |
| Gesture control unresponsive | Obstruction of sensors gesto scorretto | Assicurarsi che i sensori siano puliti e non ostruiti. Review gesture control instructions (Image 6.2). |
9. Informazioni sulla garanzia
VIKIO HOME products are manufactured to high-quality standards. This product comes with a standard manufacturer's warranty covering defects in materials and workmanship from the date of purchase. Please retain your proof of purchase for warranty claims. Specific warranty terms and duration may vary; refer to the warranty card included with your product or contact customer support for details.
10. Assistenza clienti
For any questions, assistance, or to report issues with your VIKIO HOME range hood, please contact our customer support team. We are dedicated to providing reliable support and complimentary replacements for filters and lights as needed.
Informazioni sui contatti: Please refer to the contact details provided on the VIKIO HOME official websito o sulla confezione del prodotto per le opzioni di supporto più aggiornate.