
Introduzione
Thank you for choosing the LIORQUE Wireless Weather Station YGH6208. This device provides accurate indoor and outdoor temperature and humidity readings, weather forecasts, and features a DCF radio-controlled clock with alarm functions. This manual will guide you through the setup, operation, and maintenance of your weather station.
Contenuto della confezione
- 1 x Stazione meteorologica wireless LIORQUE (unità principale)
- 1 x sensore esterno
- 3 x AAA Batteries (for Main Unit)
- 2 x AAA Batteries (for Outdoor Sensor)
- 1 x Manuale utente (questo documento)
Prodotto finitoview
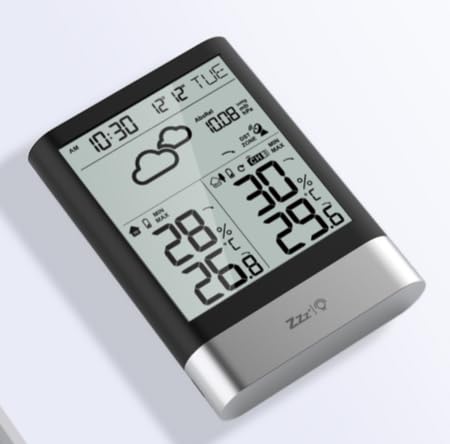
Immagine 1: LIORQUE Wireless Weather Station Main Unit. This image shows the front view of the main display unit, highlighting its LCD screen and compact design.
Caratteristiche dell'unità principale:
- 4.3-inch LCD screen with backlight
- Visualizzazione della temperatura e dell'umidità interna
- Visualizzazione della temperatura e dell'umidità esterna
- Icone di previsioni del tempo
- DCF radio-controlled clock with manual setting option
- Double alarm clock with snooze function
- Calendar and day of the week display (7 languages)
- Registrazioni di temperatura e umidità massima/minima
- Air pressure display and weather trend
- Visualizzazione dell'ora 12/24 ore
Caratteristiche del sensore esterno:
- Wireless transmission up to 100m (open area)
- Misurazione della temperatura e dell'umidità
- Supports hanging or standing placement
- Data updated every 30 seconds
- Supporta fino a 3 sensori (uno incluso)
Impostare
1. Installazione della batteria
- Sensore esterno: Open the battery compartment cover on the back of the outdoor sensor. Insert 2 x AAA batteries, ensuring correct polarity (+/-). Close the cover.
- Unità principale: Open the battery compartment cover on the back of the main unit. Insert 3 x AAA batteries, ensuring correct polarity (+/-). Close the cover.
- The main unit will power on and display indoor readings.
2. Accoppiamento del sensore
After installing batteries in both units, the main unit will automatically search for the outdoor sensor. The outdoor temperature and humidity should appear on the main unit's display within a few minutes. If the outdoor readings do not appear:
- Ensure both units are within range (up to 100m in open air).
- Press the "TX" button inside the outdoor sensor's battery compartment to manually send a signal.
- On the main unit, press and hold the "CHANNEL" button to initiate a manual search for the sensor.
3. Impostazioni iniziali (ora, data, unità)
The weather station will attempt to synchronize with the DCF radio signal for automatic time setting. This may take several hours, especially in areas with weak signals. You can manually set the time and date if needed.
- Impostazione manuale dell'ora: Press and hold the "MODE" button to enter time setting mode. Use the "UP" and "DOWN" buttons to adjust values and "MODE" to confirm and move to the next setting (e.g., 12/24 hour format, hour, minute, year, month, day, language for day of week).
- Unità di temperatura: Premere il pulsante "°C/°F" per passare da Celsius a Fahrenheit e viceversa.
- Air Pressure Units: Press the "BARO" button to cycle through air pressure units (e.g., hPa, inHg).
Istruzioni per l'uso
Visualizza informazioni
The 4.3-inch LCD screen displays various information:
- Ora e data: Ora, data e giorno della settimana correnti.
- Letture indoor: Temperatura e umidità interne attuali.
- Letture all'aperto: Current outdoor temperature and humidity from the connected sensor.
- Previsioni del tempo: Icons indicating predicted weather conditions (e.g., sunny, cloudy, rainy).
- Pressione dell'aria: Pressione atmosferica attuale e tendenza.
- Retroilluminazione: The screen backlight activates with a light touch and returns to normal brightness after 10 seconds to conserve battery.
Funzione sveglia
The weather station features a double alarm clock with snooze.
- Impostazione degli allarmi: Premere il pulsante "ALARM" per view Alarm 1. Press "ALARM" again to view Alarm 2. Hold "ALARM" to enter alarm setting mode. Use "UP" and "DOWN" to adjust the hour and minute, and "ALARM" to confirm.
- Attivazione/disattivazione degli allarmi: Mentre viewing an alarm, press "UP" to toggle it on or off. An alarm icon will appear when active.
- Funzione snooze: When an alarm sounds, press any button (except "ALARM OFF") to activate snooze. The alarm will sound again after a set interval. Press "ALARM OFF" to stop the alarm completely.
Record massimi e minimi
The weather station records the maximum and minimum indoor/outdoor temperature and humidity values.
- Press the "MAX/MIN" button once to display maximum recorded values.
- Press "MAX/MIN" again to display minimum recorded values.
- Press "MAX/MIN" a third time to return to current readings.
- To clear records, hold the "MAX/MIN" button while viewing i record.
Manutenzione
- Sostituzione della batteria: Sostituire le batterie sia nell'unità principale che nel sensore esterno quando sul display compare l'indicatore di batteria scarica. Sostituire sempre tutte le batterie contemporaneamente.
- Pulizia: Pulire le superfici del display e dell'unità con un panno morbido eamp panno. Non usare detergenti abrasivi o solventi.
- Posizionamento del sensore esterno: For optimal performance and longevity, install the outdoor sensor in a shaded area, protected from direct sunlight and rain. Ensure it is within the 100m wireless range of the main unit.
Risoluzione dei problemi
| Problema | Possibile soluzione |
|---|---|
| Nessuna visualizzazione della temperatura/umidità esterna. |
|
| Visualizzazione dell'ora errata. |
|
| Il display è scuro o vuoto. |
|
| Le previsioni del tempo sembrano imprecise. |
|
Specifiche
- Modello: YGH6208
- Marca: LIORCO
- Tipo di visualizzazione: LCD
- Fonte di alimentazione (unità principale): Batterie 3 x AAA (incluse)
- Fonte di alimentazione (sensore esterno): Batterie 2 x AAA (incluse)
- Portata wireless: Fino a 100 m (area aperta)
- Precisione della temperatura: ±0.5 °C
- Tecnologia dei sensori: Funk (Wireless)
- Caratteristiche speciali: DCF Radio Clock, Alarm, Snooze, Weather Forecast, Max/Min Records, Backlight
- Componenti inclusi: Weather Station Main Unit, Outdoor Sensor
Garanzia e supporto
I prodotti LIORQUE sono progettati per garantire affidabilità e prestazioni. Per informazioni sulla garanzia o assistenza tecnica, fare riferimento ai recapiti forniti al momento dell'acquisto o visitare il sito ufficiale LIORQUE. websito. Conservare la prova d'acquisto per eventuali reclami in garanzia.