
1. Introduzione
This manual provides detailed instructions for the installation, operation, and maintenance of your STUDIOFINIX Bluetooth 5.4 4-Zone 8-Channel Audio Amplifier Receiver. This amplifier is designed to deliver high-fidelity audio across multiple rooms, offering independent zone control, various input options, and a professional karaoke function. Please read this manual thoroughly before use to ensure proper setup and optimal performance.
2. Istruzioni di sicurezza
- Fonte di energia: Utilizzare solo l'adattatore di alimentazione fornito. Assicurarsi che il volumetage corrisponde ai requisiti specificati sul dispositivo.
- Ventilazione: Do not block any ventilation openings. Install in a location with adequate airflow to prevent overheating.
- Acqua e umidità: Non esporre l'unità a pioggia, umidità o liquidi gocciolanti/schizzi. Tenere lontano da fonti d'acqua.
- Calore: Non posizionare vicino a fonti di calore come termosifoni, bocchette di ventilazione, stufe o altri apparecchi che producono calore.
- Pulizia: Unplug the unit from the power outlet before cleaning. Use a dry, soft cloth only.
- Manutenzione: Non tentare di riparare questo prodotto da soli. Affidare tutte le operazioni di manutenzione a personale di assistenza qualificato.
- Impedenza dell'altoparlante: Ensure connected speakers have an impedance of 4-8 ohms. Connecting speakers with lower impedance may damage the amppiù vivace.
3. Contenuto della confezione
Verifica che tutti gli articoli elencati di seguito siano inclusi nel tuo pacchetto:
- STUDIOFINIX Amplificatore x 1
- Adattatore di alimentazione x 1
- Black Terminal Connectors x 4
- Manuale di istruzioni x 1

Figure 3.1: Package Contents. The image displays the amplifier unit, its power adapter, four black terminal connectors, and the user manual.
4. Prodotto finitoview
4.1 Introduzione al pannello frontale
Il pannello frontale consente di accedere ai controlli principali e alle porte di ingresso per un utilizzo più pratico.

Figure 4.1: Front Panel Layout. Key controls include the Volume/Power ON/OFF knob, MIC VOL knob, MIC input, AUX input, USB port, TF Card slot, and Bass/Treble adjustment knobs.
- VOLUME/PWR ON/OFF: Controls the master volume and powers the unit on/off.
- VOL MIC: Regola il volume del microfono collegato.
- Ingresso MIC: Jack da 3.5 mm per il collegamento del microfono.
- Ingresso AUX: 3.5mm jack for auxiliary audio devices.
- Porta USB: Per riprodurre l'audio files da un'unità USB.
- Slot per schede TF: Per riprodurre l'audio fileda una scheda TF (MicroSD).
- BASSI/ACUTI: Adjusts the low and high frequency response of the audio output.
4.2 Introduzione al pannello superiore
The top panel features controls for mode selection, playback, and echo effects for karaoke.

Figure 4.2: Top Panel Layout. This view highlights the MODE button, playback controls (Fast Retreat/Previous Song, Play/Pause, Fast Forward/Next Song), and the ECHO button for microphone effects.
- DIREZIONI: Switches between input sources (Bluetooth, Optical, AUX, LINE IN, USB, TF Card).
- Controlli di riproduzione: Buttons for previous track, play/pause, and next track when using USB/TF card or Bluetooth.
- ECO: Activates and adjusts the echo effect for the microphone input.
- Zone Control Buttons (1, 2, 3, 4): Independently turn on or off each of the four audio zones.
4.3 Back Panel Introduction
The back panel contains the main speaker outputs and additional wired input options.

Figure 4.3: Back Panel Layout. This image shows the DC IN port, speaker output terminals for Zones 1-4 (supporting 8 speakers), Optical input, and stereo RCA Line In (R/L) inputs.
- DC IN: Power input port for the provided power adapter.
- Speaker Outputs (ZONE 1-4): Connect up to 8 speakers (2 per zone) with 4-8 ohm impedance. Red terminals are positive (+), black terminals are negative (-).
- Ingresso OTTICO: Ingresso audio digitale per collegare dispositivi come TV o console di gioco.
- LINEA IN (DX/SX): Stereo RCA inputs for connecting analog audio sources.
5. Impostazione
5.1 Collegamento degli altoparlanti
IL amplifier supports up to 8 speakers, divided into 4 independent zones. Ensure your speakers have an impedance of 4-8 ohms.
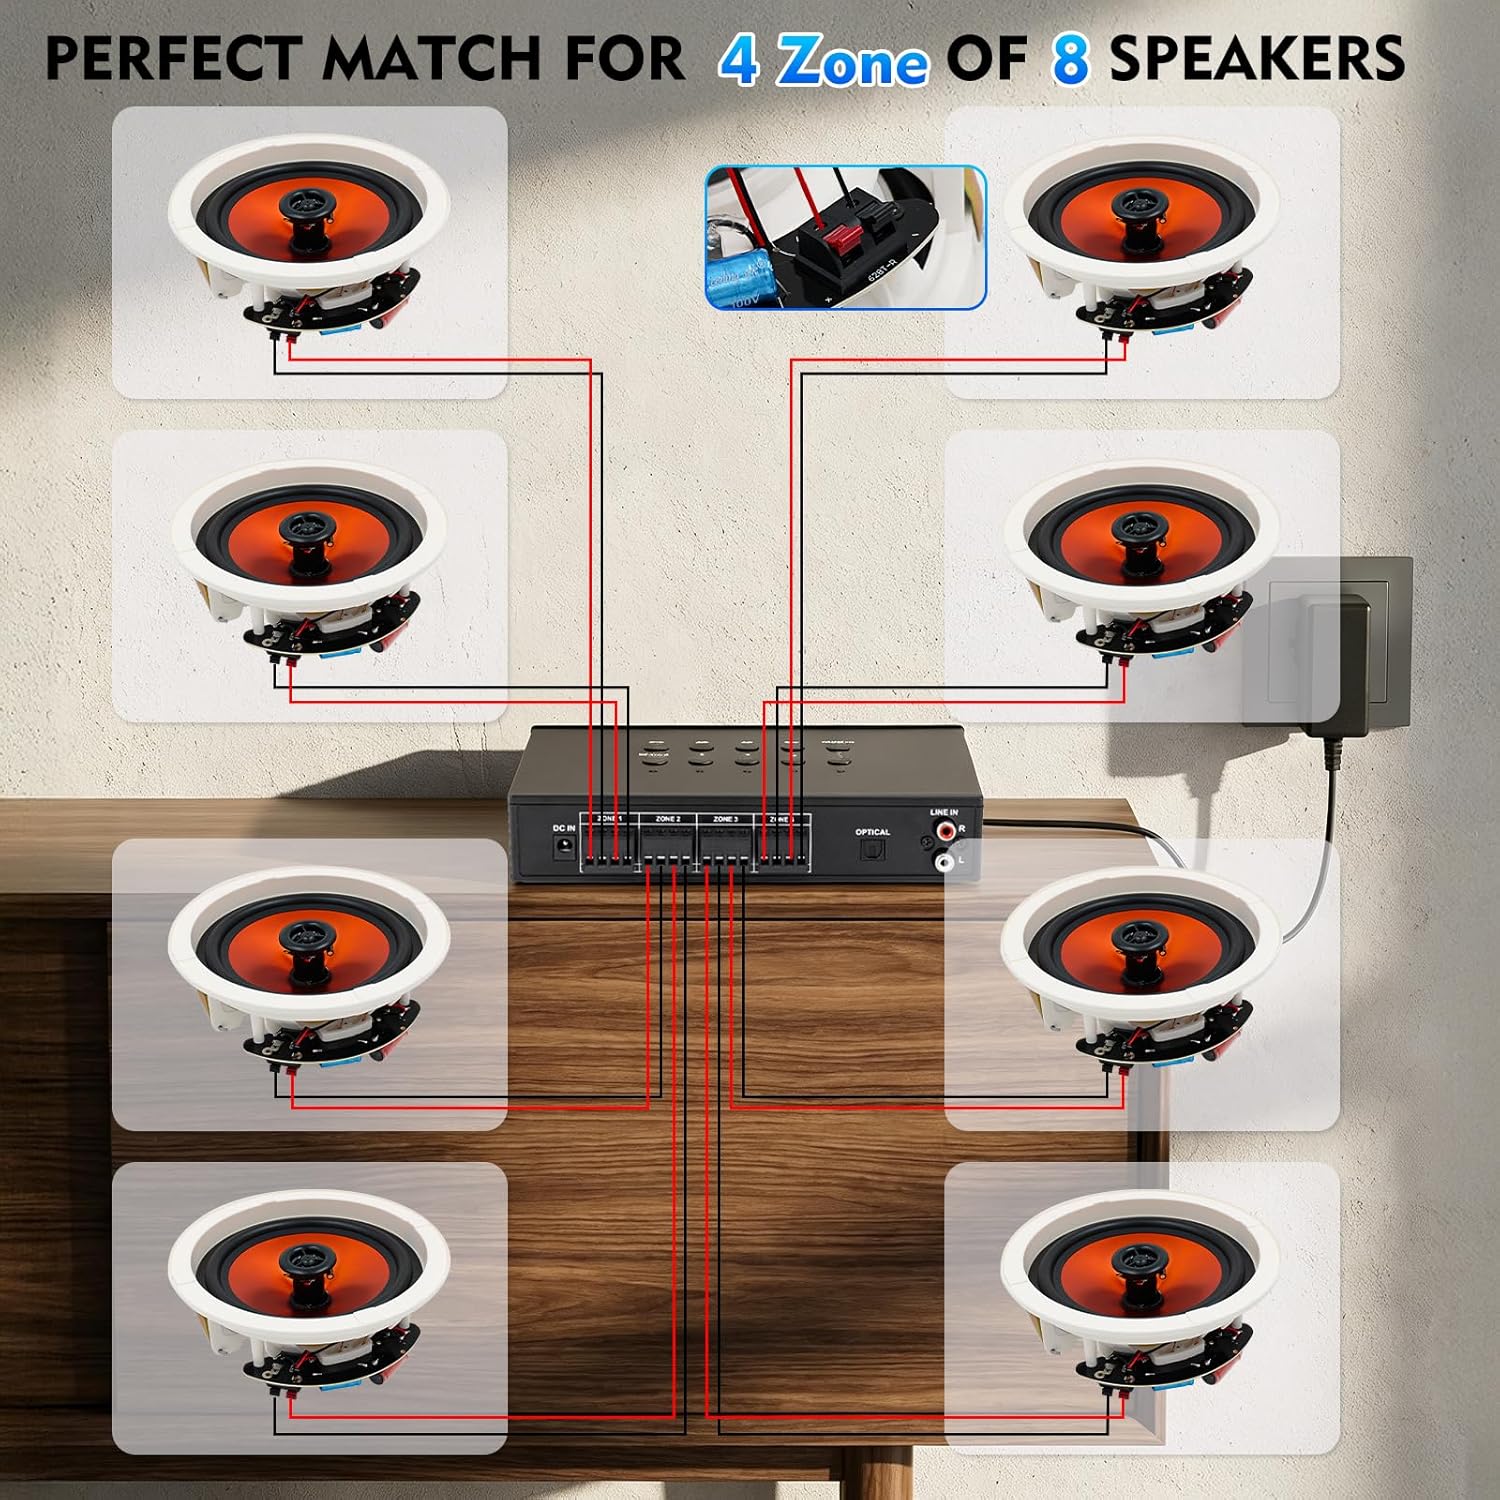
Figure 5.1: Speaker Wiring Diagram. This illustration demonstrates connecting two speakers per zone, with red wires to positive (+) terminals and black wires to negative (-) terminals on the amplifier's back panel.
- Identifica i terminali positivo (+) e negativo (-) sugli altoparlanti.
- Connect the positive (+) wire from each speaker to the corresponding red (+) terminal on the amplifier for the desired zone.
- Connect the negative (-) wire from each speaker to the corresponding black (-) terminal on the amplifier for the desired zone.
- Repeat for all speakers across the 4 zones. Ensure all connections are secure.
5.2 Collegamento di alimentazione
After connecting all speakers and audio sources, connect the power adapter.
- Insert the DC plug of the power adapter into the 'DC IN' port on the back of the amppiù vivace.
- Collegare l'adattatore di alimentazione a una presa a muro adatta.
6. Istruzioni per l'uso
6.1 Accensione/spegnimento e controllo del volume
- Per accendere il amplifier, rotate the VOLUME/PWR ON/OFF knob clockwise until the display illuminates.
- Per spegnere, ruotare la manopola in senso antiorario finché non scatta in posizione.
- Adjust the master volume by rotating the VOLUME/PWR ON/OFF manopola.
6.2 Selezione della sorgente di input
Premere il tasto MODALITÀ button on the top panel to cycle through available input sources: Bluetooth, Optical, AUX, LINE IN, USB, and TF Card.
6.3 Associazione Bluetooth
Per connettere un dispositivo Bluetooth:

Figure 6.1: Bluetooth Connectivity. The image shows a smartphone successfully paired with the amplifier, indicating stable Bluetooth 5.4 connection for wireless audio streaming.
- Selezionare la modalità Bluetooth utilizzando il MODALITÀ button. The display will show "BT" or a similar indicator.
- Sul tuo smartphone, tablet o altro dispositivo abilitato Bluetooth, attiva il Bluetooth e cerca i dispositivi disponibili.
- Select "STUDIOFINIX" or a similar name from the list to pair.
- Una volta associato, è possibile trasmettere l'audio in modalità wireless al amppiù vivace.
6.4 Wired Input Operation
IL amplifier supports various wired audio sources:

Figure 6.2: Multiple External Audio Sources. This graphic illustrates the diverse input options available, including Microphone, Bluetooth, USB, AUX, and TF Card, allowing connection of various external devices.
- Ingresso ottico: Connect a digital audio cable from your source (e.g., TV, game console) to the OPTICAL port on the back panel. Select Optical mode using the MODALITÀ pulsante.
- Ingresso AUX: Connect a 3.5mm audio cable from your device to the AUX port on the front panel. Select AUX mode.
- LINEA IN: Connect RCA cables from your analog audio source (e.g., CD player) to the LINE IN (R/L) ports on the back panel. Select LINE IN mode.
- Scheda USB/TF: Insert a USB drive or TF card into the respective slot on the front panel. The amplifier will automatically switch to USB or TF mode and begin playback. Use the playback controls on the top panel to manage tracks.
6.5 Funzione Karaoke
Enjoy karaoke with the built-in microphone input and echo effect.

Figure 6.3: Karaoke Ready. This image depicts individuals enjoying a karaoke session, highlighting the amplifier's capability to connect a microphone for vocal performances.
- Collega il microfono al Ingresso MIC sul pannello frontale.
- Regola il volume del microfono usando il VOL MICROFONO manopola.
- Premere il tasto ECO button on the top panel to activate and adjust the echo effect for your vocals.
6.6 Controllo di zona indipendente
IL amplifier allows you to independently control the power for each of the four speaker zones.

Figure 6.4: 4-Zone Independent Control. This visual demonstrates how the amplifier can manage audio in four separate areas, allowing users to turn zones on or off as needed for multi-room audio customization.
- Utilizza l'apposito ZONE 1, ZONE 2, ZONE 3, ZONE 4 buttons on the top panel to toggle each zone on or off.
- Note that while zones can be independently turned on/off, the overall volume, bass, and treble settings apply to all active zones simultaneously.
6.7 Regolazione dei bassi e degli acuti
Adjust the audio's tonal characteristics using the BASS E ALTI knobs on the front panel to suit your preference.
7. Manutenzione
- Pulizia: Disconnect the power before cleaning. Use a soft, dry cloth to wipe the exterior of the unit. Do not use liquid cleaners or aerosol sprays.
- Magazzinaggio: If storing the unit for an extended period, disconnect it from power and store in a cool, dry place away from direct sunlight.
- Ventilazione: Regularly check that ventilation openings are clear of dust and debris.
8. Risoluzione Dei Problemi
| Problema | Possibile causa | Soluzione |
|---|---|---|
| Nessun potere | Power adapter not connected; Power outlet not working; Unit is off. | Ensure power adapter is securely connected and plugged into a live outlet. Turn the VOLUME/PWR ON/OFF knob clockwise. |
| Nessun suono dagli altoparlanti | Incorrect input source selected; Speaker wires loose or incorrectly connected; Volume too low; Specific zone turned off. | Press MODE to select the correct input. Check speaker wire connections (positive/negative). Increase master volume. Ensure the relevant zone button is ON. |
| Il Bluetooth non si connette | Not in Bluetooth mode; Device too far; Device already connected to another amppiù vivace. | Select Bluetooth mode. Move device closer to the amplifier. Scollegarsi dagli altri dispositivi Bluetooth e riprovare ad associare. |
| Il microfono non funziona | Microphone not plugged in; MIC VOL too low. | Ensure microphone is securely plugged into the MIC input. Increase the MIC VOL knob. |
| La scheda USB/TF non funziona | Modalità errata; Incompatibile file formato; Supporto danneggiato. | Select USB or TF mode. Ensure audio files are in a supported format (e.g., MP3). Try a different USB drive or TF card. |
9. Specifiche
| Caratteristica | Specificazione |
|---|---|
| Marca | STUDIOFINIX |
| Numero di modello | NS-AMP-8PBT-BK-US |
| Numero di canali | 8 |
| Uscita Wattage | 480 Watt (totale) |
| Versione Bluetooth | 5.4 |
| Impedenza dell'altoparlante | 4-8 ohm |
| Opzioni di input | Optical, AUX, LINE IN, USB, TF Card, MIC, Bluetooth |
| Risposta in frequenza | ±2dB@20-20kHz |
| Signal-to-Noise Ratio | 85 dB |
| Dimensioni (L x P x A) | 195mm x 40mm x 140mm (Approx.) |
10. Informazioni sulla garanzia
This STUDIOFINIX amplifier viene fornito con un Garanzia limitata di 1 anni from the date of purchase. This warranty covers manufacturing defects in materials and workmanship under normal use. It does not cover damage caused by misuse, accident, unauthorized modification, or improper installation. Please retain your proof of purchase for warranty claims.
11. Assistenza clienti
For technical assistance, warranty claims, or general inquiries, please contact STUDIOFINIX customer support through the retailer's platform or visit the official STUDIOFINIX websito per le informazioni di contatto.
Supporto online: www.studiofinix.com