
1. Introduzione
Thank you for choosing the Jocoevol 1104 Coffee Bar Cabinet. This manual provides essential information for the safe assembly, proper operation, and effective maintenance of your new cabinet. Please read all instructions carefully before beginning assembly or use to ensure optimal performance and longevity of the product.
2. Informazioni sulla sicurezza
Always follow basic safety precautions when assembling and using this product to reduce the risk of injury or damage. Keep these instructions for future reference.
- Montaggio: Assemble on a clean, flat, and soft surface to prevent scratches. Ensure all parts are securely fastened before use. Do not overtighten screws.
- Stabilità: This cabinet is designed to be stable when assembled correctly. For added safety, especially in homes with children or pets, consider securing the unit to a wall using appropriate anti-tip hardware (not included unless specified).
- Capacità di peso: Do not exceed the recommended weight capacity for shelves and the countertop. Distribute weight evenly.
- Prese elettriche: The integrated power outlets are for convenience. Do not overload the outlets. Ensure appliances plugged in are within the specified voltage and current limits. Keep liquids away from electrical components.
- Mini Fridge Space: Ensure the mini fridge dimensions fit within the designated space (41" W × 21.6” D × 36.6” H). Allow adequate ventilation around the fridge as per the fridge manufacturer's instructions.
3. Contenuto della confezione
Before assembly, verify that all components and hardware are present. Refer to the assembly video for a visual guide to parts and tools.
Video 1: Jocoevol Coffee Bar Cabinet Assembly Guide. This video provides a step-by-step visual guide for assembling the Jocoevol Coffee Bar Cabinet, detailing each component and hardware piece required for construction.
Parts List (Refer to video for visual identification)
- Various engineered wood panels (numbered 1-21 in assembly guide)
- Hardware: Screws (A, B, E, P, S, T), Cam Locks (C), Dowels (D), Magnetic Catch (U), Shelf Pins (R), Hinges (Q), Wine Glass Rack (D), LED Light Strip (F), Power Outlet Unit (K), Wall Anchors (V, W)
If any parts are missing or damaged, please contact customer service for assistance.
4. Istruzioni di montaggio
Follow the steps below and refer to the provided assembly video for detailed visual guidance. It is recommended to have two people for assembly.
Assemblaggio passo dopo passo:
- Preparare i pannelli di base: Attach screws (A) and dowels (B) to panels 1 and 2.
- Montare il telaio superiore: Connect panels 3 and 4 using dowels (B) and secure with cam locks (C) to panel 1. Repeat for panel 2.
- Installa scaffali: Attach shelf 5 to the upper frame using screws (A) and dowels (B), then secure with cam locks (C). Insert shelf pins (R) for adjustable shelves.
- Attach Wine Glass Rack & LED Light: Secure the wine glass rack (D) with screws (E). Install the LED light strip (F) along the designated area, securing it with clips (Z) and screws (E).
- Construct Side Cabinet: Attach screws (A) and dowels (B) to panel 6. Connect panels 7 and 8 to panel 6 using screws (H).
- Montare i ripiani interni: Attach panels 9 to panel 10 using screws (A) and dowels (B), then secure with cam locks (C). Insert these into the side cabinet.
- Fissare il pannello posteriore: Secure back panel 12 to the side cabinet structure using screws (A) and dowels (B), then cam locks (C).
- Collega le sezioni principali: Attach panel 13 to the assembled side cabinet using screws (A) and cam locks (C). Connect panel 14 to complete the main lower structure.
- Installare il pannello inferiore: Secure bottom panel 15 to the lower structure using screws (A) and dowels (B).
- Installare la presa di corrente: Mount the power outlet unit (K) into the designated cutout on the countertop using screws (L).
- Assemble Door Storage: Attach screws (A) and dowels (B) to panels 16 and 17. Connect panels 18 and 19 using cam locks (C). Insert rods (20) to create bottle holders.
- Attach Door Panel: Secure panel 21 to the door storage assembly using screws (A) and dowels (B). Install the magnetic catch (U) with screws (E) and the handle (N) with screws (P).
- Porta di montaggio: Attach hinges (Q) to the door and the main cabinet using screws (E).
- Finalizzare l'assemblaggio: Secure the top shelf unit to the lower cabinet using cam locks (C). Attach wall anchors (V, W) with screws (S) to the top of the cabinet and to the wall for anti-tip safety.
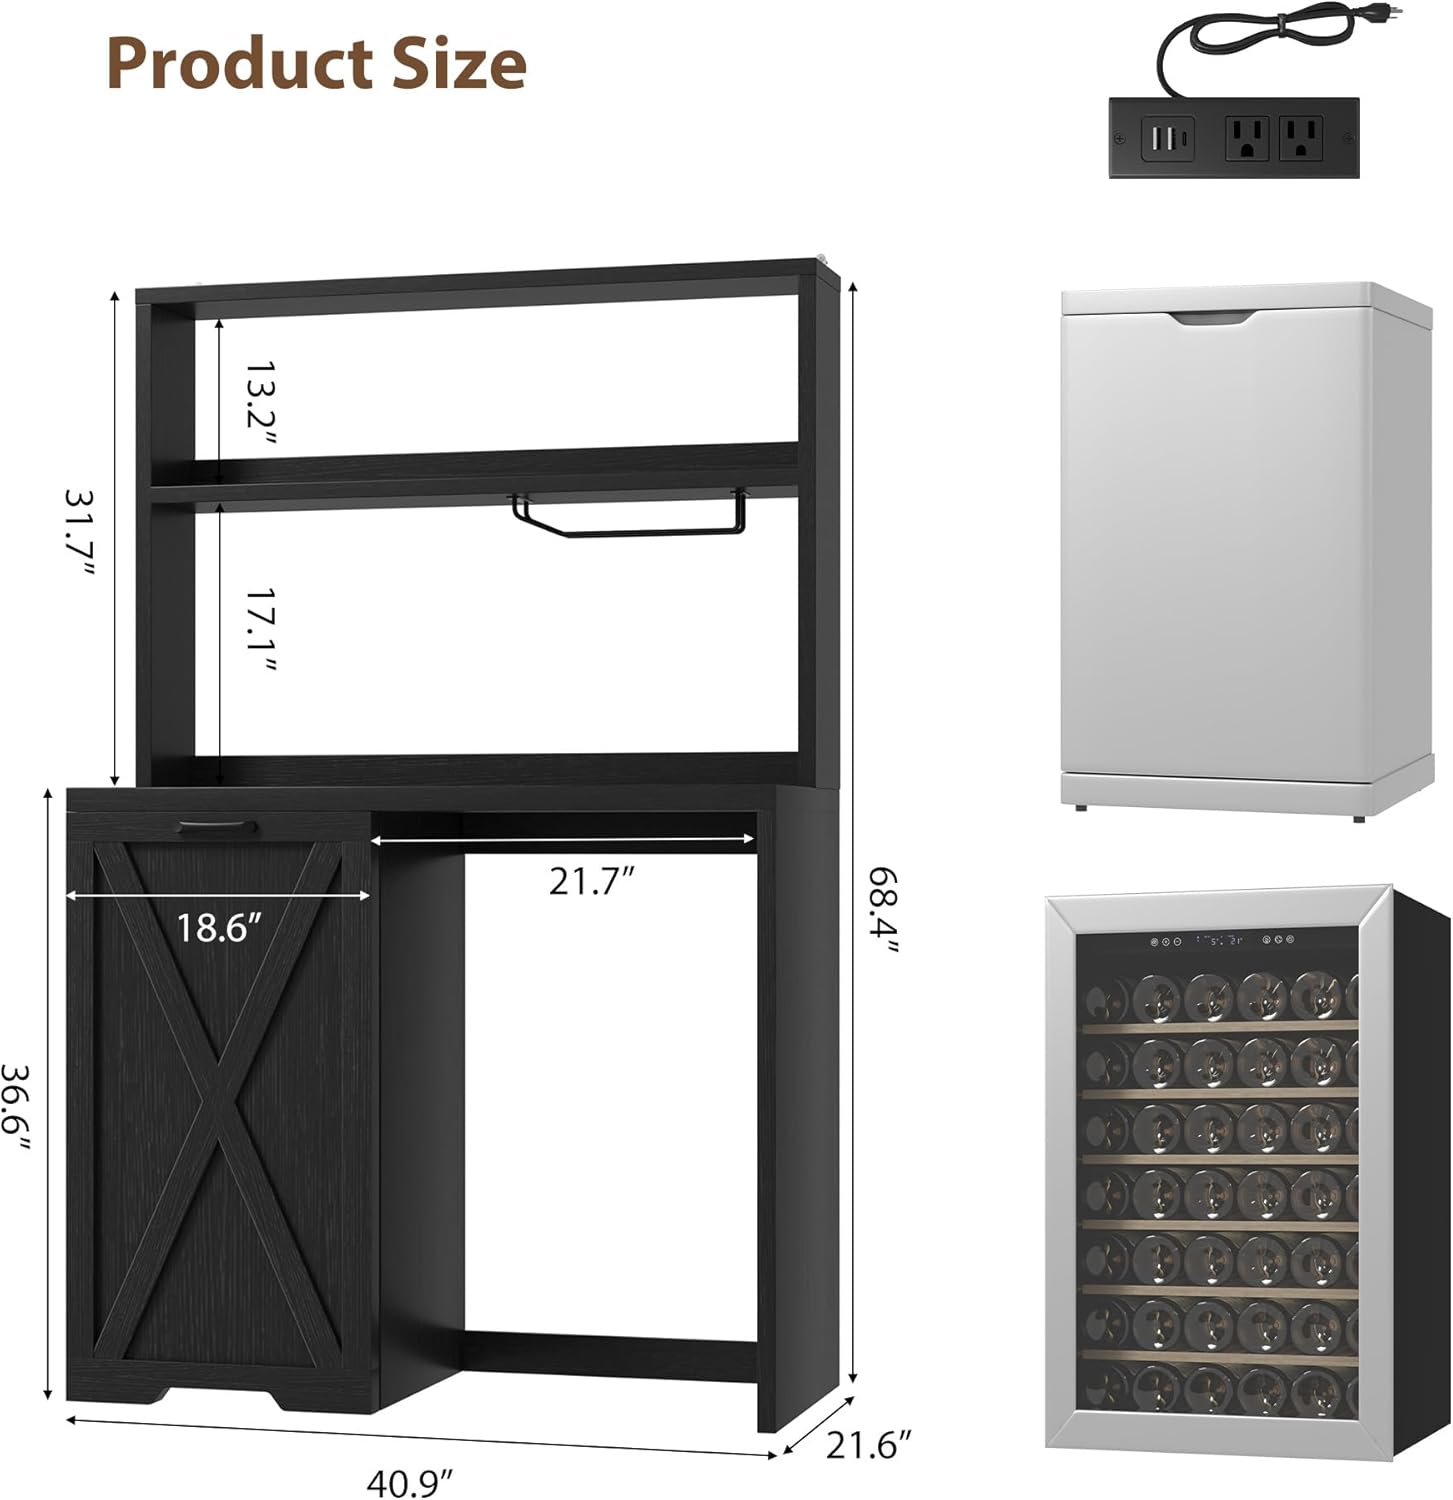
Immagine 1: Dimensioni del prodotto. This image illustrates the overall dimensions of the Jocoevol Coffee Bar Cabinet, including the height, width, and depth of the unit and its various sections, such as the mini-fridge space.

Image 2: Internal Storage and Wine Glass Rack. Questo view shows the cabinet with its door open, revealing three adjustable shelves for bottles and other items, along with a wine glass rack in the upper section. Dimensions for the adjustable shelves are indicated.
5. Istruzioni per l'uso
The Jocoevol Coffee Bar Cabinet is designed for versatile use. Here are instructions for its key features:
Prese di corrente:
- The cabinet includes 3 AC outlets and 2 USB ports.
- Plug the cabinet's power cord into a standard wall outlet.
- Use the AC outlets for coffee makers, blenders, or other small kitchen appliances.
- Use the USB ports to charge mobile devices.
- Do not exceed the maximum electrical load for the integrated power strip. Refer to the power strip's label for specific ratings.

Image 3: Built-in Charging Station. This image highlights the integrated power strip with 3 AC outlets and 2 USB ports, showing a phone and smartwatch charging, and a coffee machine plugged in.
Illuminazione a LED:
- The cabinet features a smart LED light strip under the upper shelf.
- Operate the LED light using its integrated switch or remote control (if included).
- Multiple modes and brightness levels may be available.

Image 4: Multiple Modes Smart LED Light. This image shows the LED light strip installed under the upper shelf, illuminating the countertop area and items placed on it.
Conservazione e organizzazione:
- Utilize the three open shelves for cups, jars, and snacks.
- The spacious countertop can accommodate a microwave, coffee maker, or other appliances.
- The lower cabinet and side door offer versatile storage for canned beverages, wine, or other essentials.
- The side door features three shelves with varying heights (9.8", 9.2", 13") for customized storage.

Image 5: Multi-Functional Design. This composite image demonstrates various uses for the cabinet, including a buffet cabinet, baker's rack, coffee bar, and wine bar, showcasing its adaptability to different needs and room types.
6. Manutenzione
Una cura adeguata contribuirà a preservare l'aspetto e la funzionalità del tuo mobile.
- Pulizia: Pulire le superfici con un panno morbido, damp panno. Evitare prodotti chimici aggressivi o detergenti abrasivi, poiché possono danneggiare la finitura.
- Fuoriuscite: Pulire immediatamente eventuali fuoriuscite per evitare macchie o danni causati dall'acqua.
- Hardware: Controllare periodicamente tutte le viti e gli elementi di fissaggio per assicurarsi che siano ben serrati. Serrare nuovamente se necessario.
- Luce solare: Evitare l'esposizione prolungata alla luce solare diretta per evitare lo sbiadimento o lo scolorimento della finitura del legno.
7. Risoluzione Dei Problemi
If you encounter any issues with your Jocoevol Coffee Bar Cabinet, refer to the following common solutions:
- Mobiletto traballante: Ensure all cam locks and screws are fully tightened. Verify that the cabinet is on a level surface. Adjust furniture levelers if present.
- La porta non si chiude correttamente: Check hinges for proper alignment and tightness. Ensure no items are obstructing the door's path.
- Prese di corrente non funzionanti: Verify the main power cord is securely plugged into a functional wall outlet. Check if the circuit breaker for the power strip has tripped (if applicable). Do not attempt to repair electrical components yourself.
- Luce LED non funzionante: Check the power connection to the LED strip. Ensure the switch is in the 'on' position.
Per problemi persistenti o dubbi non trattati qui, contattare l'assistenza clienti.
8. Specifiche
| Caratteristica | Dettaglio |
|---|---|
| Marca | Jocoevol |
| Numero di modello | 1104 bar cabinet |
| Colore | Nero |
| Materiale | Legno ingegnerizzato |
| Dimensioni del prodotto (P x L x A) | 21.6"P x 41"L x 43"A |
| Peso dell'articolo | 30 libbre |
| Mini Fridge Space (W x D x H) | 41" W × 21.6” D × 36.6” H (approximate, check product image for exact fit) |
| Prese di corrente | 3 prese CA, 2 porte USB |
| Numero di ripiani | 6 (including open and internal door shelves) |
| Assemblaggio richiesto | SÌ |
| Tipo di montaggio | Montaggio a pavimento (ancoraggio a parete consigliato) |
9. Garanzia e supporto
For warranty information, product support, or to order replacement parts, please refer to the contact information provided at the point of purchase or visit the official Jocoevol webluogo. Conserva la ricevuta di acquisto per eventuali richieste di garanzia.