
1. Introduzione
Thank you for choosing the hygger Programmable LED Aquarium Light, Model HG160. This light is designed to provide a full spectrum lighting solution for planted aquariums, featuring a 24/7 sunrise and sunset cycle, adjustable colors, and brightness levels. This manual provides detailed instructions for installation, operation, and maintenance to ensure optimal performance and longevity of your aquarium light.
2. Istruzioni di sicurezza
- Scollegare sempre la lampada dalla presa di corrente prima di effettuare qualsiasi operazione di manutenzione, pulizia o installazione.
- This product is designed for indoor use only. Do not expose to rain or extreme moisture.
- Assicurarsi che le mani siano asciutte quando si maneggia l'adattatore di alimentazione e il controller.
- Do not operate the light if any part is damaged, especially the power cord or adapter.
- Tenere fuori dalla portata dei bambini.
- Assicurarsi che la luce sia montata saldamente sull'acquario per evitare cadute accidentali in acqua.
- The light unit is IP68 waterproof, but the controller and power adapter are not. Keep them away from water.
3. Contenuto della confezione
Verificare che tutti gli articoli siano presenti nel pacco:
- LED Aquarium Light Unit
- Controller esterno
- Staffe estensibili (pre-fissate o separate)
- Power Adapter (100-240V AC to 24V/2A DC)
- Manuale dell'utente (questo documento)
4. Configurazione e installazione
Follow these steps to install your hygger LED Aquarium Light:
- Disimballare i componenti: Estrarre con cautela tutti gli articoli dall'imballaggio.
- Fissare le staffe: If the extendable brackets are not pre-attached, slide them onto the ends of the light unit.
- Luce di posizione: Place the light unit on top of your aquarium. Adjust the extendable brackets to fit your tank size (e.g., 29-35 inches for the L size model) securely. Ensure the light is centered and stable.
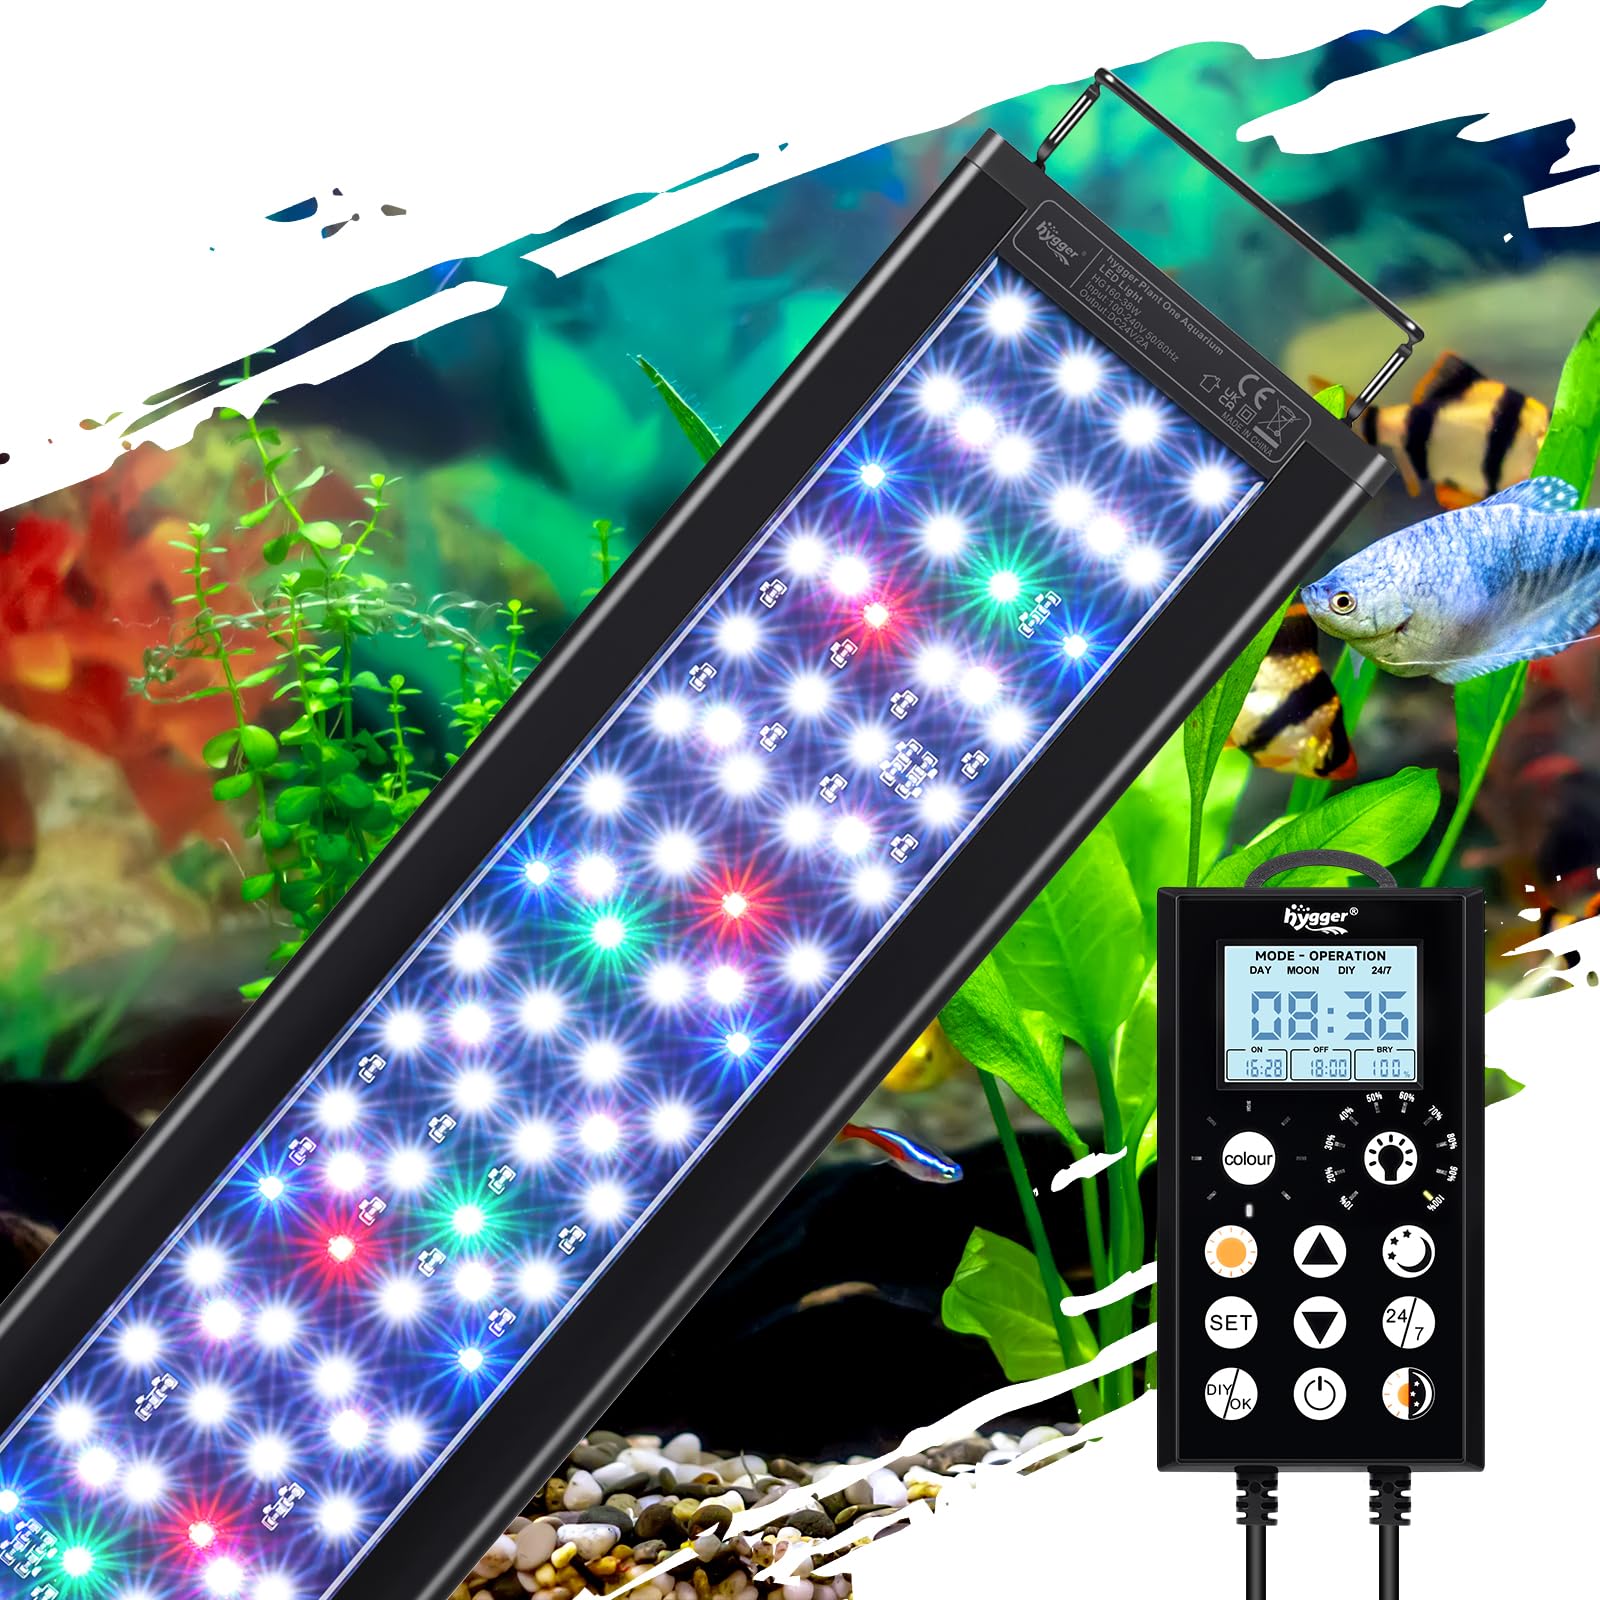
Image: hygger LED Aquarium Light mounted on an aquarium.

Image: Close-up of the adjustable extendable brackets.
- Collega il controllore: Plug the light unit's cable into the designated port on the external controller.
- Connetti alimentazione: Collegare l'adattatore di alimentazione al controller, quindi collegare l'adattatore a una presa elettrica standard.
5. Istruzioni per l'uso
5.1 Controllore finitoview
The external controller features an LCD display and several buttons for programming and adjusting the light settings. Familiarize yourself with the button functions:

Image: Detailed diagram of the controller and its functions.
- HOUR/MIN: Adjusts time values.
- IMPOSTATO: Enters settings, confirms selections, or switches between hours/minutes.
- COLORE: Cycles through 8 available colors in DIY mode.
- LUMINOSITÀ: Adjusts 10 levels of brightness.
- Frecce SU/GIÙ: Adjusts values (time, brightness, color).
- ACCESO/SPENTO: Premere brevemente per accendere, premere a lungo (3 secondi) per spegnere.
- 24/7: Activates the 24/7 automatic daylight cycle.
- GIORNO: Activates Sunlight constant mode. Long press (3 seconds) to set the daylight timer.
- NOTTE: Activates Moonlight constant mode. Long press (3 seconds) to set the moonlight timer.
- DAY+NIGHT: Switches between daylight mode and moonlight mode. Long press (3 seconds) to set the day/night mode timer.
- DIY/OK: Enters DIY mode, confirms end time of each segment.
5.2 Impostazione dell'ora locale
Before using timed modes, set the current local time on the controller. Refer to the video below for a visual guide on operating the light, which includes time setting.
Video: Instructions on how to operate the hygger HG160 smart aquarium light, including initial setup and time setting.
5.3 24/7 Default Mode
This mode simulates a natural 24-hour sunrise and sunset pattern, providing a stable lighting environment for your aquarium. It turns on at 6:00 AM and off at 11:00 PM with smooth transitions.
- Ensure the local time is set correctly.
- Premere brevemente il tasto 24/7 pulsante per attivare questa modalità.

Image: Light intensity graph for the 24/7 mode, illustrating sunrise, daylight, dusk, and moonlight phases.
Video: Demonstrates the hygger IP68 Waterproof LED Aquarium Light with Timer, showing its operation.
Video: Shows the Day and Nightlight functionality of the aquarium light.
Video: Demonstrates the Nightlight Mode of the LED Aquarium Light.
Video: Demonstrates the Daylight Mode of the LED Aquarium Light.
5.4 Modalità fai da te
The DIY mode allows you to customize the timing, color, and brightness for up to 5 distinct stages (L1-L5) throughout the day, tailoring the lighting to your specific aquatic ecosystem needs.
- Premere il tasto DIY/OK button to enter DIY mode.
- For each segment (L1-L5) in sequence:
- Premere SU/GIÙ arrows to set the start time. Press IMPOSTATO to switch between hours/minutes. Press IMPOSTATO per confermare.
- Premere brevemente il tasto COLORE button to select a color. Press IMPOSTATO per confermare.
- Premere brevemente il tasto LUMINOSITÀ button to adjust brightness levels (10%-100%). Press IMPOSTATO per confermare.
- Premere brevemente SU/GIÙ arrows to set the end time for the current segment.
- Premere DIY/OK to proceed to the next segment.
- Repeat for all 5 segments.

Image: Illustration of the DIY 5 Stages Mode, demonstrating customizable light phases.
Video: Demonstrates the DIY Mode of the LED Aquarium Light, showing customization options.
5.5 Manual Modes (Day, Night, Daylight & Moonlight)
These modes allow for constant lighting at specific settings:
- Modalità giorno: Premere brevemente il tasto GIORNO button for constant sunlight. Long press (3 seconds) to set a specific timer for this mode.
- Modalità notturna: Premere brevemente il tasto NOTTE button for constant moonlight. Long press (3 seconds) to set a specific timer for this mode.
- Daylight & Moonlight Mode: Premere brevemente il tasto DAY+NIGHT button to switch between daylight and moonlight. Long press (3 seconds) to set a specific timer for this combined mode.

Image: Comparison of Day Mode and Night Mode settings with the controller.

Image: Controller displaying Daylight & Moonlight Mode.
5.6 Regolazione del colore e della luminosità
In DIY or manual modes, you can adjust the light's appearance:
- Colori: Choose from 8 colors: White, Blue, Red, Green, Yellow, Azure, Orange, Purple. Use the COLORE button to cycle through options.
- Luminosità: Adjust between 10 brightness levels (10% to 100%). Use the LUMINOSITÀ pulsante o SU/GIÙ frecce.

Image: Visual representation of the 8 color options and 10 brightness levels.
5.7 Funzione di memoria intelligente
The light features intelligent power recovery. In case of a power outage, all settings are restored. However, the local time may need to be reset. The 24/7 cycle will seamlessly resume if no adjustments are made within 5 minutes of reboot.

Image: Illustration of the Smart Memory Function, showing light states before and after a power interruption.
6. Manutenzione
Una manutenzione regolare garantisce la longevità e le prestazioni ottimali della luce del tuo acquario.
- Pulizia: Unplug the light before cleaning. Wipe the aluminum alloy shell with a soft, damp cloth. Do not use abrasive cleaners or immerse the controller or power adapter in water.
- Dissipazione del calore: The light features a fin-like texture for efficient heat dissipation. Ensure these fins are not obstructed to maintain proper cooling.
- Ispezione dei cavi: Controllare periodicamente il cavo di alimentazione e i collegamenti per verificare la presenza di eventuali segni di usura o danni.

Image: Close-up of the aluminum alloy housing with fin-type design for heat dissipation.
Video: Oltreview of the IP68 Waterproof Full Spectrum Aquarium Plant Light, highlighting its features and design.
7. Risoluzione Dei Problemi
If you encounter issues with your hygger LED Aquarium Light, refer to the following common problems and solutions:
| Problema | Possibile causa | Soluzione |
|---|---|---|
| La luce non si accende. | Nessuna alimentazione, connessione allentata, adattatore danneggiato. | Check power outlet. Ensure all connections are secure. Inspect power adapter for damage; replace if necessary. |
| Controller screen is blank or malfunctioning. | Problema di alimentazione, guasto interno. | Unplug and replug the power. If issue persists, contact customer support. |
| Specific colors are not working. | LED fault, wiring issue. | Ensure the light is not in a mode that restricts color. If problem persists, contact customer support. |
| 24/7 mode not starting or ending correctly. | Incorrect local time setting. | Verify and reset the local time on the controller. |
If troubleshooting steps do not resolve the issue, please contact hygger customer support for assistance.
8. Specifiche
Key technical specifications for the hygger Programmable LED Aquarium Light (Model HG160):
| Caratteristica | Dettaglio |
|---|---|
| Numero di modello | HG160 |
| Cosatage | 38 watt |
| Quantità LED | 150 (94 white, 6 red, 14 blue, 6 green, 30 RGB) |
| Lumen | 1398 lumen |
| Temperatura del colore | 12781K |
| CRI (indice di resa cromatica) | >90 |
| Dimensioni del prodotto | 28.5"D x 4.3"W x 0.5"H (72.5 cm length) |
| Dimensioni del serbatoio applicabili | 29-35 pollici (75-90 cm) |
| Fonte di alimentazione | Corded Electric (100-240V AC to 24V/2A DC adapter) |
| Materiale | Lega di alluminio |
| Grado di impermeabilità | IP68 (solo unità luminosa) |
| Durata | 50,000 ore |
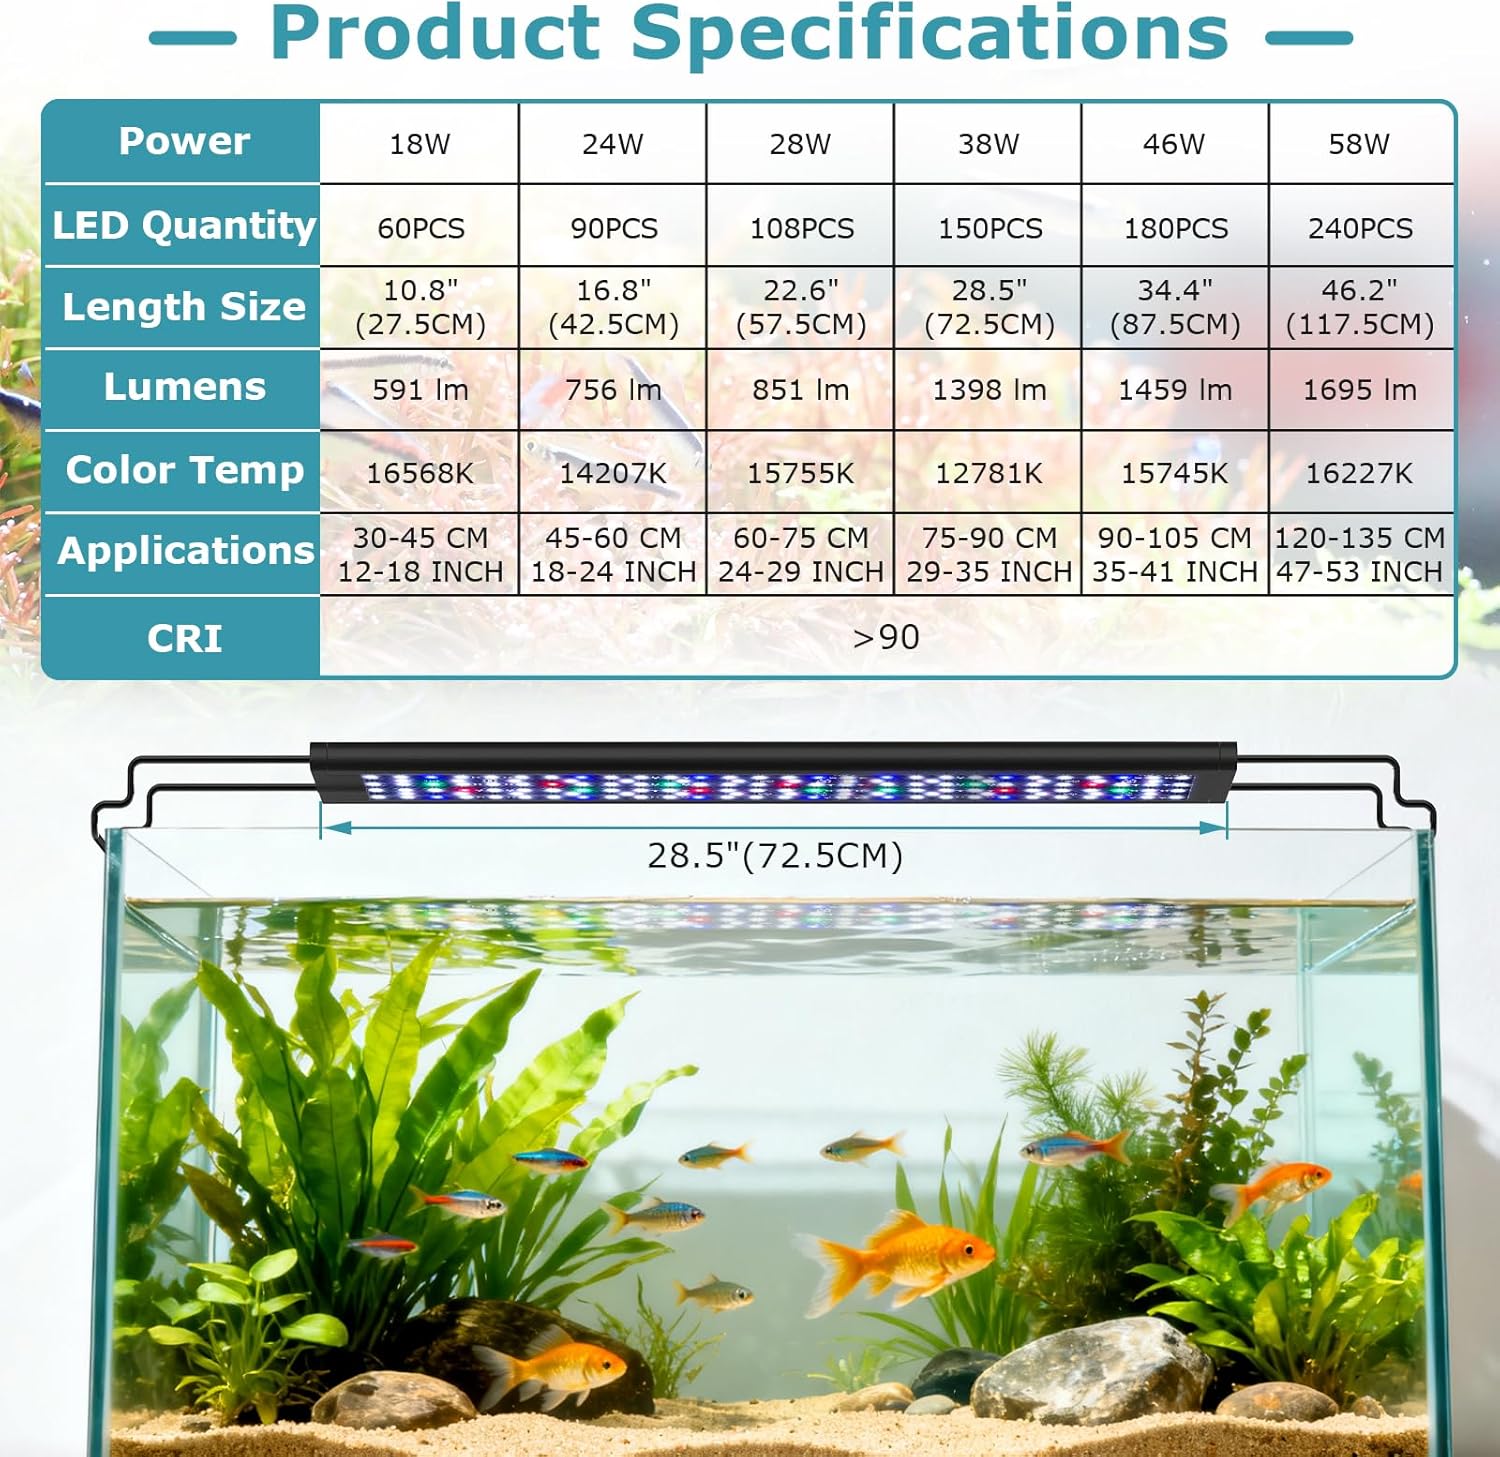
Image: Comprehensive product specifications table for different light sizes.

Image: Details on the 38W full spectrum and high rendering index (CRI >90).
9. Garanzia e supporto
This hygger LED Aquarium Light comes with a Garanzia del produttore di 2 anniLa presente garanzia copre i difetti di materiali e di fabbricazione in normali condizioni di utilizzo.
For warranty claims, technical support, or any questions regarding your product, please contact hygger customer service:
- Websito: www.hygger-online.com (Si prega di controllare il sito ufficiale websito per le informazioni di contatto più aggiornate.)
- E-mail: Fare riferimento alla confezione del prodotto o alle istruzioni ufficiali websito per l'email di supporto.
Please have your model number (HG160) and proof of purchase ready when contacting support.