Introduzione
Thank you for choosing the Sainlogic SA6 Professional Weather Station. This manual provides detailed instructions for the setup, operation, and maintenance of your new weather station. The SA6 is designed to provide accurate and comprehensive weather data, including temperature, humidity, wind speed and direction, rainfall, and atmospheric pressure, all displayed on a clear 6.5-inch HD color LCD.
Cosa c'è nella scatola
- Console (unità di visualizzazione)
- External Sensor Array
- Adattatore di alimentazione
- Manuale dell'utente (questo documento)
- Mounting Hardware (screws, bolts, mounting pole support)
Impostare
1. Installazione del sensore esterno
The external sensor array measures wind speed, wind direction, rainfall, temperature, and humidity. Proper placement is crucial for accurate readings.
- Scegli una posizione: Select an open area free from obstructions like trees or buildings that could interfere with wind or rain measurements. Ensure it is within 100 meters (330 feet) of the display console.
- Installa le batterie: The external sensor requires 3 AA batteries (not included) for operation. Open the battery compartment, insert the batteries according to polarity, and secure the cover.
- Montare il sensore: The sensor can be mounted on a fence, roof, or pole using the provided mounting hardware. Ensure the sensor is level using the integrated bubble level for accurate rain and wind measurements. The wind vane should point North for correct wind direction readings.

Figure 1: Outdoor Sensor Mounting Options

Figure 2: Outdoor Sensor Components
2. Configurazione della console di visualizzazione
- Installare batterie di riserva: The display console requires 3 AAA batteries (not included) to retain settings and data during power outages. Open the battery compartment on the back, insert the batteries, and close the cover.
- Collegare l'adattatore di alimentazione: Plug the provided power adapter into the DC port on the back of the console and then into a standard wall outlet. The display will illuminate.
- Sincronizzazione iniziale: Once powered on, the console will automatically begin searching for the outdoor sensor. This process may take a few minutes. Ensure both units are within range.
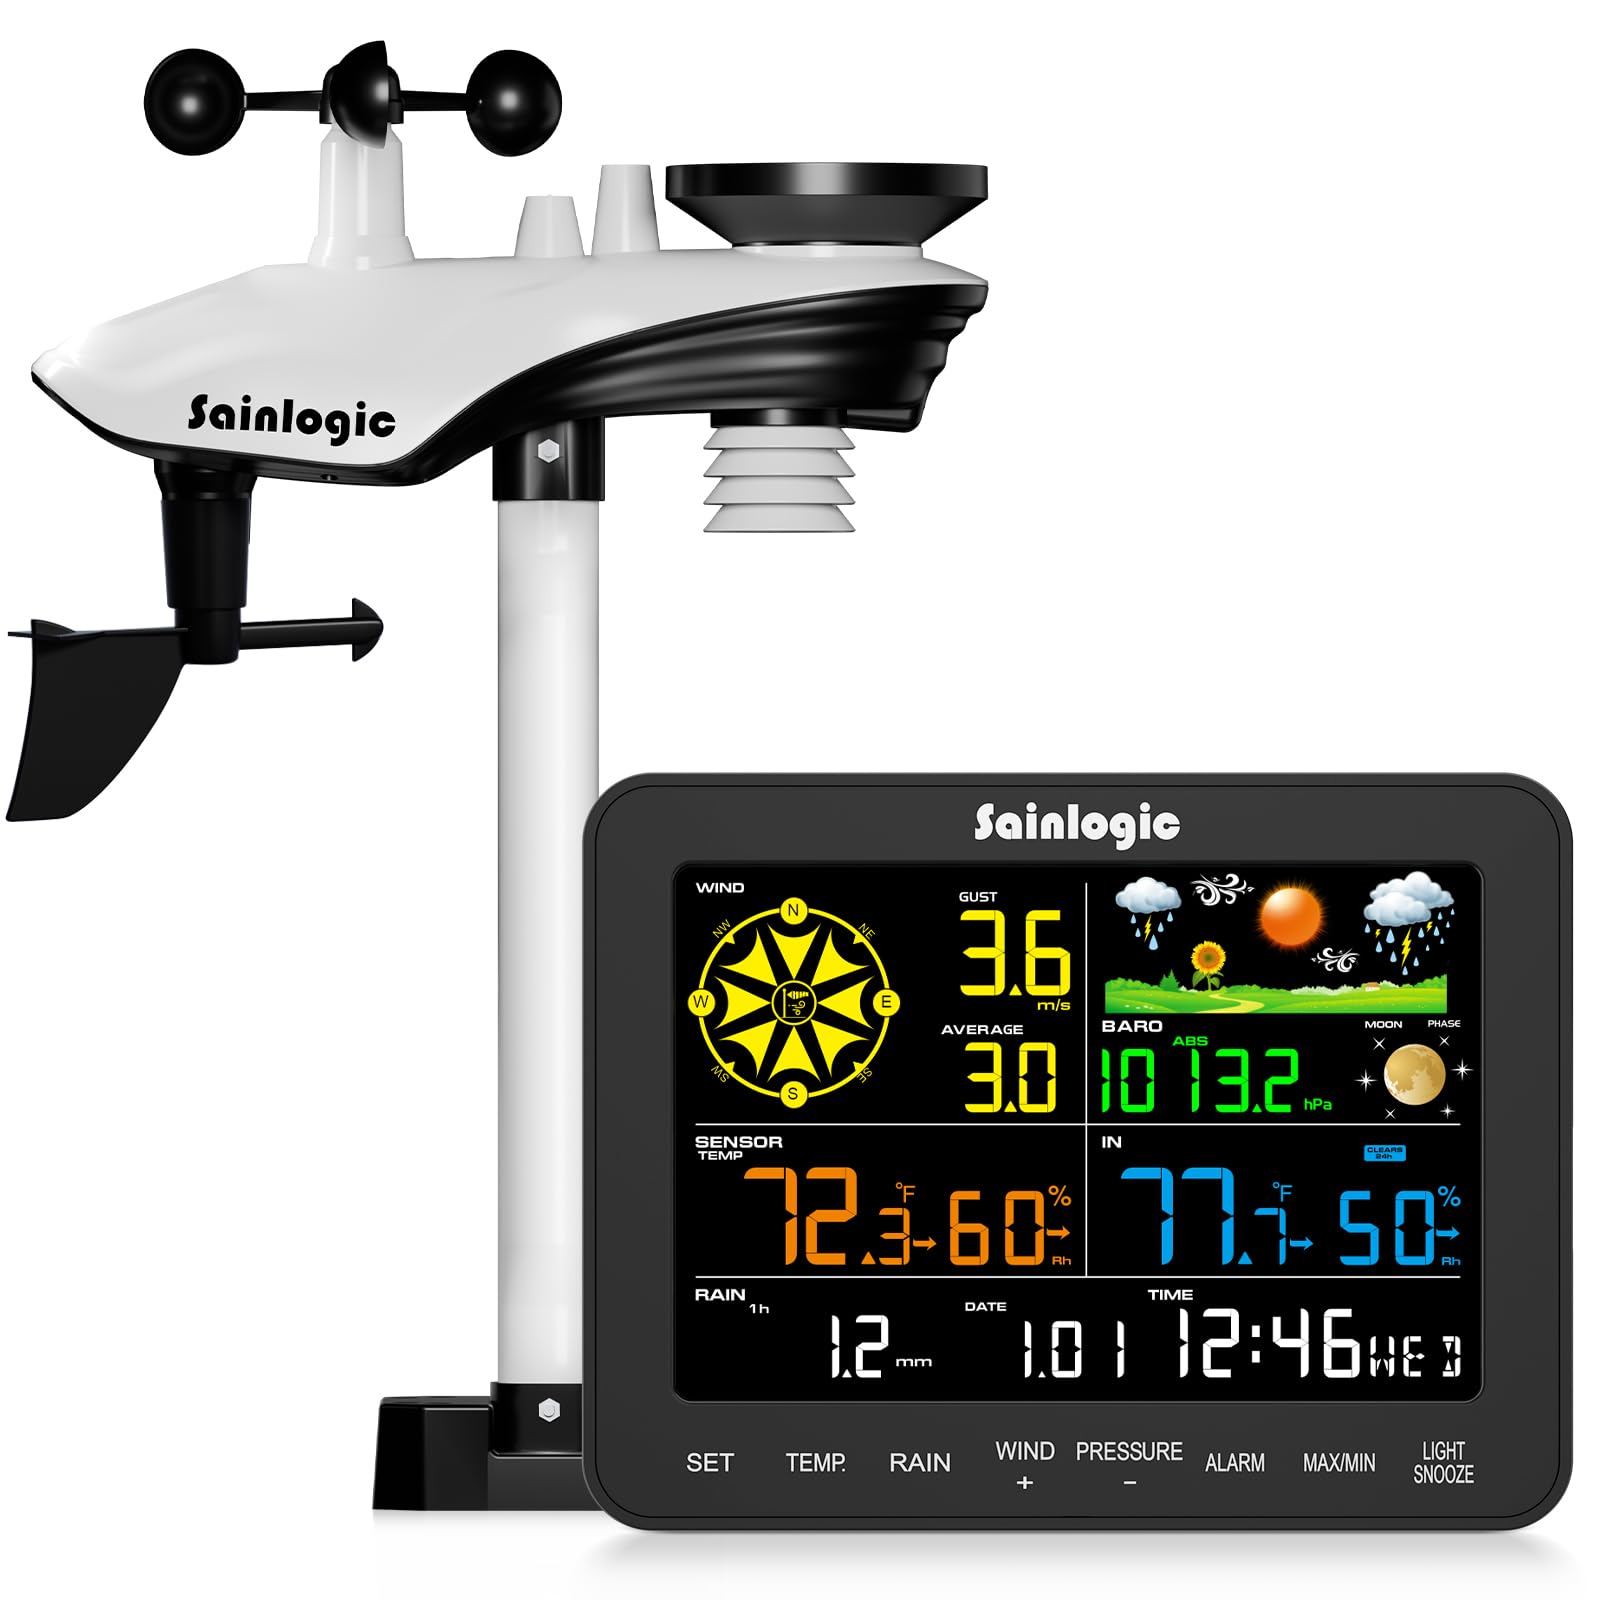
Figura 3: Console di visualizzazione
Istruzioni per l'uso
1. Visualizzazione finitaview
The 6.5-inch HD color LCD provides a clear, at-a-glance view of all current weather conditions. The display is divided into several sections, each showing specific data points.

Figure 4: Display Layout and Data Points
- Vento: Displays current wind speed, gust, and average wind speed, along with wind direction.
- Dati esterni: Shows external temperature, humidity, dew point, and felt temperature.
- Dati interni: Displays internal temperature and humidity.
- Piovosità: Tracce hourly, daily, weekly, monthly, and total rainfall.
- Pressione: Indicates current atmospheric pressure.
- Previsione: Provides a 12-hour weather forecast using intuitive icons.
- Ora dell'appuntamento: Ora, data e fase lunare attuali.
2. Funzioni dei pulsanti
The console features several buttons for navigation and settings adjustment:
- IMPOSTATO: Enters setup mode or confirms selections.
- TEMPERATURA: Toggles temperature units (°C/°F) or cycles through temperature data.
- PIOVERE: Displays different rainfall periods (hourly, daily, weekly, monthly, total).
- WIND (+): Adjusts wind settings or increases values during setup.
- PRESSURE (-): Adjusts pressure settings or decreases values during setup.
- ALLARME: Sets or activates alarms for various weather conditions.
- MASSIMO/MIN: Views maximum and minimum recorded values.
- LUCE/SNOOZE: Adjusts backlight brightness or activates snooze for alarms.
3. Customizable Alerts
The weather station supports customizable alerts for specific weather conditions, such as high/low temperature, strong winds, or heavy rainfall. When an alert condition is met, the console will provide visual (flashing) and audible notifications.

Figure 5: Intelligent Weather Alerts
Manutenzione
1. Cleaning the Sensor Array
Periodically inspect and clean the outdoor sensor array to ensure accurate readings. Dust, debris, or insects can affect performance.
- Pluviometro: Clear any leaves or debris from the rain collector funnel.
- Anemometer Cups & Wind Vane: Ensure they spin freely. Gently remove any obstructions.
- Schermo antiradiazioni termoigrometrico: Keep the vents clear for proper air circulation.
2. Sostituzione della batteria
Replace batteries in both the outdoor sensor and display console as needed. Low battery indicators will appear on the display. Always use fresh, high-quality batteries of the specified type (3 AA for sensor, 3 AAA for console backup).
Risoluzione dei problemi
| Problema | Possibile causa | Soluzione |
|---|---|---|
| Nessun dato esterno visualizzato | Sensore fuori portata, batterie del sensore scariche, interferenza. | Move sensor closer to console, replace sensor batteries, check for strong electronic interference. |
| Temperatura/umidità imprecisa | Sensor exposed to direct sunlight/heat source, blocked vents. | Relocate sensor to a shaded area, clear radiation shield vents. |
| Letture del vento imprecise | Obstructions near sensor, wind vane not pointing North. | Ensure clear path for wind, verify wind vane orientation. |
| Inaccurate rainfall | Rain collector blocked, sensor not level. | Clear debris from collector, ensure sensor is perfectly level. |
| Display console not powering on | Power adapter disconnected, faulty adapter, no backup batteries. | Check power connection, try a different outlet, ensure backup batteries are installed. |
Specifiche

Figura 6: Dimensioni e specifiche del prodotto
- Numero modello: SA6
- Display: 6.5-inch HD Color LCD
- Batterie del sensore esterno: 3 x AA (non inclusa)
- Console Backup Batteries: 3 x AAA (non incluso)
- Fonte di energia: AC Adapter / Battery
- Materiale: Acrilonitrile Butadiene Stirene (ABS)
- Gamma di trasmissione wireless: Fino a 100 m (330 piedi)
- Intervallo di temperatura esterna: Da -40°C a 140°C (da -40°F a 60°F)
- Intervallo di temperatura interna: da 32°F a 140°F (da 0°C a 60°C)
- Gamma di umidità: 10% al 99% di umidità relativa
- Intervallo di pressione barometrica: da 300 a 1100 hPa
- Precisione delle precipitazioni: ±1 mm (for <15 mm), ±7% (for 15-9999 mm)
- Caratteristiche speciali: Customizable alerts, adjustable brightness, portable, wireless, alarm clock.
- Dimensioni del prodotto: Console: 2.5 x 17 x 13.2 cm; Sensor: 12.9 x 18.5 x 4.25 cm (approximate)
- Peso dell'articolo: 2.74 chilogrammi (pacchetto totale)
Garanzia e supporto
The Sainlogic SA6 Professional Weather Station comes with a standard manufacturer's warranty. For specific warranty details, please refer to the documentation included with your purchase or contact Sainlogic customer support. If you encounter any issues or require assistance, please reach out to our support team via the contact information provided on our official websito o sulla tua piattaforma di acquisto.