1. Introduzione
Thank you for choosing the iScooter i14 Electric Scooter with Seat. This manual provides essential information for the safe assembly, operation, and maintenance of your new electric scooter. Please read it thoroughly before your first ride and keep it for future reference. Proper use and care will ensure optimal performance and longevity of your scooter.
2. Informazioni sulla sicurezza
Your safety is paramount. Always wear a helmet and appropriate protective gear (knee pads, elbow pads) when riding. Familiarize yourself with local laws and regulations regarding electric scooter use. Do not ride in adverse weather conditions or on slippery surfaces. Avoid riding under the influence of alcohol or drugs. Regular maintenance checks are crucial for safe operation.
- Indossare sempre casco e dispositivi di protezione.
- Check brakes, tires, and all fasteners before each ride.
- Rispettare le leggi e i regolamenti locali sul traffico.
- Non superare la capacità di peso massima di 264 libbre.
- Avoid riding in heavy rain, snow, or on icy roads.
3. Contenuto della confezione
Dopo aver disimballato il prodotto, verificare che siano presenti tutti i componenti:
- Scooter elettrico i14
- Caricabatterie
- Manuale dell'utente (questo documento)
- Kit di strumenti
4. Installazione e assemblaggio
Follow these steps to assemble your iScooter i14 Electric Scooter. A detailed assembly video is provided below for visual guidance.
4.1 Disimballaggio e ispezione iniziale
Rimuovere con attenzione tutti i componenti dall'imballaggio. Verificare eventuali danni che potrebbero essersi verificati durante il trasporto.

Figure 4.1: The iScooter i14 Electric Scooter with Seat.
4.2 Front Wheel and Fender Installation
Attach the front wheel and fender to the scooter's fork using the provided tools. Ensure all bolts are securely tightened.
4.3 Gruppo manubrio
Insert the handlebar stem into the main frame and secure it. Adjust the handlebar height to your preference and tighten the quick-release clamp. Attach the handlebar to the stem and secure it with the provided screws.

Figure 4.2: Adjusting the height of the handlebar for comfortable riding.
4.4 Installazione del sedile
Insert the seat post into the designated slot on the scooter frame. Adjust the seat height for comfortable riding and secure it with the quick-release lever. Ensure the seat is firmly in place.

Figure 4.3: Adjusting the seat height to suit individual rider preferences.
4.5 Rear Basket Attachment
Secure the rear storage basket to the designated mounting points on the scooter's rear rack using the provided hardware. Ensure it is stable and can safely carry items.

Figure 4.4: The spacious rear basket for carrying personal belongings.
4.6 Guida video all'assemblaggio
Video 4.1: This video demonstrates the assembly process for the iScooter i14 Electric Scooter with Seat, including unboxing, attaching the front wheel, handlebar, seat, and rear basket.
5. Istruzioni per l'uso
Understand the controls and features of your iScooter i14 for a safe and enjoyable ride.
5.1 Power On/Off and Key Ignition
Insert the mechanical key into the ignition slot and turn it to the 'ON' position to power on the scooter. The LCD display will illuminate. Turn the key to 'OFF' to power down.
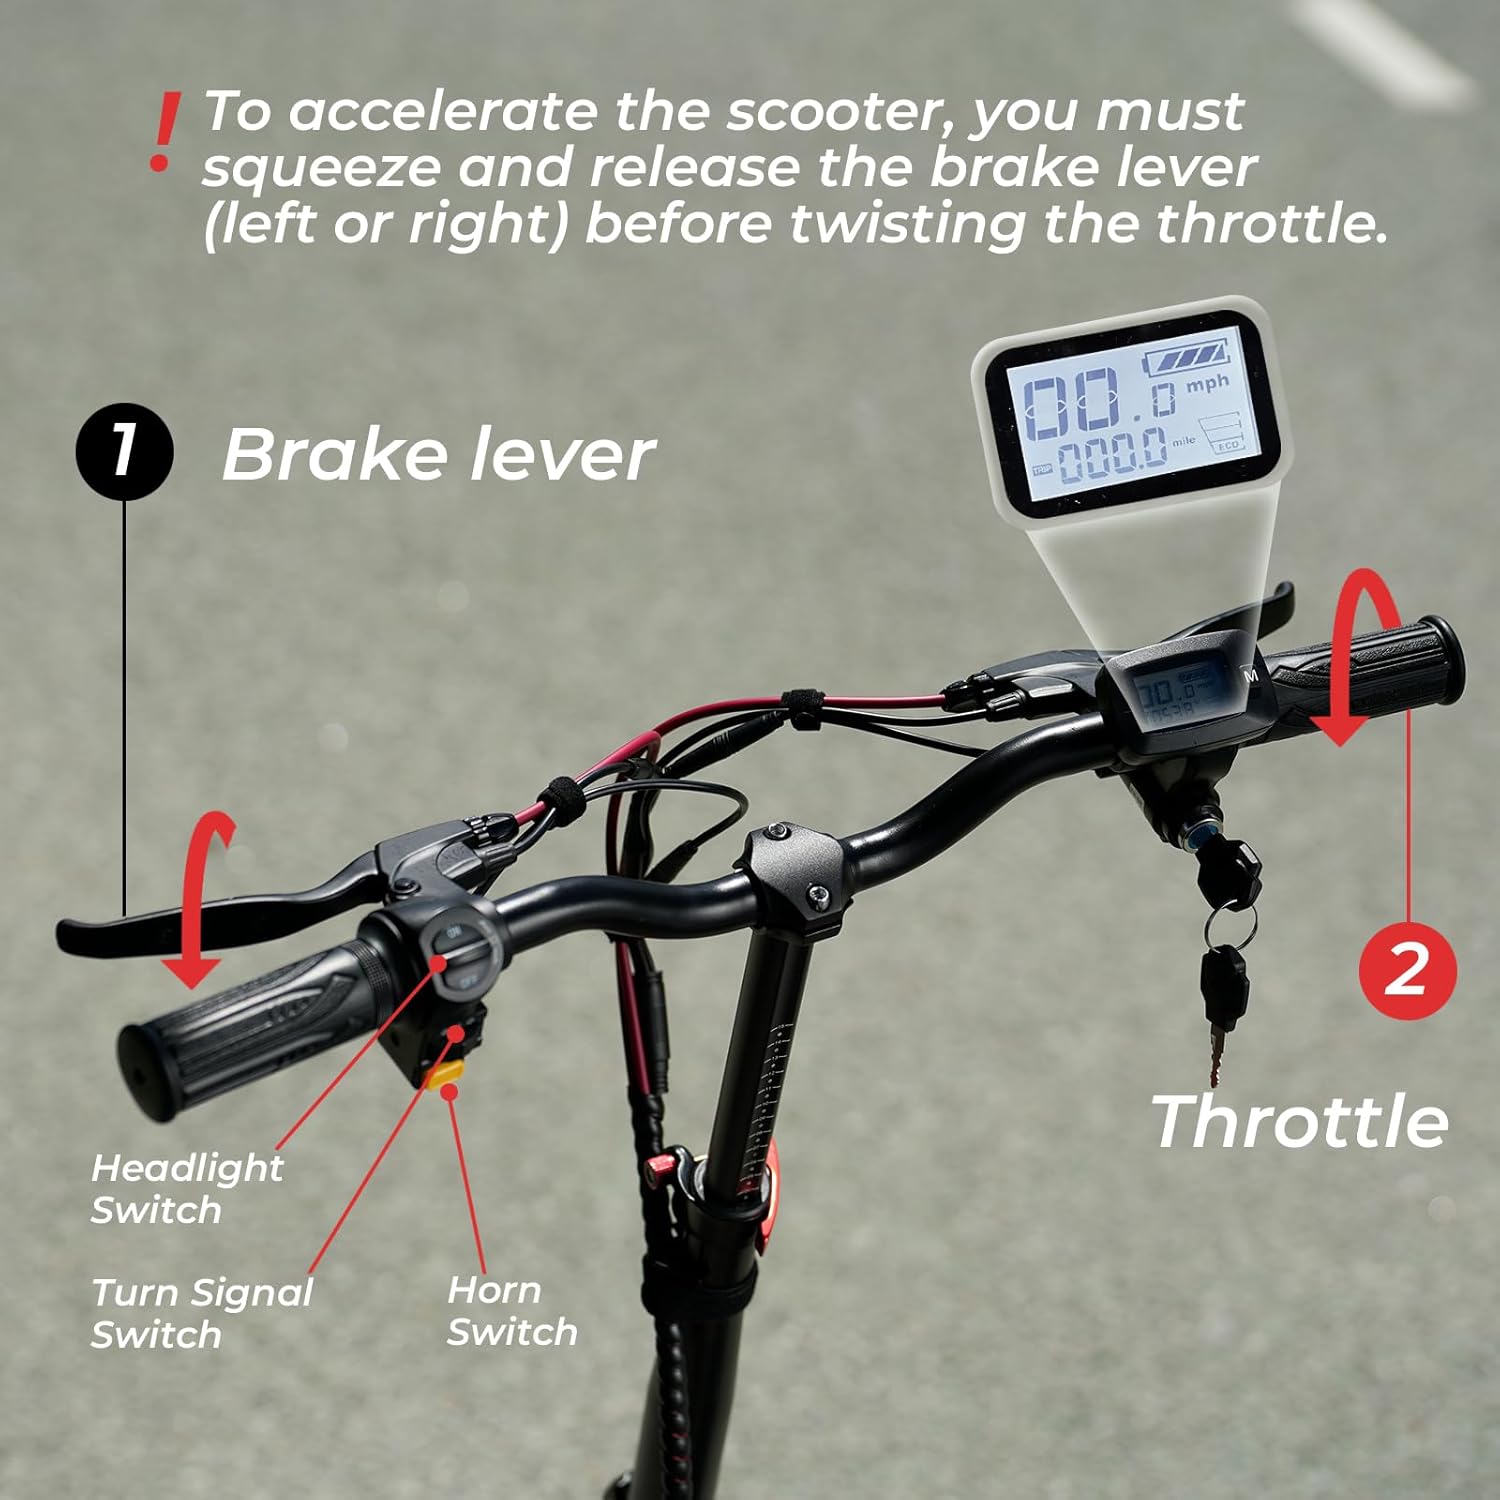
Figura 5.1: Oltreview of the handlebar controls, including the LCD display, key ignition, and switches.
5.2 modalità di velocità
The iScooter i14 offers 3 adjustable speed modes: 9 MPH, 21 MPH, and 28 MPH. To switch between modes, press the 'M' button on the display twice. Select the appropriate speed mode based on your riding environment and experience level.
5.3 Funzionamento dell'acceleratore
To accelerate, you must first squeeze and release either the left or right brake lever before twisting the throttle. This safety feature prevents accidental acceleration. Twist the throttle gently to control your speed.
5.4 Luci, clacson e indicatori di direzione
Use the dedicated switches on the handlebar to activate the front and rear LED lights for visibility, the horn for alerts, and the turn signals to indicate your direction to others.

Figure 5.2: The bright front LED light enhances visibility during low-light conditions.

Figure 5.3: The rear LED light ensures you are seen from behind, improving safety.
5.5 Sistema frenante
The scooter is equipped with front and rear disc brakes, along with an electric lock system, for powerful and reliable stopping performance. Apply both brake levers gently and evenly to slow down or stop. Avoid sudden, harsh braking, especially at high speeds.

Figure 5.4: The robust disc brake system provides effective stopping power.
6. Operazione di ricarica
To charge your iScooter i14, locate the charging port on the scooter's deck. Connect the charger to the port, then plug the charger into a standard wall outlet. The indicator light on the charger will typically turn red during charging and green when fully charged. A full charge takes approximately 8 hours.
Video 6.1: This video demonstrates the charging process for the iScooter i14 Electric Scooter.
7. Manutenzione
Una manutenzione regolare garantisce la longevità e il funzionamento sicuro del tuo scooter.
- Pressione degli pneumatici: Check the pressure of the 14-inch pneumatic tires regularly. Maintain the recommended PSI as indicated on the tire sidewall for optimal ride comfort and range.
- Ispezione dei freni: Periodically inspect the front and rear disc brakes for wear and proper function. Adjust brake cables if necessary to ensure responsive braking.
- Pulizia: Pulisci lo scooter con l'adamp panno. Evitare di utilizzare getti d'acqua ad alta pressione direttamente sui componenti elettrici.
- Cura della batteria: Conservare lo scooter in un luogo fresco e asciutto. In caso di rimessaggio prolungato, caricare la batteria a circa il 50-70% e ricaricarla ogni 1-2 mesi per evitare che si scarichi completamente.
- Elementi di fissaggio: Controllare regolarmente tutte le viti, i bulloni e i meccanismi di sgancio rapido per assicurarsi che siano ben serrati e sicuri.
8. Risoluzione Dei Problemi
Ecco alcuni problemi comuni e le loro possibili soluzioni:
| Problema | Possibile causa | Soluzione |
|---|---|---|
| Lo scooter non si accende | Low battery; Key not fully turned; Loose connections | Charge battery; Ensure key is in 'ON' position; Check all visible cable connections. |
| Il motore non si innesta | Brake lever not released before throttle; Faulty throttle; Motor issue | Ensure brake lever is released; Contact customer support if issue persists. |
| I freni sembrano deboli | Pastiglie dei freni usurate; Cavo del freno allentato; Aria nel sistema idraulico (se applicabile) | Inspect brake pads for wear and replace if needed; Adjust brake cable tension; Consult a professional for hydraulic brake issues. |
| Rumori insoliti durante il funzionamento | Componenti allentati; detriti nelle ruote/freni; problema al motore | Check all fasteners; Inspect wheels and brakes for obstructions; Contact customer support. |
9. Specifiche
| Caratteristica | Specificazione |
|---|---|
| Marca | iScooter |
| Nome del modello | i14 |
| Potenza del motore | 800W |
| Velocità massima | 28 miglia orarie |
| Distanza massima di portata | 34 miglia |
| Batteria | 48V 10.4Ah |
| Tempo di ricarica | 8 ore |
| Dimensioni del pneumatico | 14 pollici |
| Tipo di pneumatici | Pneumatico |
| Tipo di sospensione | Doppia sospensione (anteriore e posteriore) |
| Stile del freno | Double Disc Brakes & EABS Braking Systems |
| Limite di peso | 264 libbre |
| Peso dell'articolo | 72 libbre |
| Dimensioni del prodotto (LxWxH) | 43 cm L x 17 cm P x 45 cm A |
| Materiale del telaio | Alluminio |
| Caratteristiche speciali | 800W Motor, 28MPH Top Speed, 34MILES Long Range, Dual Suspension, Adjustable Height, Adjustable Seat |
| Usi consigliati | Pendolarismo |
10. Garanzia e supporto
10.1 Informazioni sulla garanzia
iScooter offers a 12-month or 180-day warranty on different components of your product. Please refer to the specific warranty terms provided with your purchase for detailed coverage.
10.2 Assistenza clienti
For any questions, concerns, or assistance with your iScooter i14, please contact our customer support team:
- Centro di assistenza clienti: +1 (855) 916-2366
- Chat dal vivo/E-mail: support@iscooterglobal.com
Our customer support team is available to assist you.

Figure 10.1: iScooter customer support details for assistance.