1. Introduzione
This manual provides detailed instructions for setting up, operating, and maintaining your AOOSTAR MACO AMD Ryzen 7 H255 Mini PC. Please read this manual thoroughly before using the device to ensure proper functionality and safety. The AOOSTAR MACO Mini PC is designed for high performance, featuring an AMD Ryzen 7 H255 processor, Radeon 780M graphics, and extensive connectivity options.
2. Contenuto della confezione
Verifica che tutti gli articoli elencati di seguito siano presenti nel tuo pacco:
- 1 x AOOSTAR MACO AMD Ryzen 7 H255 Mini PC
- 1 x SSD Cooling Pad
- 1 x 120W 19V 6.32A Type-C Power Supply
3. Prodotto finitoview
The AOOSTAR MACO Mini PC is a compact yet powerful computing solution. Below are key features and an overview of its components and ports.
3.1 Caratteristiche principali
- Processore: AMD Ryzen 7 H255 (8-core, 16-thread, up to 4.9 GHz) with Zen 4 architecture and 4nm process.
- Grafica: Integrated Radeon 780M graphics (RDNA 3 architecture).
- Memoria: Dual-channel DDR5 5600MHz (expandable up to 128GB).
- Magazzinaggio: Dual-channel M.2 2280 NVMe PCIe4.0x4 SSD (expandable up to 8TB).
- Sicurezza: One-touch fingerprint unlock for secure access.
- Supporto display: Supports up to four 4K displays simultaneously.
- Connettività: OCuLink, Dual USB4, USB 3.2 Gen2, USB 3.0, HDMI, DisplayPort, Dual 2.5G LAN, Wi-Fi 6.
3.2 Componenti e porte esterne
Familiarize yourself with the various ports and components of your Mini PC.
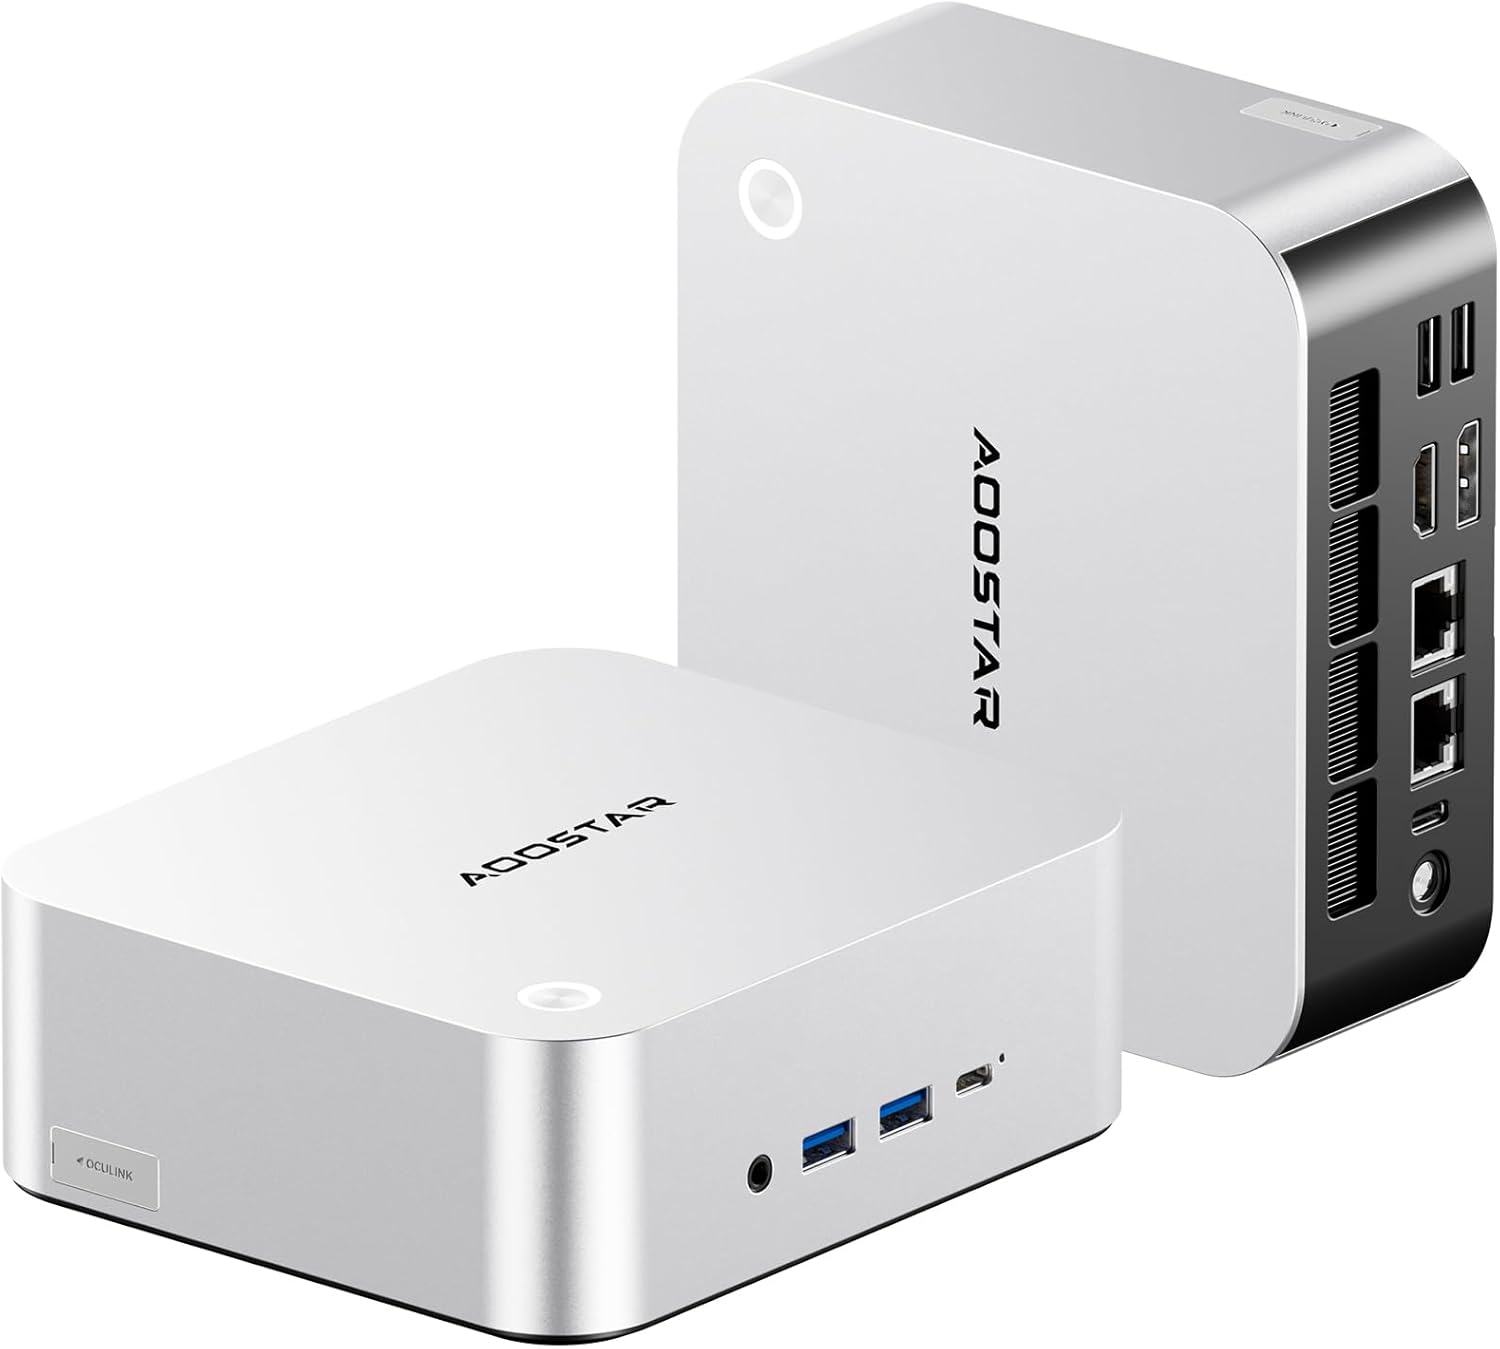
Immagine: anteriore e posteriore view of the AOOSTAR MACO Mini PC, showcasingrazie al suo design compatto e alle sue numerose porte.

Immagine: dettagliata view of the AOOSTAR MACO Mini PC's rear ports, including OCuLink, USB4, USB 3.2 Gen2, HDMI, DisplayPort, and Dual 2.5G LAN ports.
- Pannello frontale: Power button with fingerprint sensor, USB ports.
- Pannello posteriore: OCuLink port (1), USB4 ports (2), USB 3.2 Gen2 ports (2), USB 3.0 ports (2), HDMI port (1), DisplayPort (1), 2.5G LAN ports (2), DC power input (1), Audio Jack (1).

Image: Close-up of the one-touch fingerprint sensor on the AOOSTAR MACO Mini PC for secure login.

Image: Visual representation of the AMD Ryzen 7 H255 processor, highlighting its core count, turbo frequency, and architecture.

Immagine: Interna view showing the dual DDR5 memory slots and dual M.2 PCIe 4.0 SSD slots for high-speed storage and memory.

Image: The OCuLink port connected to an external GPU enclosure, demonstrating its use for enhanced graphics performance.

Image: Two AOOSTAR MACO Mini PCs side-by-side, highlighting the dual USB4 ports for high-speed data transfer and power delivery.
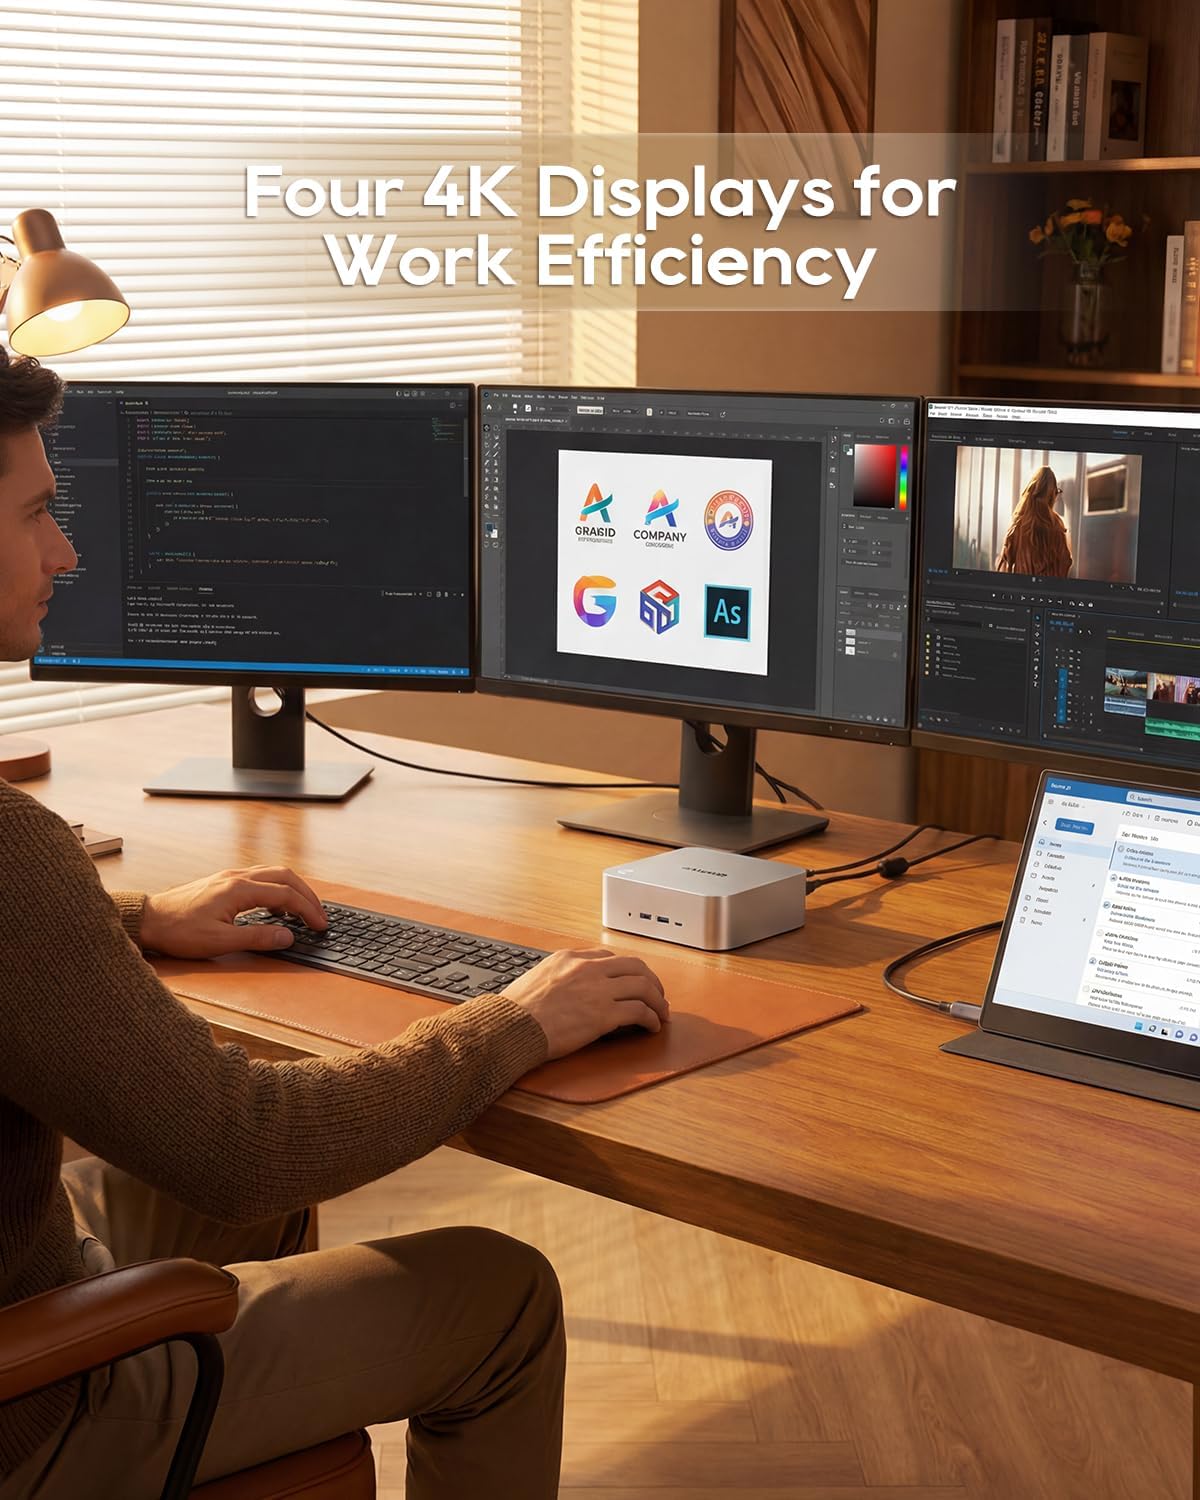
Image: A user working with the AOOSTAR MACO Mini PC connected to four 4K displays, illustrating its multi-display capability for productivity.
Image: The rear of the Mini PC showing the dual 2.5G LAN ports and an external WiFi antenna, emphasizing its high-speed networking capabilities.
Video: Un oltreview of the AOOSTAR MACO Mini PC, demonstrating its features such as fingerprint unlock, business applications, gaming performance, and home theater use.
4. Istruzioni per l'installazione
Follow these steps to set up your AOOSTAR MACO Mini PC:
- Connetti Display: Connect your monitor(s) to the Mini PC using an HDMI or DisplayPort cable. The Mini PC supports up to four 4K displays.
- Connetti le periferiche: Collega la tastiera, il mouse e qualsiasi altro dispositivo USB alle porte USB disponibili.
- Connessione di rete: For wired internet, connect an Ethernet cable to one of the 2.5G LAN ports. For wireless internet, ensure the Wi-Fi antenna is connected (if external) and the device is powered on to configure Wi-Fi settings.
- Collegamento elettrico: Connect the 120W Type-C power supply to the DC input port on the Mini PC, then plug the power adapter into a wall outlet.
- Accensione: Premere il pulsante di accensione sulla parte anteriore del Mini PC. Il sistema si avvierà.
- Configurazione iniziale: Follow the on-screen instructions to complete the operating system setup (e.g., Windows OS).
5. Istruzioni per l'uso
This section covers general operation and specific features of your Mini PC.
5.1 Sblocco tramite impronta digitale
The Mini PC features a one-touch fingerprint unlock for enhanced security and quick access. During initial OS setup or via system settings, you can enroll your fingerprints. Once configured, simply touch the power button to wake and log in without needing a password.
5.2 Configurazione multi-display
The Mini PC supports connecting up to four 4K displays. Connect your monitors to the available HDMI and DisplayPort outputs. You can configure display settings (e.g., extend, duplicate) within your operating system's display settings.
5.3 OCuLink for External Graphics
The OCuLink port provides a high-bandwidth connection (64 Gbps) for external GPU solutions. This allows for significantly improved graphics performance for demanding applications or gaming. Note that OCuLink is not hot-swappable and does not occupy an M.2 2280 PCIe4.0 SSD slot.
5.4 Porte USB4
The dual USB4 ports offer versatile connectivity with high data transfer speeds and power delivery capabilities (up to 100W). These ports can be used for external graphics card docks, NVMe SSD arrays, or other high-speed peripherals.
6. Manutenzione
Una manutenzione regolare contribuisce a garantire la longevità e le prestazioni ottimali del tuo Mini PC.
- Pulizia: Utilizzare un panno morbido e asciutto per pulire l'esterno del Mini PC. Per rimuovere la polvere accumulata nelle prese d'aria, utilizzare aria compressa. Assicurarsi che il dispositivo sia spento e scollegato prima di pulirlo.
- Ventilazione: Assicurarsi che il Mini PC sia posizionato in un'area ben ventilata. Non ostruire le aperture di ventilazione.
- Aggiornamenti software: Regularly update your operating system, drivers, and applications to maintain security and performance.
7. Risoluzione Dei Problemi
Se riscontri problemi con il tuo Mini PC, fai riferimento ai seguenti passaggi comuni per la risoluzione dei problemi:
- Nessun potere:
- Assicurarsi che l'adattatore di alimentazione sia collegato saldamente sia al Mini PC sia a una presa di corrente funzionante.
- Verificare che la presa di corrente funzioni collegandovi un altro dispositivo.
- Nessuna visualizzazione:
- Check that the display cable (HDMI/DisplayPort) is securely connected to both the Mini PC and the monitor.
- Assicurarsi che il monitor sia acceso e impostato sulla sorgente di input corretta.
- Prova a collegarti a un display diverso o a utilizzare un cavo diverso.
- Nessuna connessione internet:
- Per la connessione cablata, controllare lo stato del cavo Ethernet e del router.
- For Wi-Fi, ensure Wi-Fi is enabled in the operating system settings and you are connected to the correct network with the correct password.
- Riavvia il router/modem e il Mini PC.
- Prestazioni lente:
- Chiudere le applicazioni non necessarie in esecuzione in background.
- Controlla che ci sia spazio di archiviazione libero sufficiente sul tuo SSD.
- Ensure the Mini PC is well-ventilated to prevent overheating.
8. Specifiche
Detailed technical specifications for the AOOSTAR MACO AMD Ryzen 7 H255 Mini PC:
| Caratteristica | Specificazione |
|---|---|
| Marca | AOOSTAR |
| Numero di modello | MACO AMD Ryzen 7 H255 |
| Modello CPU | AMD Ryzen 7 H255 |
| Velocità della CPU | 3.8 GHz (Base), up to 4.9 GHz (Max Boost) |
| Coprocessore grafico | Radeon 780M |
| Dimensione della memoria RAM installata | 24 GB |
| Tecnologia della memoria RAM | DDR5 |
| Velocità di memoria | 5600 MHz |
| Dimensione massima della memoria RAM | 128 GB |
| Capacità di archiviazione della memoria | SSD da 1 TB |
| Interfaccia del disco rigido | PCIe x 4 |
| Sistema operativo | Sistema operativo (preinstallato) |
| Tecnologia di connettività | HDMI, USB, Wi-Fi 6, 2.5G LAN, OCuLink |
| Interfaccia di uscita video | Porta Display, HDMI |
| Risoluzione | 4K |
| Porte USB totali | 6 (2x USB4, 2x USB 3.2 Gen2, 2x USB 3.0) |
| Dimensioni dell'articolo | 5.12 x 5.12 x 2.36 pollici |
| Peso dell'articolo | 660 grammi |
| Colore | Nero |
9. Garanzia e supporto
The AOOSTAR MACO AMD Ryzen 7 H255 Mini PC comes with a 1-year warranty. For warranty claims, technical support, or service inquiries, please contact AOOSTAR customer support through their official channels or the retailer where the product was purchased. Keep your proof of purchase for warranty validation.


