1. Informazioni sulla sicurezza
Read all instructions carefully before using the Trisomy Walking Pad Treadmill. Keep this manual for future reference.
- Assicurarsi che il tapis roulant sia posizionato su una superficie piana e stabile.
- Tenere i bambini e gli animali domestici lontani dal tapis roulant durante il funzionamento.
- Always use the safety key. Attach the clip to your clothing before starting.
- Non utilizzare il tapis roulant se è danneggiato o non funziona correttamente.
- Indossare calzature sportive adatte.
- Consultare un medico prima di iniziare qualsiasi nuovo programma di esercizi.
- Capacità massima di peso dell'utente: 350 libbre (158 kg).
- Assicurare uno spazio libero adeguato attorno al tapis roulant (almeno 2 cm sui lati e sul retro).
2. Contenuto della confezione
Verificare che tutti gli articoli siano presenti nella scatola:
- Trisomy Walking Pad Treadmill (main unit)
- Manuale d'uso
- Guida di installazione rapida
- Telecomando
- Olio lubrificante
- Hex Screw for belt adjustment
- Magnetic Safety Key with clip
- Porta tablet
- Handlebar Fixing Nuts (x2)
- Tablet Holder Nuts (x2)

Figure 2.1: All included components of the Trisomy Walking Pad Treadmill.
3. Guida all'installazione
3.1 Disimballaggio e posizionamento iniziale
Carefully remove the treadmill from its packaging. Place it on a level surface in your desired exercise area. The treadmill is designed for easy mobility with built-in wheels.

Figure 3.1: The treadmill features smooth-rolling wheels for easy movement and storage.
3.2 Montaggio e regolazione del manubrio
The handlebar is adjustable to 6 different height levels (35" to 47") to accommodate various user heights. To adjust:
- Lift the handlebar to the upright position.
- Locate the handlebar fixing screws on each side.
- Rotate the screws counter-clockwise to loosen.
- Adjust the handlebar to your desired height, aligning the holes.
- Rotate the screws clockwise to secure the handlebar firmly in place.
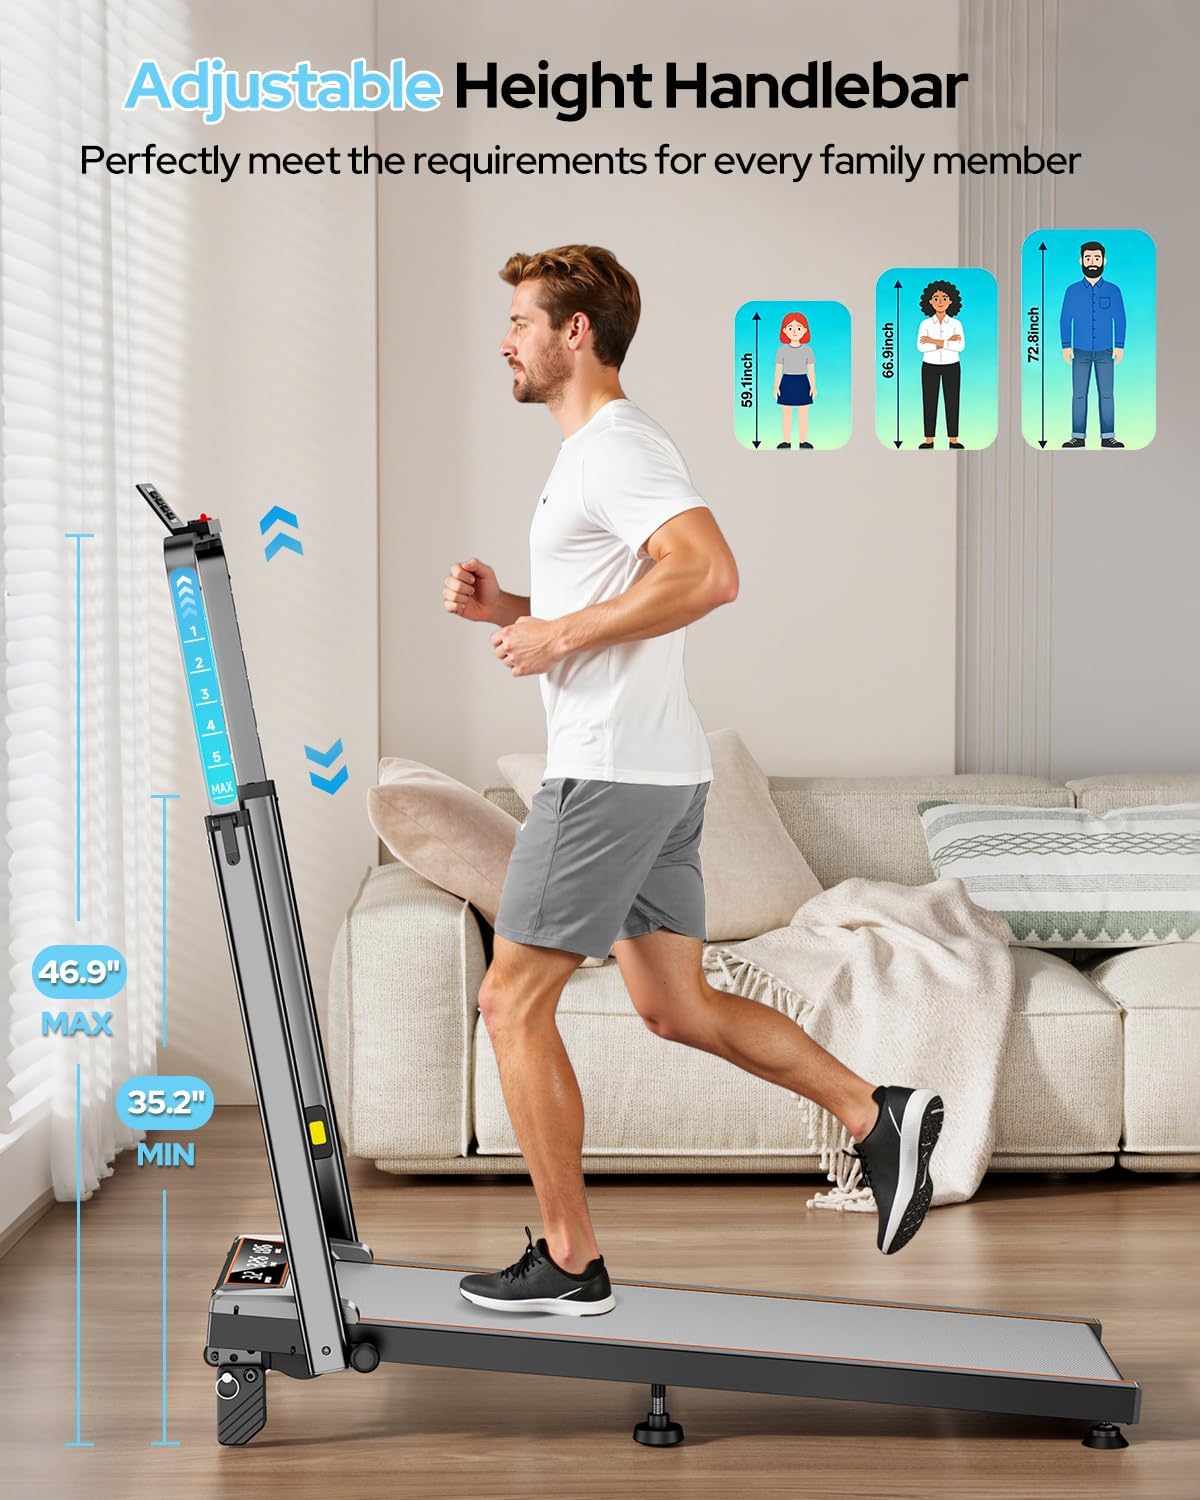
Figure 3.2: Adjusting the handlebar height for comfortable use.

Figure 3.3: The adjustable handlebar accommodates users from 35 to 47 inches in height.
3.3 Tablet Holder Installation
Attach the tablet holder to the top of the handlebar for convenient device placement during workouts.
- Align the tablet holder with the designated slots on the handlebar.
- Secure it using the provided tablet holder screws and nuts.
Figure 3.4: The tablet holder is easily attached to the handlebar.
3.4 Regolazione manuale dell'inclinazione
The treadmill offers 3 manual incline levels: 0%, 6%, and 12%. To adjust the incline:
- Assicurarsi che il tapis roulant sia spento e scollegato.
- Sollevare con cautela la parte posteriore del tapis roulant.
- Adjust the support feet to the desired incline level (0%, 6%, or 12%).
- Ensure both sides are set to the same level for stability.
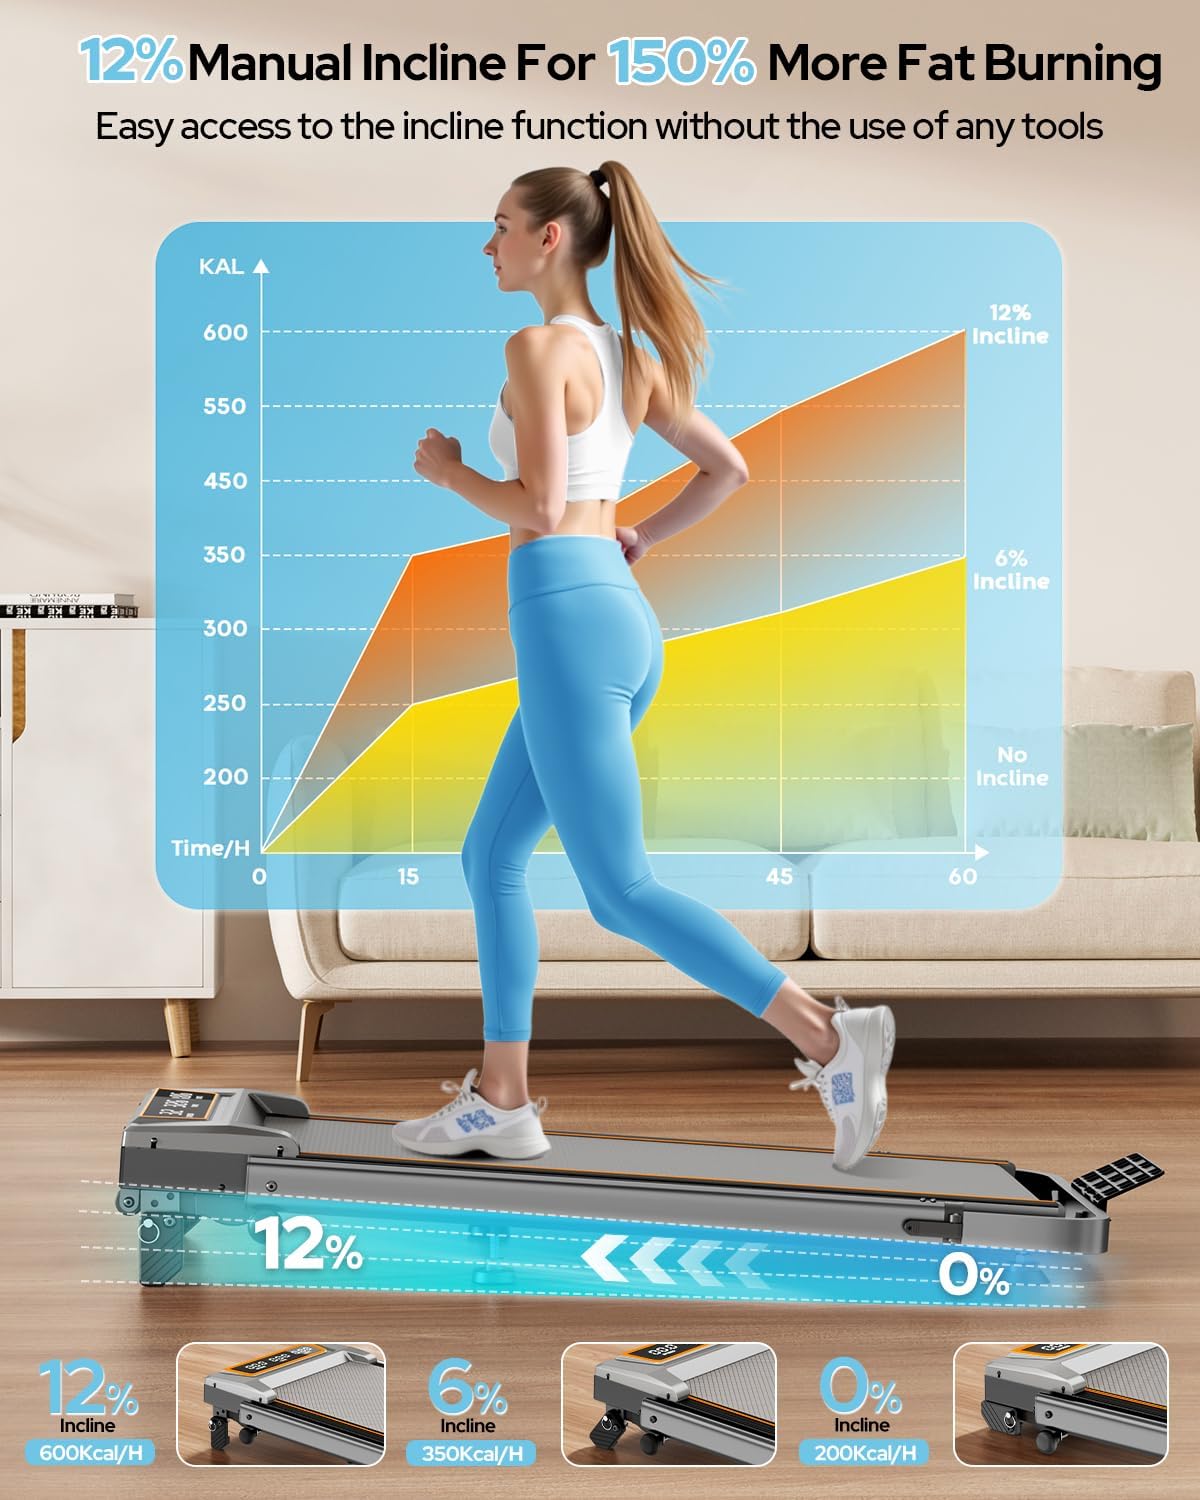
Figure 3.5: Manual adjustment of the treadmill's incline to 0%, 6%, or 12%.

Figure 3.6: The 12% incline setting can enhance calorie burn during workouts.
3.5 Regolazione del nastro da corsa
The running belt may require adjustment over time to ensure proper alignment and tension. Use the provided hex screw for this purpose.
- If the belt drifts to the right: Tighten the right screw slightly or loosen the left.
- If the belt drifts to the left: Tighten the left screw slightly or loosen the right.
- Self-Centering Function: The treadmill corrects slight belt misalignment during low-speed operation without a load.
Figure 3.7: Adjusting the running belt ensures smooth and safe operation.
3.6 Guida video all'assemblaggio
Video 3.1: This video demonstrates the assembly process and key features of the Trisomy walking pad with handle bar.
4. Istruzioni per l'uso
4.1 Powering On/Off and Safety Key
To power on, plug the treadmill into a grounded outlet and flip the power switch located at the rear of the motor housing. Before starting any exercise, attach the magnetic safety key to the designated area on the console and clip the other end to your clothing. The treadmill will not operate without the safety key in place. Removing the safety key will immediately stop the treadmill.
4.2 Utilizzo del telecomando
The remote control allows you to adjust speed, start/stop the treadmill, and activate the one-click MUTE function. The MUTE function turns off alert sounds, ideal for quiet environments like offices or when others are resting.

Figure 4.1: The remote control provides convenient access to speed and mute functions.
4.3 Display a LED
The clear LED display shows real-time workout data, including:
- Velocità: Velocità attuale in MPH.
- Tempo: Durata del tuo allenamento.
- Distanza: Total distance traveled in miles.
- Calorie: Calorie bruciate stimate.

Figure 4.2: The LED display provides essential workout metrics.
4.4 APP Control (FitShow)
Connect your smartphone to the treadmill via Bluetooth and use the FitShow APP to control settings and track your progress. The app offers various training modes and allows you to monitor your workout data.

Figure 4.3: Control the treadmill and track progress using the FitShow APP.
5. Caratteristiche principali
- Manubrio regolabile: 6-level height adjustment from 35 to 47 inches for comfortable use by various users.
- Inclinazione manuale del 12%: Three adjustable incline levels (0%, 6%, 12%) to vary workout intensity and target different muscle groups.
- Motore potente e silenzioso: Equipped with a 3.5HP motor, operating at less than 40dB, offering a speed range of 0.6-6.0 MPH. Supports users up to 350 lbs.
- Assorbimento degli urti avanzato: Features a 7-layer anti-slip running belt and multi-structure shock absorption system to protect joints and reduce impact.
- Design pieghevole e salvaspazio: Folds to a compact 4.72 inches thick for easy storage under furniture or in small spaces. Built-in wheels facilitate effortless movement.
- Doppio sistema di controllo: Operate the treadmill via the intuitive LED display, magnetic remote control, or the dedicated smartphone APP.

Figure 5.1: The 4-in-1 design supports various exercise modes.

Figure 5.2: The compact design allows for easy storage in small spaces.
6. Manutenzione
Una manutenzione regolare garantisce la longevità e le prestazioni ottimali del tuo tapis roulant.
6.1 Pulizia
- Pulisci le superfici del tapis roulant con un pannoamp panno dopo ogni utilizzo per rimuovere sudore e polvere.
- Evitare l'uso di detergenti abrasivi o solventi che potrebbero danneggiare la finitura.
6.2 Lubrificazione
Il nastro trasportatore richiede una lubrificazione periodica per ridurre l'attrito e prolungarne la durata. Utilizzare l'olio lubrificante fornito.
- Spegnere e scollegare il tapis roulant.
- Loosen the running belt by turning the rear roller bolts counter-clockwise.
- Applicare una piccola quantità di lubrificante in modo uniforme sotto la parte centrale del nastro trasportatore.
- Tighten the running belt bolts until the belt is snug but not overly tight.
- Far funzionare il tapis roulant a bassa velocità per alcuni minuti per distribuire il lubrificante.
6.3 Regolazione del nastro da corsa
Refer to Section 3.5 for detailed instructions on adjusting the running belt tension and alignment.
7. Risoluzione Dei Problemi
If you encounter any issues, please refer to the following common solutions. For more complex problems, contact customer support.
| Problema | Possibile causa | Soluzione |
|---|---|---|
| Il tapis roulant non si accende. | Cavo di alimentazione non collegato, interruttore di alimentazione spento, chiave di sicurezza non inserita. | Check power connection, ensure power switch is ON, insert safety key. |
| Il nastro trasportatore si ferma inaspettatamente. | Safety key removed, motor overload. | Re-attach safety key. Reduce load or speed. |
| Il nastro trasportatore scivola o è decentrato. | Tensione della cinghia troppo lenta, disallineamento della cinghia. | Adjust running belt tension and alignment as per Section 3.5. |
| Rumore insolito durante il funzionamento. | Mancanza di lubrificazione, componenti allentati. | Lubricate the running belt (Section 6.2). Check for and tighten any loose screws. |
8. Specifiche
| Caratteristica | Dettaglio |
|---|---|
| Marca | Trisomy |
| Numero di modello | HSM-T12C1 |
| Colore | Grigio carbone |
| Dimensioni del prodotto (P x L x A) | 42.5" x 22.4" x 4.4" (piegato) |
| Peso dell'articolo | 48 libbre |
| Materiale | Acciaio legato |
| Velocità massima | 6.0 miglia all'ora |
| Potenza massima | 3.5 CV |
| Percentuale di inclinazione massimatage | 12% (3 livelli manuali: 0%, 6%, 12%) |
| Tipo di visualizzazione | GUIDATO |
| Area della cintura da corsa | 36" x 15" |
| Capacità di peso | 350 libbre |
| Livello di rumore | <40dB |
9. Garanzia e supporto
The Trisomy Walking Pad Treadmill HSM-T12C1 comes with a Garanzia di 2 anno. For technical assistance, product inquiries, or warranty claims, please contact Trisomy customer support. We offer lifetime technical support and 24/7 online assistance.
Refer to the included "User Manual" for detailed contact information and further support resources.

Figure 9.1: Locate support information within your user manual.