
1. Introduzione
This manual provides essential information for the safe and efficient operation, assembly, and maintenance of your Aipas M1 Pro Electric Bike. Please read this manual thoroughly before your first ride and retain it for future reference. Understanding the features and proper handling procedures will ensure a safe and enjoyable riding experience.
The Aipas M1 Pro is an electric mountain bike designed for various terrains, featuring a powerful motor, long-range battery, and dual suspension system.
2. Informazioni sulla sicurezza
- Quando si va in bicicletta, indossare sempre il casco e l'attrezzatura di sicurezza adeguata.
- Informatevi sulle normative locali in materia di e-bike e sul codice della strada.
- Prima di ogni utilizzo, effettuare un'ispezione preliminare, controllando i freni, la pressione degli pneumatici e il livello della batteria.
- Non guidare sotto l'effetto di alcol o droghe.
- Evitare di guidare in condizioni meteorologiche avverse o su superfici eccessivamente scivolose.
- Prima di partire, assicurarsi che tutti i componenti siano ben fissati.
- Non superare il peso massimo raccomandato di 450 libbre.
3. Contenuto della confezione
Your Aipas M1 Pro Electric Bike package includes the following items:
- Aipas M1 Pro Electric Bike (95% pre-assembled)
- Caricabatterie
- Manuale d'uso
- Strumenti di montaggio (se applicabile)
- Fenders (may require attachment)
- Headlight (may require attachment)
- Rear Light (may require attachment)
4. Installazione e assemblaggio
The Aipas M1 Pro Electric Bike arrives 95% pre-assembled. Follow these steps to complete the assembly:
- Disimballaggio: Estrarre con cautela la bicicletta e tutti i componenti dall'imballaggio.
- Installazione del manubrio: Fissare il manubrio all'attacco manubrio, assicurandosi che sia centrato e ben serrato.
- Installazione della ruota anteriore: Installare la ruota anteriore, assicurandosi che il rotore del freno a disco sia correttamente allineato con la pinza.
- Headlight and Fenders: Attach the front headlight and both front and rear fenders as per the instructions.
- Installazione del pedale: Identificare il pedale sinistro (L) e quello destro (R). Avvitare manualmente i pedali nelle pedivelle, quindi serrarli con una chiave. Notare che il pedale sinistro ha la filettatura inversa.
- Regolazione del reggisella: Insert the seat post into the frame and adjust the seat height for comfortable riding, ensuring the quick-release lever is securely closed.
- Installazione/ricarica della batteria: Ensure the 48V 17.5Ah battery is fully charged before your first ride. Insert the battery securely into its compartment.
- Ispezione finale: Double-check all bolts, quick releases, and connections for tightness. Verify brake functionality and tire pressure.
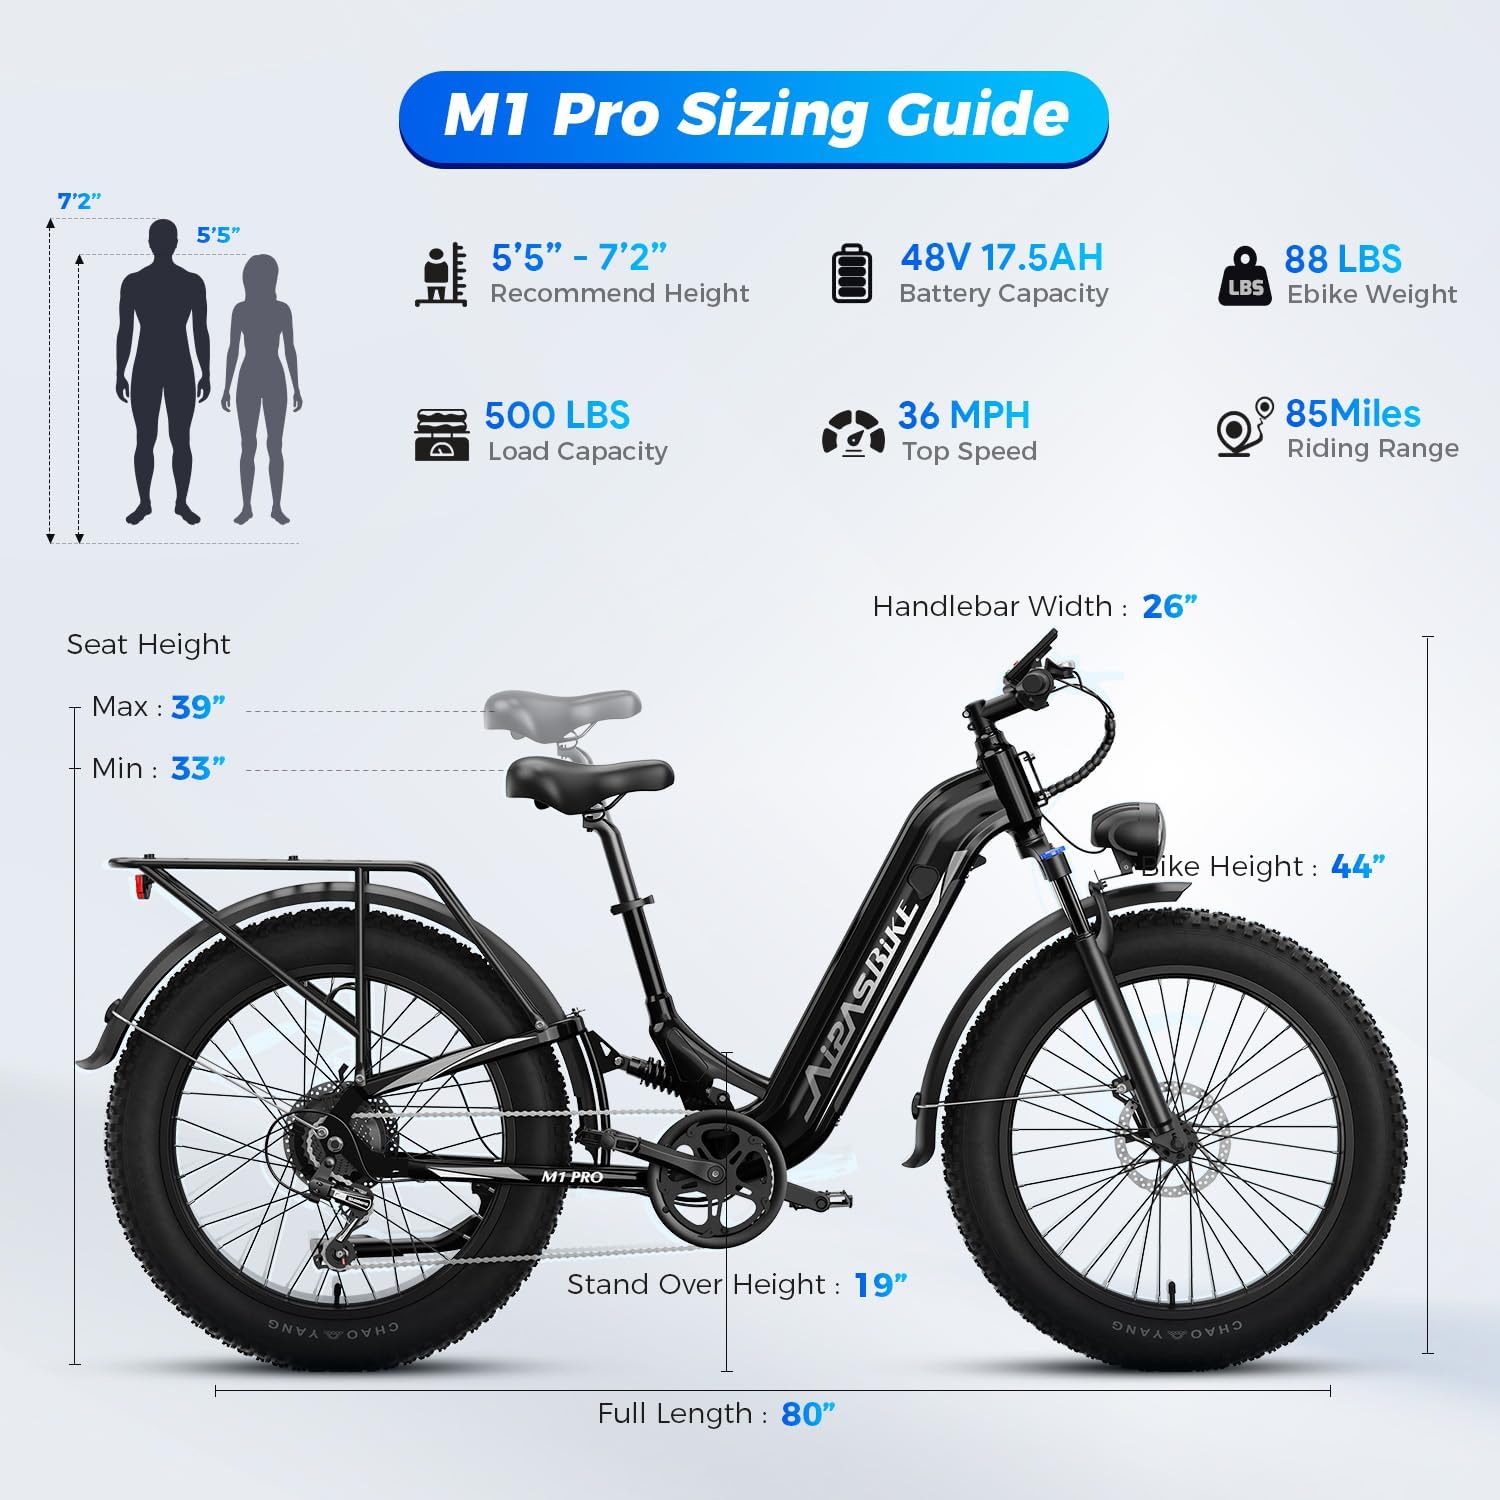
Figure 4.1: Aipas M1 Pro Sizing Guide. This image illustrates the recommended rider height (5'5" - 7'2"), e-bike weight (88 lbs), max load capacity (500 lbs), top speed (36 MPH), and riding range (85 miles). Detailed dimensions for seat height (max 39", min 33"), seat tube (16"), stand height (19"), handlebar height (44"), head tube length (10"), wheelbase (52"), and total length (80") are also provided.
5. Istruzioni per l'uso
5.1 Accensione/Spegnimento
To power on the bike, press and hold the power button on the LCD display. Repeat to power off.
5.2 Display LCD e controlli

Figure 5.1: Smart M6 USB Charging Display. This image shows the bike's handlebars with the LCD display, control buttons for lighting and horn, and a USB charging port. The display provides real-time data such as speed, power, PAS level, and distance.
The Smart M6 LCD display provides real-time ride data including speed, distance, battery level, and current riding mode. Use the integrated buttons on the handlebars to control the lighting, horn, and navigate display settings. A convenient USB charging port is available to charge your devices while riding.
5.3 Modalità di guida
The Aipas M1 Pro offers 5 distinct riding modes:
- Modalità acceleratore: Fornisce potenza senza pedalare.
- Modalità di pedalata assistita (PAS): Provides motor assistance while you pedal. There are multiple PAS levels to adjust the level of assistance.
- Modalità crociera: Mantiene una velocità impostata senza dover continuamente azionare l'acceleratore.
- Modalità normale: Funziona come una bicicletta tradizionale senza assistenza del motore.
- Modalità camminata: Fornisce assistenza a bassa velocità per portare a mano la bicicletta.
5.4 Cambio marcia
The bike is equipped with a 7-speed derailleur system. Use the thumb shifter on the handlebars to change gears, adapting to different terrains and riding conditions for optimal efficiency and comfort.
5.5 Sistema frenante

Figure 5.2: Aipas M1 Pro Electric Bike. This image shows the overall design of the bike, highlighting its robust frame and the visible front and rear disc brakes, which provide reliable stopping power.
The Aipas M1 Pro features 180mm mechanical disc brakes on both the front and rear wheels. Apply both brakes simultaneously for effective and controlled stopping. Regularly check brake pads and cables for wear and proper adjustment.
5.6 Sistema di sospensione
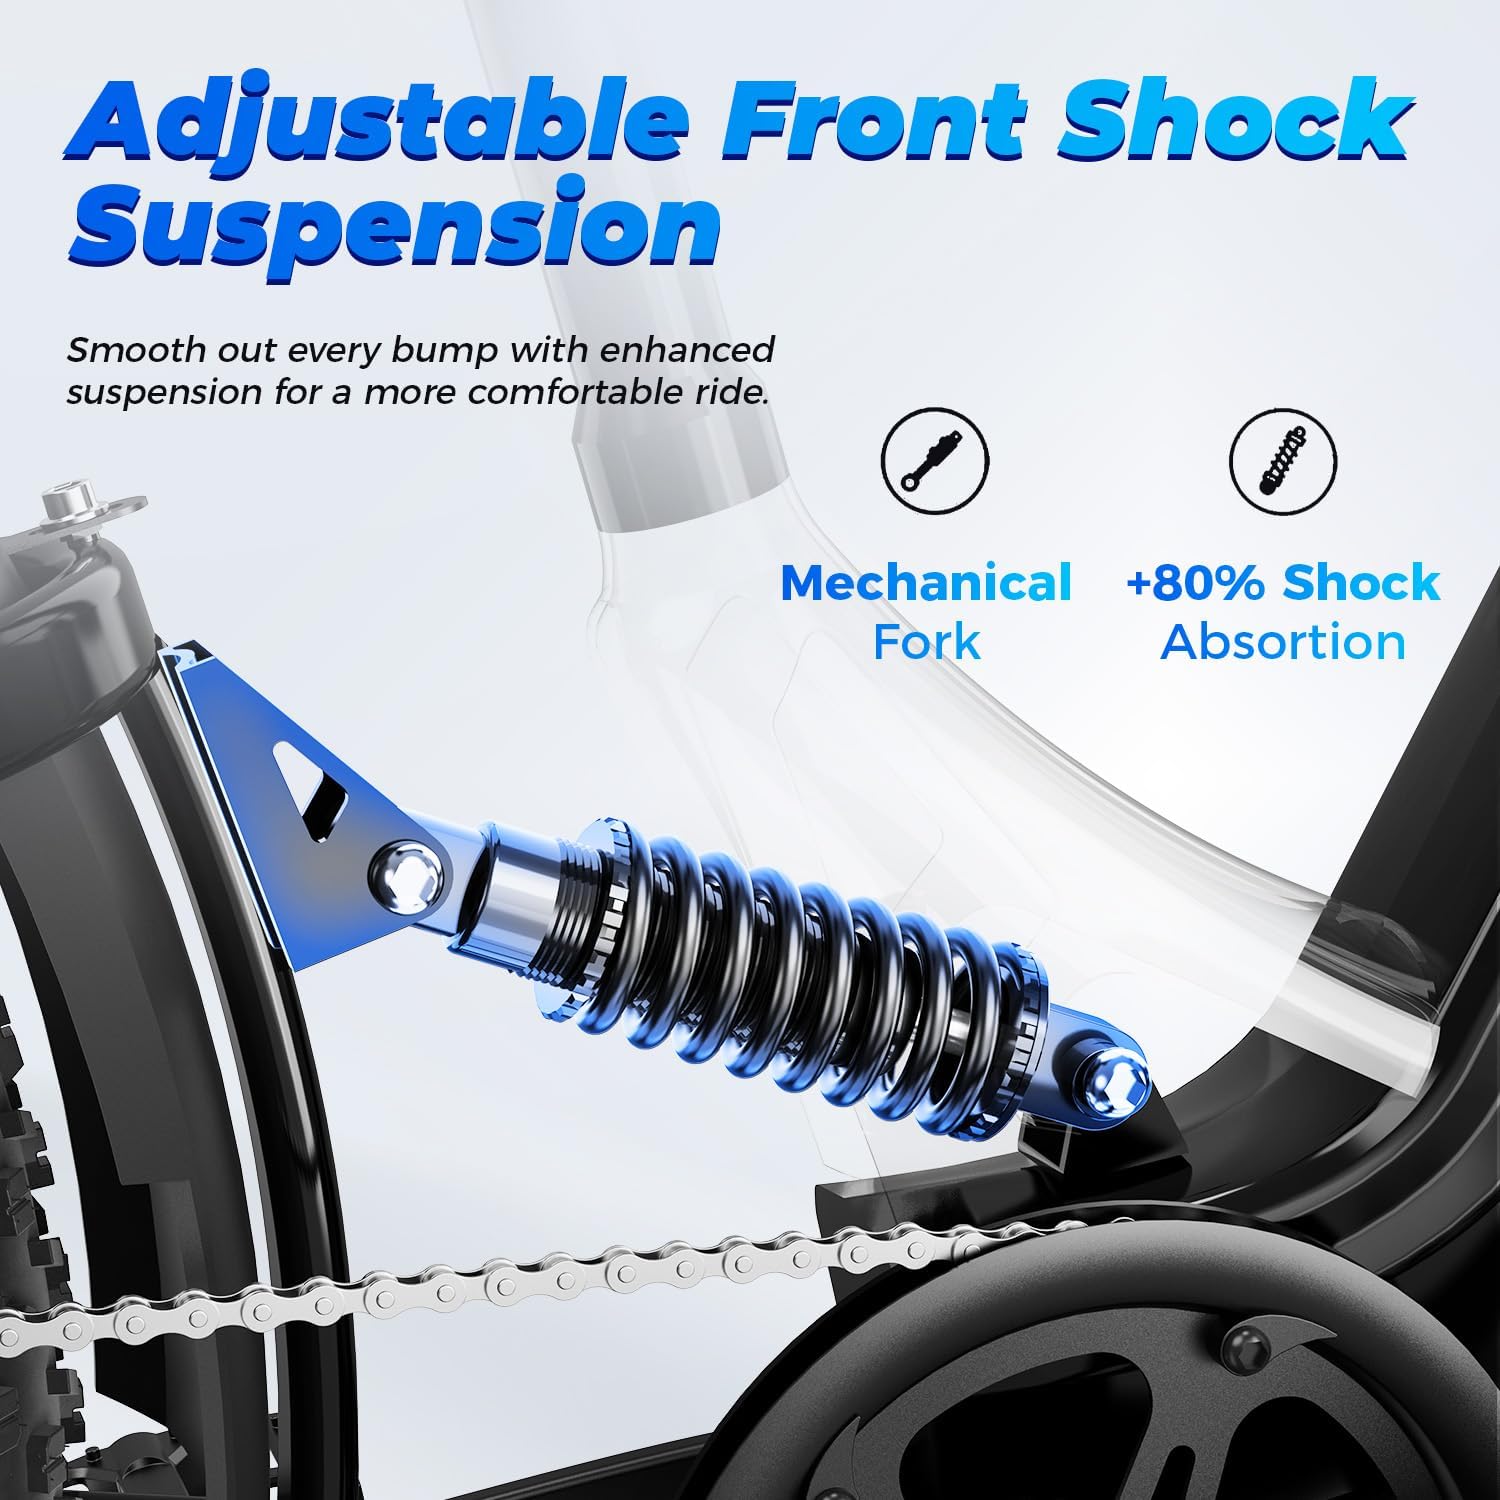
Figure 5.3: Adjustable Front Shock Suspension. This image details the front fork suspension, indicating it's a mechanical fork with adjustable lockout and providing over 80% shock absorption for a smoother ride.
The bike is equipped with a dual suspension system, including a lockable front fork and a rear shock absorber. This system is designed to absorb shocks and vibrations, providing a smoother and more comfortable ride over varied terrain. The front fork allows for adjustment of firmness.
5.7 Utilizzo della batteria

Figure 5.4: Semi-Integrated Battery. This image highlights the 48V 17.5Ah Lithium-ion battery, noting its 85-mile riding range, 4-6 hour charging time, and IP65 waterproof rating for reliable performance.
The 48V 17.5Ah removable battery provides a riding range of 25-85 miles per charge, depending on terrain, assist level, and rider weight. Charging time is approximately 4-6 hours. Always use the provided charger. The battery is IP65 waterproof, offering protection against dust and water splashes.
6. Manutenzione
- Pneumatici: Regularly check tire pressure (26" x 4.0" fat tires) and inspect for wear or damage. Maintain recommended pressure for optimal performance and safety.
- Freni: Inspect brake pads for wear and replace as needed. Ensure brake levers are responsive and cables are free from fraying.
- Catena: Mantenere la catena pulita e lubrificata per garantire cambi di marcia fluidi ed evitare un'usura prematura.
- Batteria: Store the battery in a cool, dry place. Charge it regularly, even if not in use, to maintain its lifespan. Avoid fully discharging the battery.
- Elementi di fissaggio: Controllare periodicamente che tutti i bulloni e gli elementi di fissaggio siano ben serrati, soprattutto sui componenti critici come manubrio, ruote e reggisella.
- Pulizia: Pulisci la bici con un damp panno. Evitare di utilizzare idropulitrici ad alta pressione direttamente sui componenti elettrici.
7. Risoluzione Dei Problemi
| Problema | Possibile causa | Soluzione |
|---|---|---|
| La bici non si accende | Batteria non carica o installata in modo errato; collegamenti allentati. | Ensure battery is fully charged and correctly seated. Check all electrical connections. |
| Il motore non assiste | Livello PAS impostato su 0; leve dei freni inserite; problema di collegamento al motore. | Increase PAS level. Release brake levers. Check motor cable connections. |
| I freni sembrano deboli | Worn brake pads; loose brake cables; contaminated rotors. | Ispezionare e sostituire le pastiglie dei freni. Regolare la tensione del cavo del freno. Pulire i rotori con un detergente per freni a disco. |
| Rumori insoliti durante la corsa | Componenti allentati; catena asciutta; ingranaggi disallineati. | Check all fasteners. Lubricate chain. Adjust derailleur. |
For issues not listed here, please contact Aipas customer support.
8. Specifiche
| Caratteristica | Dettaglio |
|---|---|
| Nome del modello | M1 Pro |
| Tipo di bici | Mountain bike elettrica |
| Potenza del motore (picco) | Motore brushless da 1800 W |
| Coppia | 110 Nm |
| Velocità massima | 36 miglia orarie |
| Capacità di arrampicata | Fino a 23° |
| Batteria | 48V 17.5Ah Lithium-ion (Removable) |
| Campo da equitazione | 25-85 miglia per carica |
| Tempo di ricarica | 4-6 ore |
| Grado di impermeabilità | Grado di protezione IP65 |
| Dimensioni della ruota | Pneumatici larghi da 26" x 4.0" |
| Materiale del telaio | Alluminio |
| Tipo di sospensione | Dual (Lockable Front Fork & Rear Shock Absorber) |
| Stile del freno | 180mm Mechanical Disc Brakes (Front & Rear) |
| Numero di velocità | Deragliatore a 7 velocità |
| Display | Smart LCD Display (Speed, Distance, Battery, Mode) |
| Caratteristiche speciali | USB Charging Port, Step-Thru Frame, Adjustable Comfort Saddle |
| Altezza consigliata del ciclista | 5'5" – 7'2" (165 cm minimum) |
| Peso massimo raccomandato | 450 libbre |
| Peso della bici elettrica | 88 libbre |
9. Garanzia e supporto
9.1 Informazioni sulla garanzia
The Aipas M1 Pro Electric Bike comes with a Garanzia limitata di 1 anno. Please refer to the warranty card included with your purchase or contact customer support for detailed terms and conditions.
9.2 Assistenza clienti
For any questions, technical assistance, or warranty claims, please contact Aipas Customer Service:
- Centro di assistenza clienti: 1(844) 777-0681 (Mon-Fri, 9:00 am - 5:30 pm PST)
- Supporto via e-mail: service@aipasbike.com (Responses within 24 hours)