
Introduzione
This manual provides essential information for the safe and efficient operation of your Vissani 5,000 BTU (DOE) 115-Volt Portable Air Conditioner Unit. Please read all instructions carefully before installation and use, and retain this manual for future reference.
Informazioni sulla sicurezza
AVVERTIMENTO: To reduce the risk of fire, electrical shock, or injury, observe the following safety precautions:
- Always use a grounded 3-prong outlet. Do not remove the grounding prong.
- Non utilizzare l'unità con un cavo di alimentazione o una spina danneggiati.
- Assicurarsi che l'unità sia posizionata su una superficie piana e stabile per evitare che si ribalti.
- Keep at least 20 inches (50 cm) clearance from walls and other objects for proper airflow.
- Non ostruire le prese d'aria o le uscite.
- Scollegare l'unità prima della pulizia o della manutenzione.
- Non utilizzare in ambienti umidi come bagni o lavanderie.
Prodotto finitoview
The Vissani Portable Air Conditioner is designed to provide cooling, dehumidification, and air circulation for rooms up to 150 sq. ft.
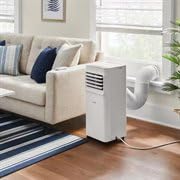
Image: The Vissani portable air conditioner unit positioned in a living room, connected to a window with its exhaust hose.
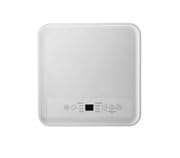
Immagine: dall'alto verso il basso view of the portable air conditioner's control panel, showing various buttons and a digital display.

Image: A graphic illustrating the 3-in-1 climate control features: Cool, Dehumidify, and Circulate, with corresponding visual representations.
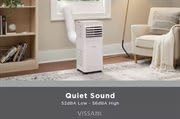
Image: A graphic highlighting the quiet sound operation of the Vissani unit, indicating sound levels of 52dBA Low and 56dBA High.
Impostare
1. Disimballaggio
Carefully remove the unit from its packaging. Inspect for any shipping damage. Keep the original packaging for future storage or if servicing is required.
2. Installazione del kit per finestre
The window kit is designed to fit most standard vertical and horizontal windows. Adjust the window slider panel to the width or height of your window opening. Secure the panel in place.
3. Collegamento del tubo di scarico
Attach the exhaust hose to the unit and then to the window kit adapter. Ensure a tight seal to prevent hot air from re-entering the room.

Immagine: un primo piano view of the white exhaust hose securely connected to the window kit, venting air outside.
4. Drainage Setup
For continuous drainage in Dehumidifier mode, connect the drain hose (not included) to the continuous drain port at the back of the unit and direct it to a floor drain or suitable container.

Immagine: Lato A view of the portable air conditioner, highlighting the rear panel where the drain port and power cord are located.
5. Collegamento elettrico
Plug the power cord into a grounded 115-Volt, 60 Hz electrical outlet. Do not use extension cords.
Istruzioni per l'uso
Pannello di controllo e telecomando
The unit can be operated using the control panel on top of the unit or the included remote control. Ensure the remote control has working batteries.
Modalità operative
- Modalità fredda: Press the MODE button until the COOL indicator lights up. Use the UP/DOWN arrows to set the desired temperature.
- Modalità di deumidificazione: Press the MODE button until the DRY indicator lights up. The fan speed will be set to low automatically.
- Modalità ventola: Press the MODE button until the FAN indicator lights up. Use the FAN SPEED button to select desired fan speed (Low, Medium, High).
Impostazione della temperatura
In Cool mode, the temperature can be set between 61°F (16°C) and 89°F (32°C).
Funzione timer
To set the timer for automatic shut-off or turn-on, press the TIMER button and use the UP/DOWN arrows to select the desired hours (1-24 hours).
Manutenzione
Pulizia del filtro dell'aria
The air filter should be cleaned every two weeks or more frequently depending on usage. A dirty filter reduces efficiency. To clean:
- Scollegare l'unità.
- Rimuovere il filtro dal retro dell'unità.
- Lavare il filtro con acqua calda e sapone. Risciacquare abbondantemente.
- Attendere che il filtro si asciughi completamente all'aria prima di reinstallarlo.
Internal Water Tank Drainage
When the internal water tank is full, the unit will stop operating and display an error code (e.g., 'FL'). To drain:
- Scollegare l'unità.
- Posizionare una teglia o un vassoio poco profondo sotto la porta di scarico nella parte inferiore posteriore dell'unità.
- Rimuovere il tappo di scarico per far defluire l'acqua.
- Richiudere il tappo di scarico quando il serbatoio è vuoto.
Magazzinaggio
Before storing the unit for an extended period, ensure the internal water tank is completely drained. Clean the air filter and store the unit in a dry, upright position.
Risoluzione dei problemi
| Problema | Possibile causa | Soluzione |
|---|---|---|
| L'unità non si accende | Nessuna alimentazione; Cavo di alimentazione non collegato; Interruttore automatico scattato | Check power outlet; Plug in power cord securely; Reset circuit breaker |
| L'unità non raffredda efficacemente | Filtro dell'aria sporco; Stanza troppo grande; Tubo di scarico non installato correttamente; Porte/finestre aperte | Clean air filter; Ensure room size is within specifications; Check exhaust hose connection; Close all doors and windows |
| Perdita d'acqua | Drain plug loose; Unit not level; Internal water tank full (in Dehumidify mode) | Tighten drain plug; Place unit on a level surface; Drain internal water tank |
| Error Code 'FL' | Internal water tank is full | Svuotare il serbatoio dell'acqua interno |
Specifiche
- Numero modello: VAP05R1AWTFR
- Capacità di raffreddamento: 5,000 BTU (DOE)
- Voltage: 115 Volt
- Frequenza: Frequenza 60 Hz
- Area di copertura: Fino a 150 mq.
- Funzioni: Condizionatore d'aria, deumidificatore, ventilatore
- Colore: Bianco
- Codice UPC: 840296508244
Garanzia e supporto
For warranty information or technical support, please refer to the warranty card included with your product or contact Vissani customer service. Keep your purchase receipt as proof of purchase.


