
1. Introduzione
Thank you for choosing the LONTEK L10 Treadmill. This manual provides essential information for the safe assembly, operation, and maintenance of your new fitness equipment. Please read this manual thoroughly before using the treadmill and retain it for future reference.
2. Informazioni importanti sulla sicurezza
Per garantire la tua sicurezza e prolungare la durata del tuo tapis roulant, osserva le seguenti precauzioni:
- Capacità di peso: Non superare il peso massimo dell'utente di 400 libbre (181 kg).
- Liquidazione: Mantenere una distanza minima di 2 metri (6.5 piedi) dietro il tapis roulant e di 0.6 metri (2 piedi) su ciascun lato.
- Bambini e animali domestici: Tenere i bambini e gli animali domestici lontani dal tapis roulant durante il funzionamento.
- Cavo di alimentazione: Ensure the power cord is not pinched or damaged. Do not place the treadmill on the power cord.
- Arresto di emergenza: Always attach the safety key to your clothing before starting the treadmill. In case of an emergency, the safety key will immediately stop the machine.
- Condizioni mediche: Consultare un medico prima di iniziare qualsiasi programma di esercizi, soprattutto se si hanno patologie preesistenti.
- Superficie stabile: Posizionare il tapis roulant su una superficie piana e stabile.
3. Contenuto della confezione
Disimballare con attenzione la scatola e assicurarsi che siano presenti tutti gli articoli:
- LONTEK L10 Treadmill Main Unit (90% pre-assembled)
- Chiave di sicurezza
- Allen Wrench (5#)
- Chiave a croce
- Screws and Washers (various sizes)
- Porta borraccia
- Manuale d'uso

Image: Treadmill components and tools, highlighting the 90% pre-assembled state.
4. Istruzioni di montaggio
Your LONTEK L10 Treadmill comes 90% pre-assembled. Follow these steps to complete the setup:
4.1 Attaching the Display to Columns
- Use a 5# Allen wrench (#10) to lock the display to the columns with screw M8*20 (#62) and washer (#48).
Video: Step-by-step guide on how to install the treadmill's display and columns.
4.2 Securing the Columns to the Base
- Use a 5# Allen wrench (#10) to lock the left and right columns to the base of the treadmill with screw (#62), screw (#67), and washer (#48).
4.3 Attaching Bottom Covers
- Use a cross wrench (#11) to lock the left and right bottom cover (#77 & #78) to the columns with screw (#60).
4.4 Installing the Water Bottle Holder
- Use a cross wrench (#11) to lock the water bottle holder (79) to the right column with screw (#60).
4.5 Securing Moving Wheels
- Fold the running deck up, and then use a 5# Allen wrench (#10) to secure the moving wheel (22) to the treadmill's main frame with screws (#62) and washers (#46) and (#48).
4.6 Placing the Safety Lock
- Place the red safety lock (#37 circular magnet) in the yellow position on the treadmill's display.
5. Istruzioni per l'uso
5.1 Accensione/Spegnimento
- Collegare il cavo di alimentazione a una presa con messa a terra.
- Portare l'interruttore di alimentazione principale (solitamente situato vicino all'ingresso del cavo di alimentazione) in posizione "ON".
- Per spegnere, portare l'interruttore principale su "OFF" e scollegare l'unità.
5.2 Utilizzo del display e dei controlli
The treadmill features an LED touchscreen and handlebar controls for easy operation.
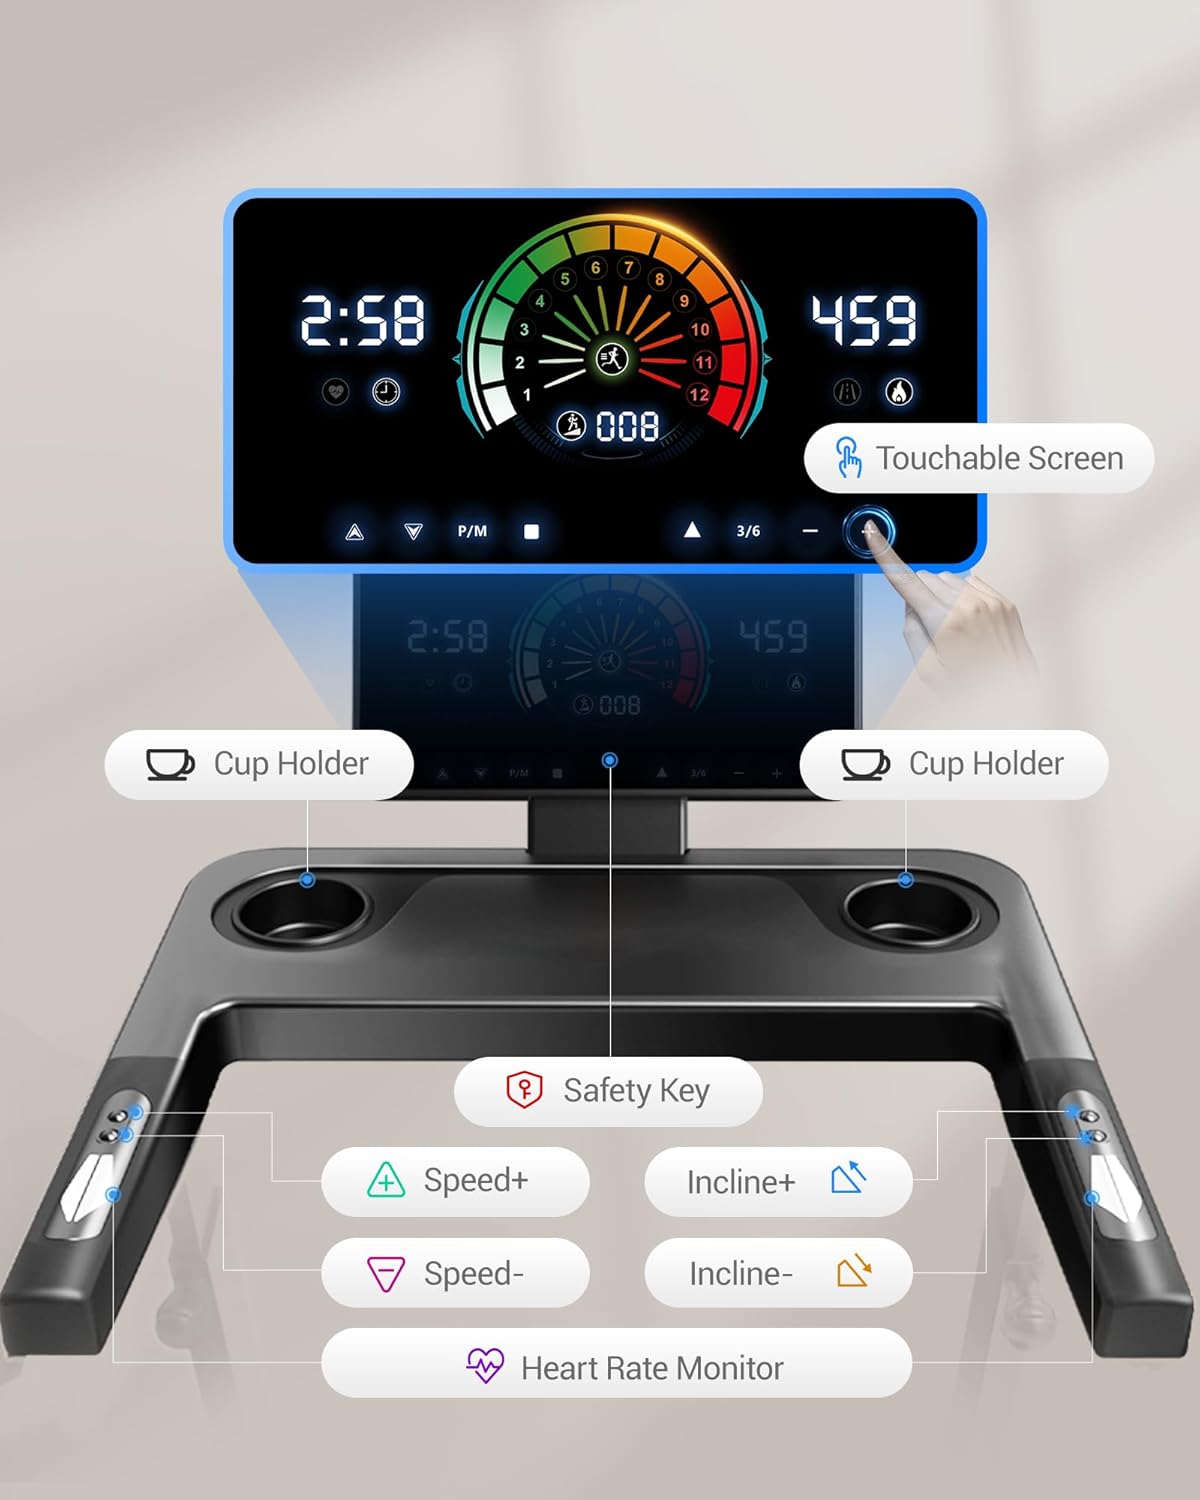
Image: LED touchscreen and handlebar controls with cup holders and safety key slot.
- Avvio/Arresto: Press the 'Start' button on the touchscreen or handlebar to begin/end your workout.
- Regolazione della velocità: Use the 'Speed+' and 'Speed-' buttons on the touchscreen or handlebars to adjust the speed from 0.6 to 8.7 MPH.
- Inclinazione automatica: Use the 'Incline+' and 'Incline-' buttons to adjust the auto incline from 2% to 20% (20 levels).
- Programmi preimpostati: Select from 20 preset programs designed for various workouts like walking, jogging, and HIIT.
- Cardiofrequenzimetro: Grip the heart rate sensors on the handlebars to monitor your heart rate in real-time.
- Chiave di sicurezza: The treadmill will not operate without the safety key properly placed on the display. Pulling the safety key will immediately stop the treadmill.

Immagine: dettagliata view of the LED touchscreen controls.

Image: Real-time data tracking on the treadmill display.
5.3 Adjustable Handle Height
The handlebar height can be adjusted to 3 levels for user comfort. Loosen both knobs, pull the handle to snap into place at the desired height, then tighten. Adjust each side separately.

Image: Adjustable handle height feature for various users.
5.4 Piegatura e stoccaggio
The treadmill features a space-saving foldable design for convenient storage under a sofa, bed, or in a closet.

Image: Fully folded treadmill with dimensions, quick folding, and easy movement.
Video: Demonstration of the foldable design and auto incline feature.
6. Manutenzione
Una manutenzione regolare garantisce prestazioni ottimali e longevità del tuo tapis roulant.
- Pulizia: Pulisci il tapis roulant con un pannoamp Dopo ogni utilizzo, rimuovere il sudore e la polvere con un panno. Non utilizzare detergenti abrasivi.
- Lubrificazione della cinghia: Refer to the separate maintenance video or contact support for instructions on lubricating the running belt. Proper lubrication is crucial for smooth operation.
- Tensione e allineamento della cinghia: Periodically check the running belt for proper tension and alignment. Adjust as needed according to the maintenance guidelines.
- Ispezione: Controllare regolarmente tutte le viti e i bulloni per assicurarsi che siano ben serrati.
7. Risoluzione Dei Problemi
If you encounter any issues with your LONTEK L10 Treadmill, refer to the following common problems and solutions:
| Problema | Possibile causa | Soluzione |
|---|---|---|
| Il tapis roulant non si accende | Cavo di alimentazione non collegato, interruttore principale spento, interruttore automatico scattato. | Ensure power cord is securely plugged in, main switch is ON, and check your household circuit breaker. |
| Il nastro trasportatore si ferma inaspettatamente | Chiave di sicurezza dislocata. | Ensure the safety key is properly placed on the display. |
| La cintura da corsa scivola o esita | Belt too loose, lack of lubrication. | Adjust belt tension (refer to maintenance section) or lubricate the belt. |
| Rumori insoliti durante il funzionamento | Loose components, worn parts. | Inspect for loose screws or bolts and tighten. If noise persists, contact customer support. |
For further assistance, please contact our dedicated support team.
8. Specifiche
- Nome modello: L10-LONTEK
- Motore: Motore brushless silenzioso da 3.5 HP
- Gamma di velocità: 0.6 - 8.7 MPH
- Inclinazione automatica: 2% - 20% (20 levels)
- Area di corsa: 42.5" x 16.2" (108 cm x 41.1 cm)
- Peso massimo dell'utente: 400 libbre (181 kg)
- Dimensioni del prodotto (aperto): 52"P x 26"L x 45.5"A (132 cm x 66 cm x 115.6 cm)
- Dimensioni piegate: 50" x 25" x 6.5" (127 cm x 63.5 cm x 16.5 cm)
- Peso dell'articolo: 87 libbre (39.5 kg)
- Materiale: Acrilonitrile Butadiene Stirene (ABS)
- Caratteristiche speciali: Adjustable Speed, Auto Incline, Foldable, Integrated Heart Rate Sensor, LCD Touchscreen, Transport Wheels, Shock Absorption System (6 silicone shock absorbers, 7-layer deck).
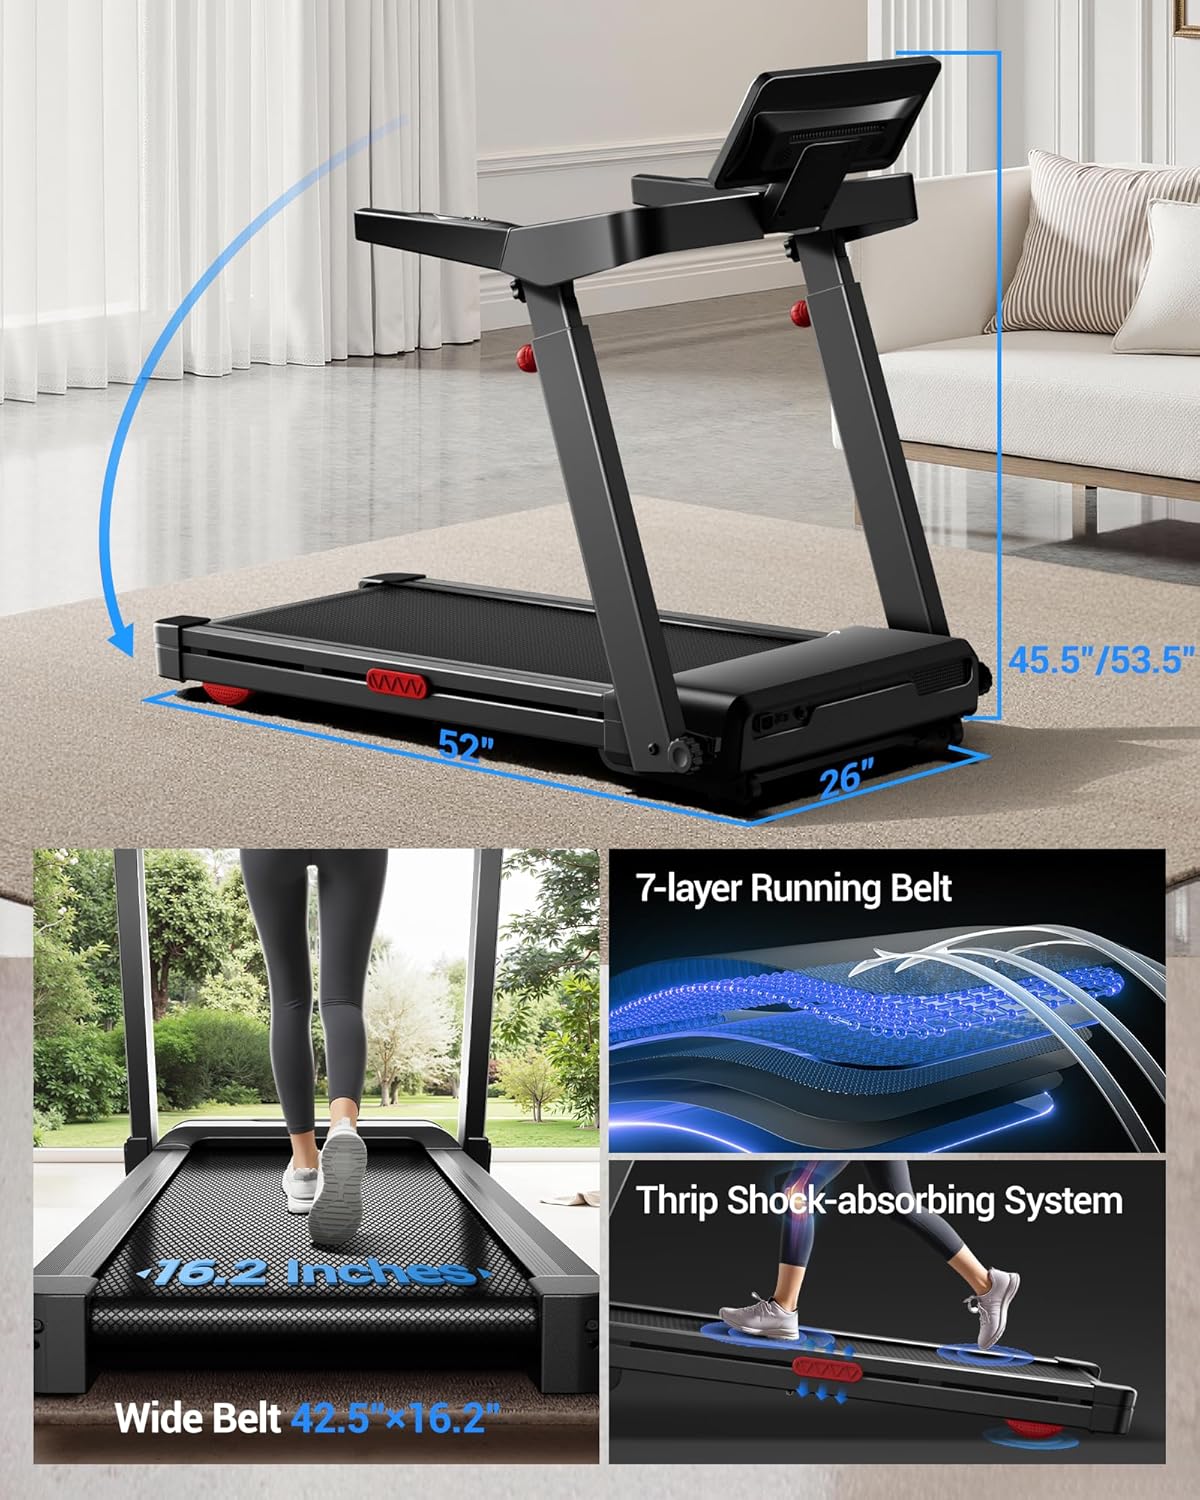
Image: Treadmill dimensions and running belt features.

Image: Treadmill in use, emphasizing motor power, weight capacity, and quiet operation.
9. Garanzia e supporto
The LONTEK L10 Treadmill comes with a Garanzia di 1 anno.
For any questions, concerns, or assistance with maintenance, please contact our dedicated support team. We are committed to providing comprehensive help and satisfaction solutions.