
1. Informazioni importanti sulla sicurezza
Please read this entire manual carefully before operating the VEVOR Belt Grinder Sander. Failure to follow these instructions may result in serious injury or property damage. Keep this manual for future reference.
- Indossare dispositivi di protezione individuale (DPI): Always wear safety glasses or a face shield, hearing protection, and appropriate gloves when operating the grinder.
- Sicurezza dell'area di lavoro: Ensure your work area is clean, well-lit, and free from obstructions. Keep children and bystanders away from the operating machine.
- Sicurezza elettrica: Collegare il macinacaffè a una presa di corrente con messa a terra. Non utilizzare in ambienti umidi. Controllare che il cavo di alimentazione non sia danneggiato prima di ogni utilizzo.
- Pezzo sicuro: Always secure the workpiece firmly to prevent kickback or loss of control.
- Evita di esagerare: Mantieni sempre una posizione e un equilibrio adeguati.
- Scollegare quando non in uso: Disconnect the power supply before changing accessories, performing maintenance, or when the machine is unattended.

Image: VEVOR Belt Grinder Sander with included accessories and user manual.
2. Prodotto finitoview
The VEVOR Belt Grinder Sander JLD10-8 is a versatile tool designed for metalworking, knife making, and woodworking tasks. It features a powerful motor and variable speed control for precise grinding and polishing.
Caratteristiche principali:
- Potente motore brushless da 550 W: Delivers strong output with a belt line speed of up to 21 m/s for efficient material removal.
- Variable Speed Control (VFD): Stepless speed adjustment from 200-5000 RPM for high-speed grinding or low-speed precision polishing.
- Two Grinding Modes: Supports circular and flat grinding for enhanced flexibility.
- Rotazione bidirezionale: Forward and reverse rotation control for greater grinding flexibility and material positioning.
- Versatile Sanding Belts: Includes three 30 x 1 inch sanding belts (100/180/240 grit) for various stages of grinding and polishing.

Image: The belt grinder sander in operation, demonstrating fast grinding and smooth control with sparks from metalworking.
Componenti inclusi:
- 1 x Belt Grinder Sander Unit
- 1 x Circular Grinding Wheel + Support Rod
- 1 x Controller (VFD)
- 1 x Flat Grinding Wheel and Bracket Assembly
- 1 x Guard Cover
- 1 chiave esagonale M6
- 1 x Manuale utente (PDF) (Download PDF)
- 2 x Workbenches (Large & Small)
- 3 x Sanding Belts (100/180/240 Grit)
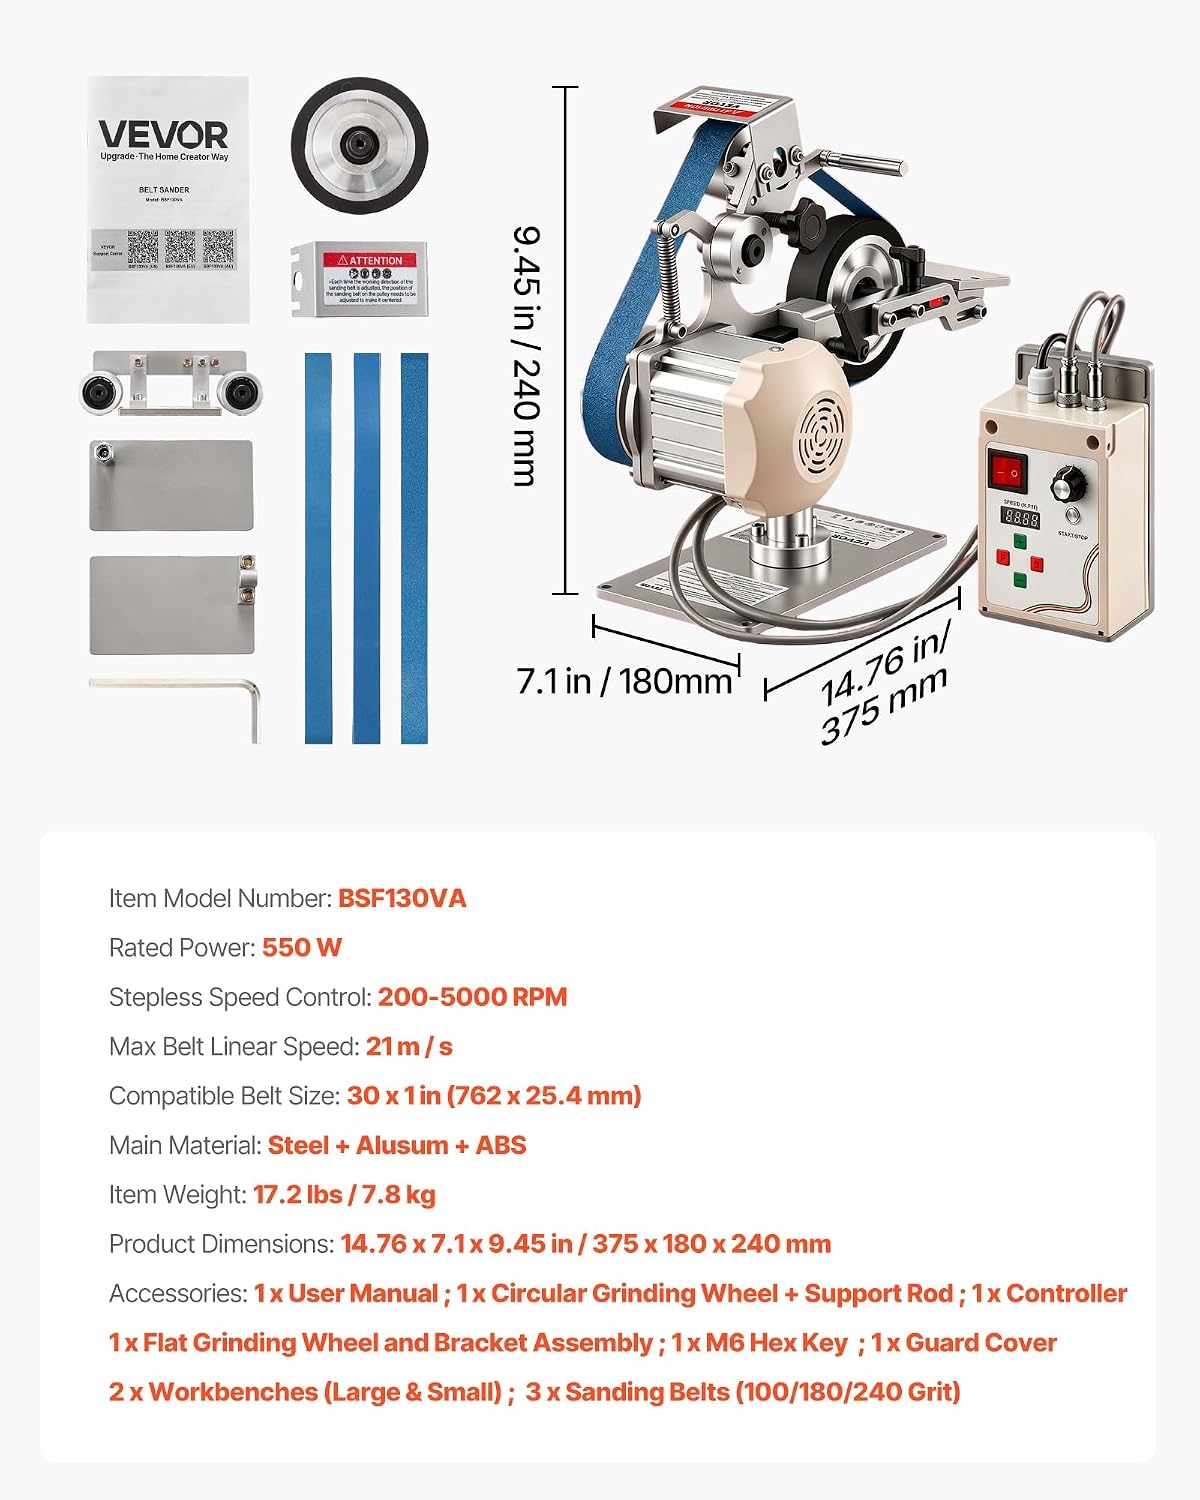
Image: Diagram illustrating the product dimensions and a visual list of included components.
3. Impostazione
Follow these steps to set up your VEVOR Belt Grinder Sander for operation.
3.1 Disimballaggio e ispezione
- Rimuovere con attenzione tutti i componenti dalla confezione.
- Inspect all parts for any signs of damage during shipping. Contact customer support if any damage is found.
- Verify that all included components listed in Section 2 are present.
3.2 Montaggio
- Place the heavy-duty steel base on a stable and level workbench.
- Attach the main grinder unit to the base, ensuring it is securely fastened.
- Connect the controller unit to the main grinder unit using the provided cables. Ensure connections are firm.
- Install the desired workbench (large or small) onto the grinder. The workbenches are removable for different grinding needs.
- Attach the guard cover for safety.

Immagine: dettagliata view of the grinder's design features, including the robust base, removable workbench, and adjustment points.
3.3 Installing a Sanding Belt
- Assicurarsi che il macinacaffè sia scollegato dalla fonte di alimentazione.
- Loosen the belt tensioning mechanism (refer to the diagram in the user manual for exact location).
- Slide the desired 30 x 1 inch sanding belt over the drive wheel and idler wheels.
- Stringere il meccanismo di tensionamento della cinghia finché la cinghia non è tesa ma non eccessivamente allungata.
- Adjust the belt tracking knob to center the belt on the wheels. This may require minor adjustments during initial operation.
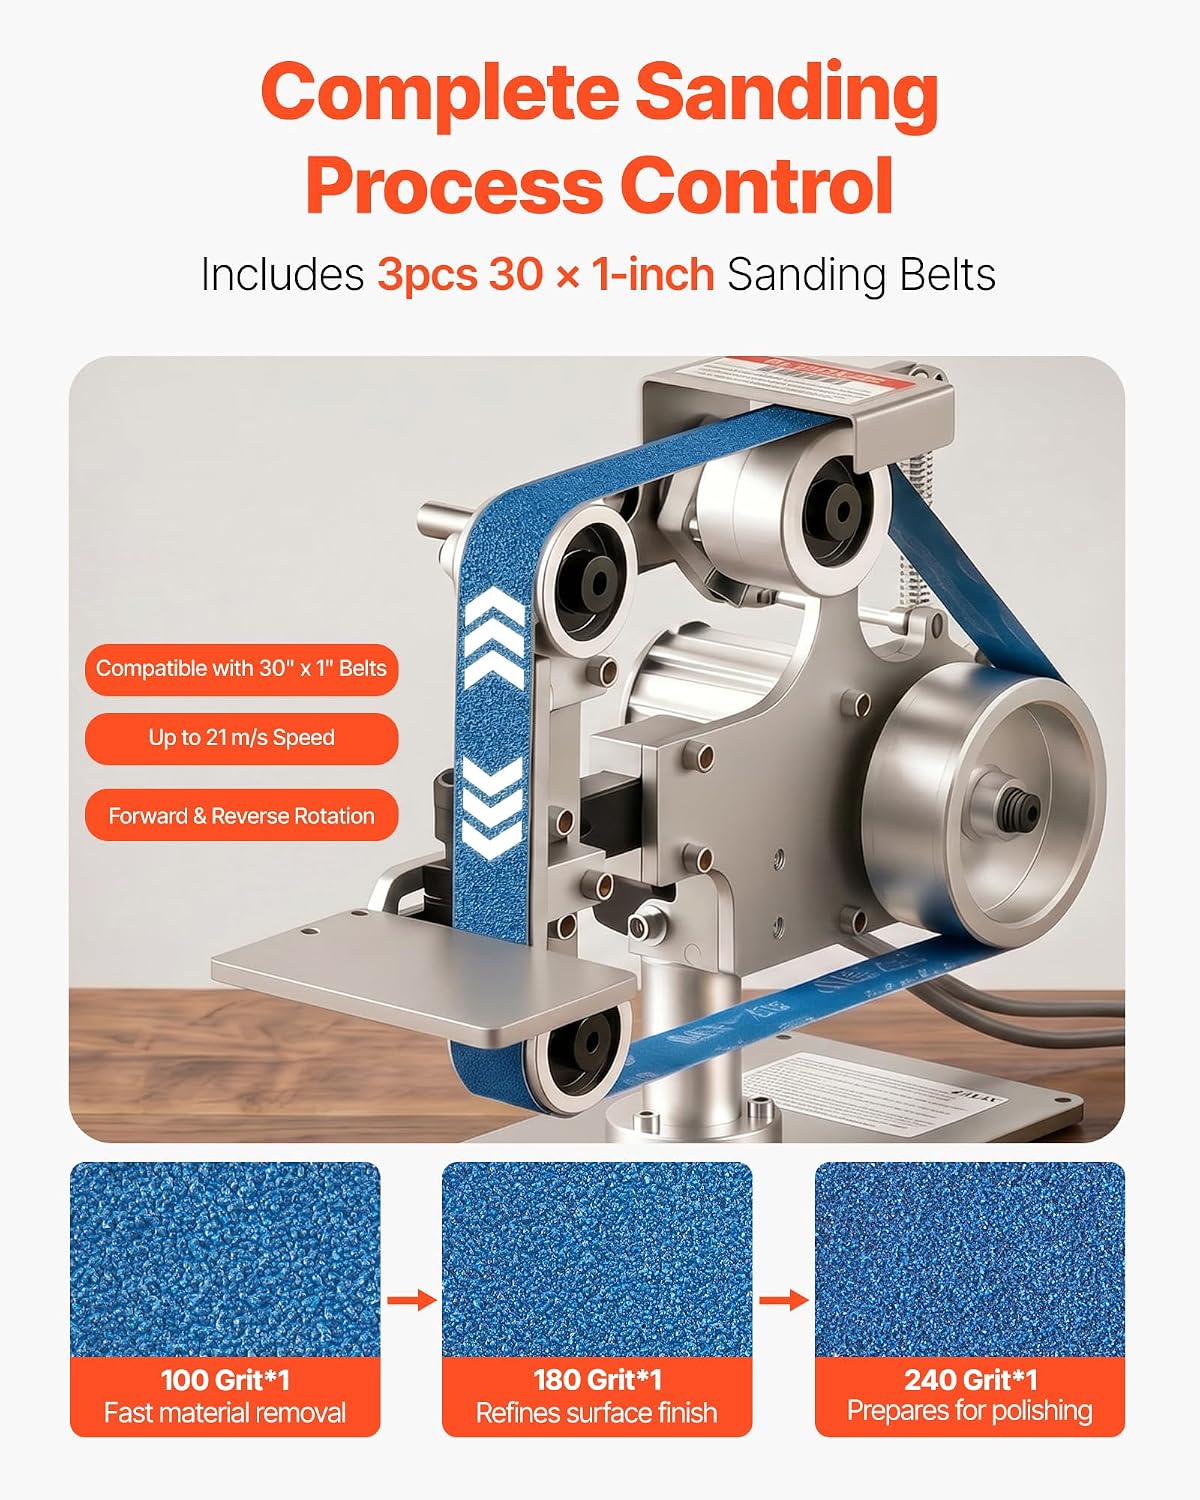
Image: The belt grinder with an installed belt, alongside examples of the 100, 180, and 240 grit sanding belts.
4. Istruzioni per l'uso
Familiarize yourself with the controls before beginning any grinding or sanding tasks.
4.1 Pannello di controllo Sopraview

Image: The control panel, highlighting the power switch, speed knob, start/stop button, and RPM display.
- Interruttore di alimentazione: Attiva/disattiva l'alimentazione principale dell'unità.
- Manopola di velocità: Adjusts the rotational speed of the belt from 200 to 5000 RPM. Turn clockwise for higher speed, counter-clockwise for lower speed.
- Pulsante di avvio/arresto: Initiates or halts the belt movement.
- Visualizzazione del numero di giri: Shows the current rotational speed.
- Controllo avanti/indietro: Press and hold the 'S' button on the controller to switch between forward and reverse rotation.
4.2 Funzionamento di base
- Assicurarsi che l'interruttore di alimentazione sia in posizione "OFF" prima di collegare l'unità a una presa di corrente da 110 V con messa a terra.
- Turn the power switch to 'ON'. The RPM display will illuminate.
- Adjust the speed knob to your desired RPM. Start with a lower speed for initial adjustments or fine work, and increase for faster material removal.
- Press the 'Start/Stop' button to begin belt movement. Observe the belt tracking and adjust with the belt tracking knob if necessary to keep the belt centered.
- Carefully bring your workpiece into contact with the moving belt. Apply even, controlled pressure.
- To stop operation, press the 'Start/Stop' button, then turn the power switch to 'OFF'. Unplug the unit when finished.
4.3 Grinding Modes and Applications
The grinder supports various configurations for different tasks:
- Rettifica circolare: Use the circular grinding wheel for shaping and contouring.
- Rettifica piana: Utilize the flat grinding platen for achieving flat surfaces and precise angles.
- Vertical and Horizontal Use: The grinder can be adjusted to operate in both vertical and horizontal orientations to accommodate different workpiece sizes and grinding angles.

Immagine: Examples of the grinder configured for circular, flat, and horizontal grinding tasks.
This machine is suitable for working with various materials including steel, aluminum, copper, hardwood, laminate wood, and softwood.
5. Manutenzione
Regular maintenance ensures the longevity and optimal performance of your belt grinder sander.
5.1 Pulizia
- Scollegare sempre la macchina prima della pulizia.
- Use a brush or compressed air to remove dust and debris from the motor vents, belt area, and workbenches.
- Wipe down exterior surfaces with a clean, dry cloth. Do not use solvents that may damage plastic components.
5.2 Sostituzione della cinghia
Replace sanding belts when they become worn or clogged. Refer to Section 3.3 for detailed belt installation instructions.
5.3 Ispezione generale
- Periodically check all fasteners and bolts for tightness. Tighten as needed.
- Inspect the power cord for cuts, fraying, or other damage. Replace immediately if damaged.
- Ensure all moving parts operate smoothly. Lubricate pivot points if necessary, using a light machine oil.
6. Risoluzione Dei Problemi
Questa sezione affronta i problemi più comuni che potresti riscontrare. Per problemi non elencati qui, contatta l'assistenza clienti VEVOR.
| Problema | Possibile causa | Soluzione |
|---|---|---|
| Il macinino non si avvia | Nessuna alimentazione Spegnimento Cavo di alimentazione difettoso | Controllare la presa di corrente e l'interruttore automatico Assicurarsi che l'interruttore di alimentazione sia acceso Inspect and replace power cord if damaged |
| Belt slips or runs off track | Tensione della cinghia troppo lenta Belt tracking not adjusted Cintura usurata | Adjust belt tensioning mechanism Adjust belt tracking knob Replace with a new sanding belt |
| Vibrazione o rumore eccessivi | Componenti sciolti Pezzo non bilanciato Cuscinetti usurati | Controllare e serrare tutti i dispositivi di fissaggio Ensure workpiece is securely held Contatta l'assistenza clienti per ricevere assistenza |
| Velocità incoerente | Problema del controllore Sovraccarico del motore | Garantire il corretto volumetage fornitura Ridurre la pressione sul pezzo in lavorazione Contatta il supporto clienti |
7. Specifiche
Technical specifications for the VEVOR Belt Grinder Sander JLD10-8.
| Specificazione | Valore |
|---|---|
| Numero di modello | Modello JLD10-8 |
| Potenza nominale | 550 L |
| Voltage | 110 volt |
| Ampera capacità | 5 A |
| Controllo della velocità continuo | 200-5000 giri/min |
| Max Belt Linear Speed | 21 metri al secondo |
| Compatible Belt Size | 30 x 1 pollici (762 x 25.4 mm) |
| Materiale principale | Steel + Aluminum + ABS |
| Peso dell'articolo | 17.2 libbre / 7.8 kg |
| Dimensioni del prodotto (L x P x A) | 14.76" x 7.1" x 9.45" (375 x 180 x 240 mm) |
8. Garanzia e supporto
Per informazioni sulla garanzia, la registrazione del prodotto o l'assistenza tecnica, fare riferimento al sito ufficiale VEVOR website or contact VEVOR customer service directly. Details can typically be found in the included user manual PDF or on the manufacturer's product page.
VEVOR Ufficiale Websito: www.vevor.com