1. Introduzione
The VEVOR Pocket Hole Jig System M4 is a professional-grade woodworking tool designed for creating strong, accurate, and concealed joints in various wood types. This system is ideal for both portable and benchtop applications, making it suitable for novices, hobbyists, and professionals in cabinetry, furniture construction, and other joinery projects.
This manual provides detailed instructions for the safe and effective use, setup, operation, and maintenance of your pocket hole jig system.
2. Informazioni sulla sicurezza
Always observe basic safety precautions when using power tools and woodworking equipment to reduce the risk of personal injury. Read and understand all instructions before operating the jig.
- Indossare adeguati dispositivi di protezione individuale (DPI), tra cui occhiali di sicurezza, protezioni acustiche e guanti.
- Assicuratevi che l'area di lavoro sia pulita, ben illuminata e libera da ostacoli.
- Tenere i bambini e gli astanti lontani dall'area di lavoro.
- Secure the workpiece firmly before drilling to prevent movement.
- Use sharp drill bits and ensure they are correctly installed.
- Scollegare gli utensili elettrici dalla fonte di alimentazione prima di effettuare qualsiasi regolazione o sostituire gli accessori.
- Do not operate the jig if any parts are damaged or missing.
- Always follow the manufacturer's instructions for any power tools used in conjunction with this jig.
3. Contenuto della confezione
Verifica che tutti gli articoli elencati di seguito siano inclusi nel tuo pacchetto:
- 1 x Pocket Hole Jig
- 1 x Dust Spout Connector
- 1 x Drill Bits (Stepped Drill Bit)
- 1 x Stop Collar
- 30 viti M4
- 10 x Pocket Hole Plugs
- 1 chiave esagonale

4. Specifiche
| Caratteristica | Specificazione |
|---|---|
| Nome del marchio | VEVOR |
| Numero di modello | Pocket Hole Jig System M4 |
| Forniture fai da te | Lavorazione del legno |
| Materiale | Lega di alluminio anodizzato |
| Tipo | Other (Pocket Hole Jig) |
| Utilizzo | Perforazione del legno |
| Unità di scala | Metric & Imperial |
| Numero di fori di perforazione | 2 |
| Numero di fori per la rimozione dei trucioli | 2 |
| Colore | Blu |
| Dimensioni articolo (L x P x A) | 11.6 x 2.4 x 3.7 pollici / 295 x 60 x 95 mm |
| Peso netto | 5.3 libbre / 2.4 kg |
| Certificazione | CE |

5. Impostazione
Before operating the VEVOR Pocket Hole Jig System M4, ensure it is properly set up for your specific woodworking task.
- Preparare il pezzo da lavorare: Ensure your wood piece is clean, stable, and securely positioned on a workbench.
- Attach Dust Spout Connector: If desired, attach the dust spout connector to the jig to facilitate dust collection during drilling.
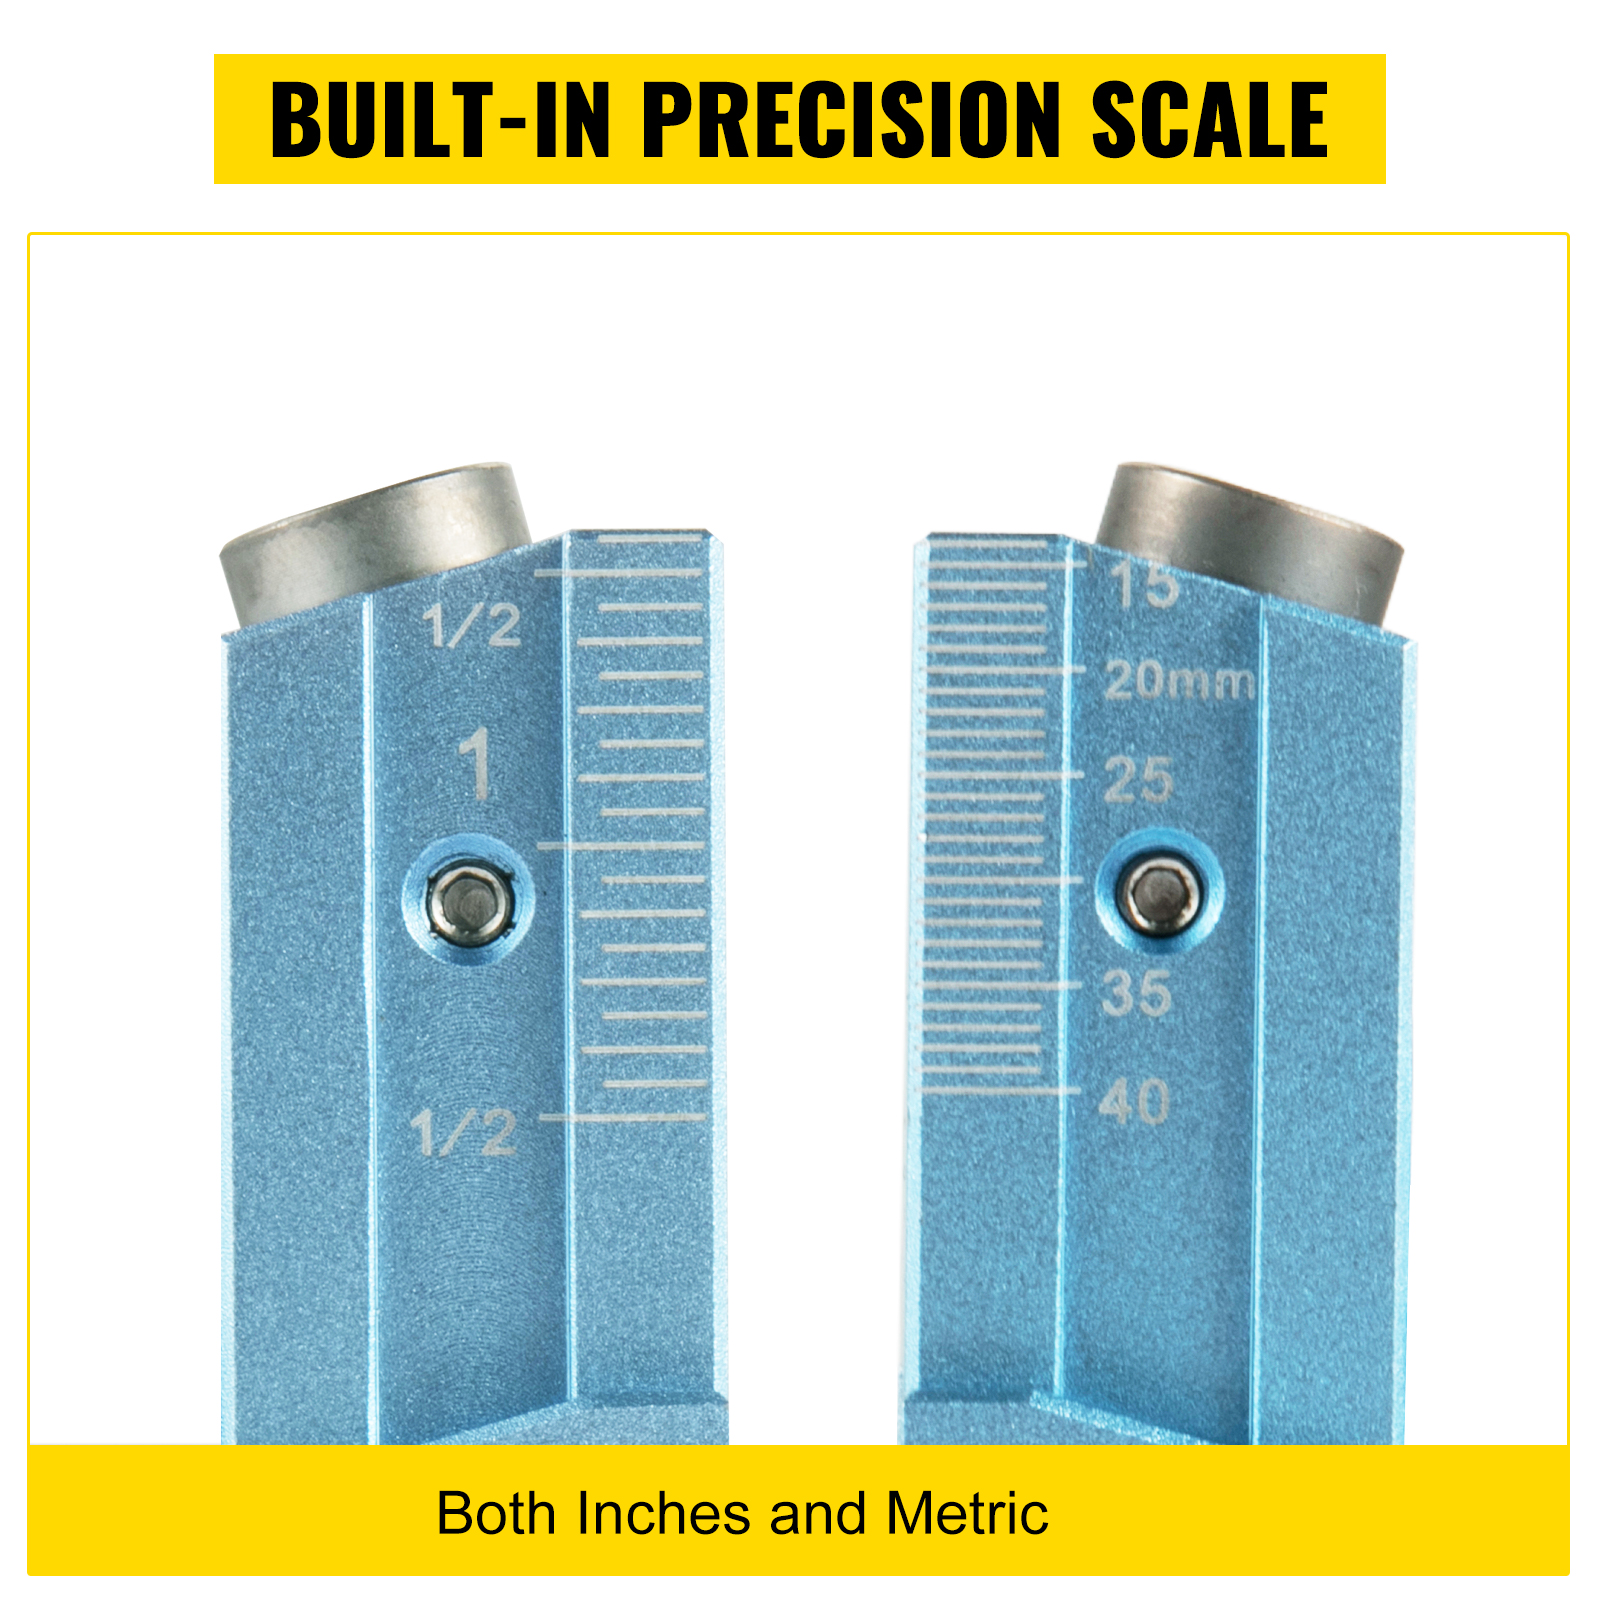
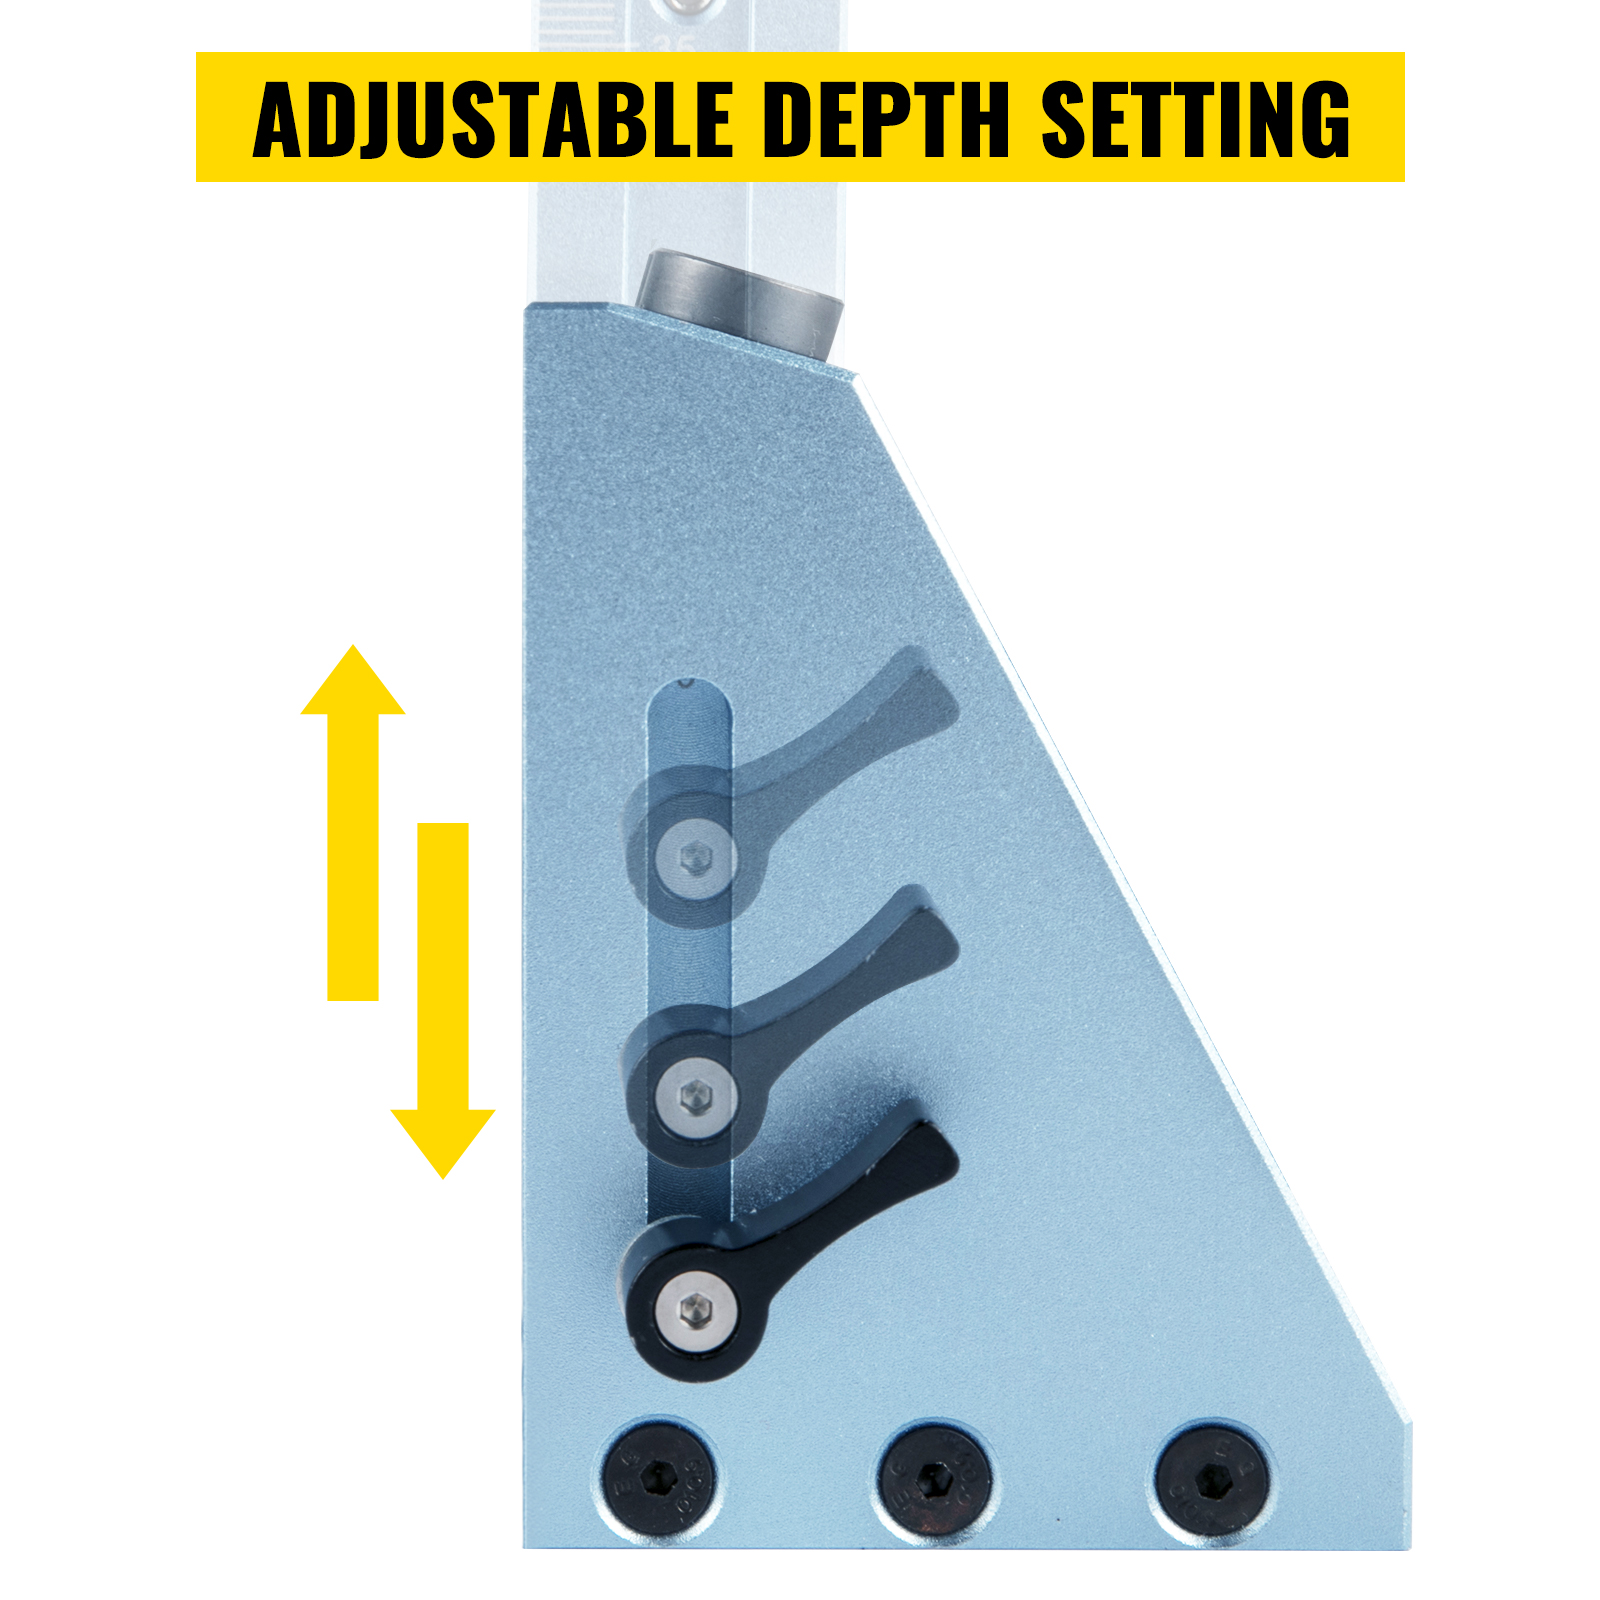
- Install Drill Bit and Stop Collar: Insert the stepped drill bit into your drill. Slide the stop collar onto the drill bit and secure it at the desired depth. The jig's built-in precision scale (Image 3) and adjustable depth setting (Image 4) will guide you in determining the correct depth based on your workpiece thickness.
6. Istruzioni per l'uso
Follow these steps for effortless and accurate pocket hole drilling:
- Measure Workpiece Thickness: Use a measuring tool to accurately determine the thickness of the wood piece you intend to join.
- Set Drill Hole Thickness: Adjust the slider on the jig according to the measured workpiece thickness. Loosen the thumbscrews, move the slider to the correct marking (metric or imperial), and re-tighten the thumbscrews.
- Regola la posizione dell'apparecchio: Position the jig on your workpiece. The jig features a quick fixture clamp to hold the wood securely.
- Fasten Workpiece and Drill: Engage the quick fixture clamp to firmly hold the workpiece against the jig. Ensure the jig is stable. Begin drilling through the guide holes with your power drill, maintaining a steady speed. The two clearance holes (Image 5) will help remove wood chips during drilling.
- Stringere le viti: Once the pocket holes are drilled, align the two wood pieces to be joined. Insert M4 screws into the pocket holes and tighten them with ease using a suitable driver.
- Achieve Tight Junctions: The result will be tight, strong junctions without visible screw holes or burrs. For a cleaner finish, use pocket hole plugs to conceal the holes.


7. Manutenzione
Proper maintenance ensures the longevity and continued accuracy of your VEVOR Pocket Hole Jig System M4.
- Pulizia: After each use, clean the jig to remove sawdust and debris. Use a brush or compressed air to clear the drill guide holes and chip removal holes.
- Lubrificazione: Periodically apply a light coat of machine oil to moving parts, such as the clamp mechanism and slider, to ensure smooth operation.
- Ispezione: Regularly inspect the jig for any signs of wear or damage, especially the hardened steel drilling sleeves and the clamp. Replace any worn or damaged parts immediately.
- Magazzinaggio: Store the jig and its accessories in a dry, clean environment to prevent rust and damage.
8. Risoluzione Dei Problemi
Ecco alcuni problemi comuni e le relative soluzioni:
- Fori imprecisi:
- Ensure the workpiece thickness is accurately measured and the jig's slider is set correctly.
- Verify the workpiece is clamped firmly and does not move during drilling.
- Check if the drill bit is sharp and properly installed. - Wood Splintering/Splitting:
- Use a sharp drill bit.
- Ensure the drill speed is appropriate for the wood type.
- Adjust the drill depth setting to avoid drilling too deep. - Difficoltà ClampPezzo in lavorazione:
- Check if the workpiece fits within the jig's clampintervallo.
- Ensure the quick fixture mechanism is clean and free of debris. - Excessive Dust Accumulation:
- Ensure the dust spout connector is properly attached and connected to a dust collection system or vacuum.
9. Suggerimenti per l'utente
- For optimal results, always perform a test drill on a scrap piece of the same material before working on your final project.
- When joining thicker materials, consider using longer pocket hole screws for increased joint strength.
- While the jig accommodates a diversified range of thicknesses, always ensure your workpiece fits securely within the clamping mechanism for safe and accurate drilling.
- Keep your drill bits sharp. Dull bits can lead to tear-out and inefficient drilling.
10. Garanzia e supporto
VEVOR products are designed for durability and performance. For any warranty claims, technical support, or service inquiries, please refer to the contact information provided at the point of purchase or visit the official VEVOR websito. Conserva la ricevuta d'acquisto come prova d'acquisto.