1. Introduzione e oltreview
This manual provides essential information for the safe and efficient operation of your Sealey RD2500 Oil Filled Radiator. Please read these instructions carefully before use and retain them for future reference.
The Sealey RD2500 is an oil-filled radiator designed for heating spaces such as offices, homes, showrooms, and workshops. It is manufactured to rigorous standards and incorporates features for user safety and comfort.
Caratteristiche principali:
- Integrated safety tip-over switch for enhanced safety.
- Full thermostatic heat control, automatically adjusting power to maintain a preset temperature.
- Elements designed to maximize heated surface area for efficient heat transfer.
- Equipped with castors for easy mobility.
2. Istruzioni di sicurezza
AVVERTIMENTO: Failure to follow these safety instructions may result in electric shock, fire, or personal injury.
- Always ensure the radiator is placed on a stable, level surface to prevent tipping. The integrated tip-over switch will automatically shut off the unit if it is knocked over.
- Do not cover the radiator. Covering can lead to overheating and fire hazards. Maintain adequate clearance around the unit.
- Keep the radiator away from water or damp environments. Do not operate with wet hands.
- Garantire l'alimentazione voltage matches the rating on the radiator's label (230V).
- Non utilizzare questo radiatore in bagni, lavanderie o luoghi interni simili dove potrebbe entrare in contatto con l'acqua.
- Keep children and pets away from the radiator, especially when it is operating, as surfaces can become hot.
- Do not route the power cord under carpeting or cover it with throw rugs, runners, or similar coverings. Position the cord away from traffic areas where it will not be tripped over.
- Unplug the radiator from the outlet when not in use or before cleaning.
- Non utilizzare il riscaldatore se il cavo o la spina sono danneggiati, se il riscaldatore non funziona correttamente, se è caduto o se è stato danneggiato in qualsiasi modo.
3. Componenti del prodotto
The Sealey RD2500 Oil Filled Radiator consists of the following main components:
- Elementi riscaldanti: 11 alette riempite d'olio per la distribuzione del calore.
- Pannello di controllo: Houses the power switches and thermostat dial.
- Quadrante del termostato: Per regolare la temperatura ambiente desiderata.
- Interruttori di alimentazione: Control the heat output settings (I, II).
- ruote: Wheels for easy movement of the unit.
- Cavo di alimentazione e spina: Per il collegamento a una presa elettrica.
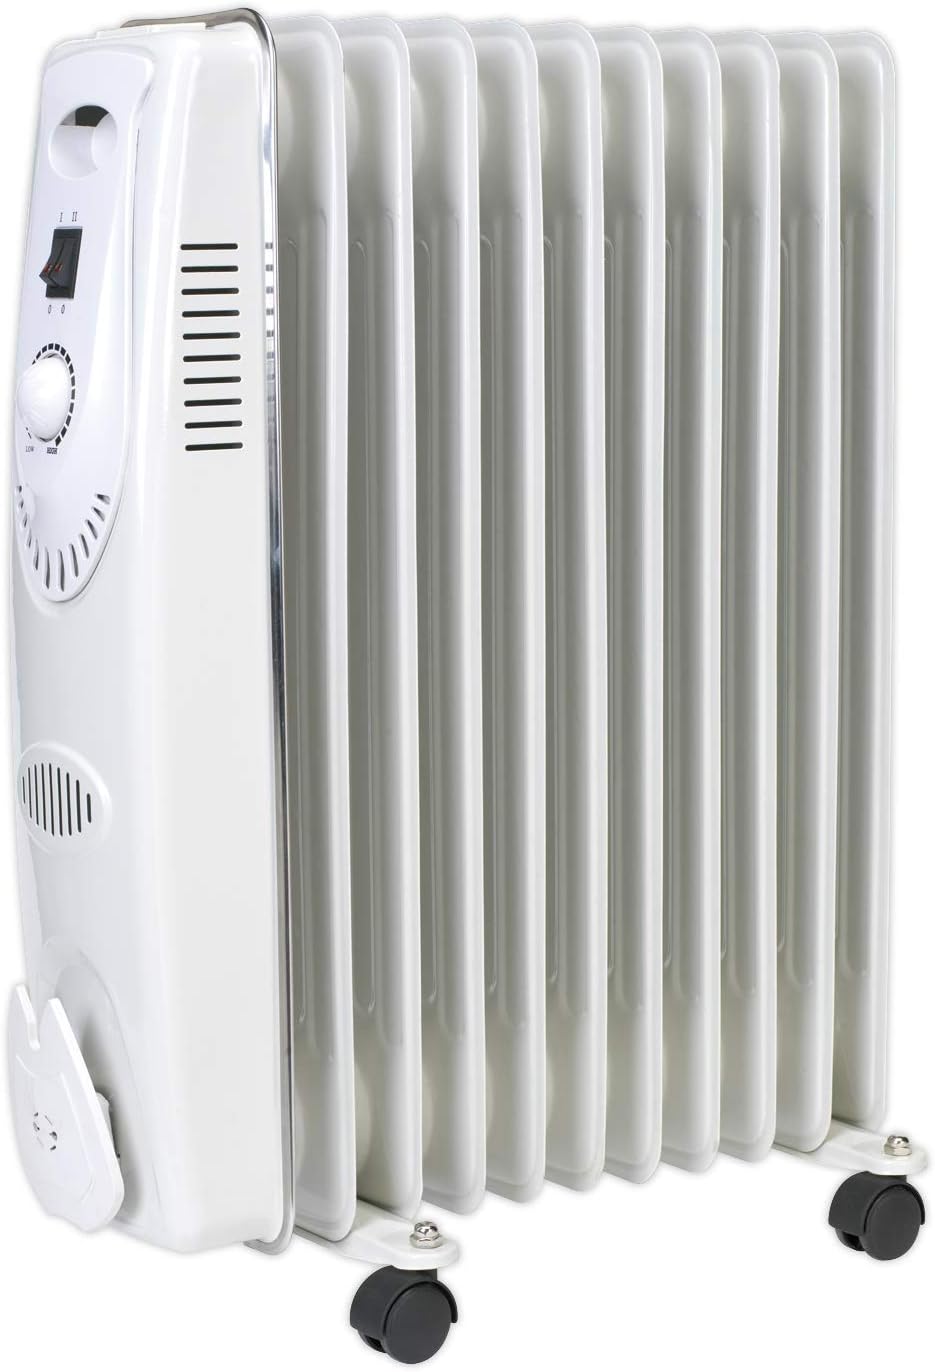
Figura 3.1: Fronte view of the Sealey RD2500 Oil Filled Radiator, showing the heating elements, control panel, and castors.

Figure 3.2: Detail of the power switches (I and II) on the control panel.

Figure 3.3: Detail of the thermostat dial, ranging from LOW to HIGH settings.
4. Installazione e assemblaggio
Follow these steps to prepare your radiator for use:
- Disimballare: Carefully remove the radiator from its packaging. Retain packaging for storage if needed.
- Fissare le rotelle: The radiator is supplied with castors for mobility. Turn the radiator upside down. Attach the castor assemblies to the base of the radiator using the provided screws or clips, ensuring they are securely fastened. Return the radiator to an upright position.
- Posizionamento: Place the radiator on a firm, level surface. Ensure there is at least 50cm (20 inches) clearance from walls, furniture, and curtains to allow for proper heat circulation and prevent fire hazards. Do not place the radiator directly below a power outlet.
- Collegamento elettrico: Ensure the radiator is switched off (all power switches in the '0' position) before plugging it into a suitable 230V electrical outlet.

Figure 4.1: The Sealey RD2500 radiator positioned in a room, demonstrating appropriate clearance from furniture.
5. Istruzioni per l'uso
To operate your Sealey RD2500 Oil Filled Radiator:
- Collegare: Ensure the radiator is securely plugged into a grounded 230V electrical outlet.
- Imposta termostato: Turn the thermostat dial to the maximum ('HIGH') setting. This will allow the radiator to begin heating immediately.
- Select Heat Output: Use the power switches (I and II) to select the desired heat output:
- Switch 'I' ON: Low heat setting.
- Switch 'II' ON: Medium heat setting.
- Both 'I' and 'II' ON: High heat setting (2500W).
- Regola il termostato: Once the room reaches your desired temperature, slowly turn the thermostat dial counter-clockwise until you hear a click. The radiator will now cycle on and off to maintain this temperature. If the room temperature drops, the radiator will automatically turn on. If it rises, it will turn off.
- Spegnimento: To turn off the radiator, switch both power switches (I and II) to the '0' position and then unplug the unit from the wall outlet.
6. Manutenzione
Una manutenzione regolare garantisce la longevità e il funzionamento efficiente del radiatore.
- Pulizia: Scollegare sempre il radiatore e lasciarlo raffreddare completamente prima di pulirlo. Pulire le superfici esterne con un panno morbido e asciutto.amp cloth. Do not use abrasive cleaners, solvents, or harsh chemicals, as these can damage the finish. Ensure no water enters the internal components.
- Magazzinaggio: If storing the radiator for an extended period, ensure it is clean and dry. Coil the power cord neatly. Store the unit in a cool, dry place, preferably in its original packaging, to protect it from dust and damage.
- Ispezione: Periodically inspect the power cord and plug for any signs of damage. If damage is found, do not use the radiator and contact a qualified service technician.
7. Risoluzione Dei Problemi
If you encounter issues with your Sealey RD2500 radiator, refer to the table below:
| Problema | Possibile causa | Soluzione |
|---|---|---|
| Il radiatore non si accende. | Nessuna alimentazione elettrica. Termostato impostato troppo basso. Interruttore antiribaltamento attivato. | Check if plugged in and outlet is working. Turn thermostat to a higher setting. Ensure radiator is upright on a stable surface. |
| Il radiatore non riscalda a sufficienza. | Heat output setting too low. Termostato impostato troppo basso. Room is too large for the heater. | Select a higher heat output (both switches ON). Aumentare la temperatura del termostato. Consider using additional heating or a more powerful unit for larger spaces. |
| Radiator emits unusual noise or smell. | New unit (initial smell). Guasto interno. | A slight odor is normal for new heaters during first use; it should dissipate quickly. If noise or smell persists or is strong, unplug immediately and contact customer support. |
| Radiator repeatedly turns off. | Protezione contro il surriscaldamento attivata. Interruttore antiribaltamento attivato. | Ensure radiator is not covered and has adequate ventilation. Allow to cool before restarting. Ensure radiator is upright on a stable surface. |
If the problem persists after attempting these solutions, please contact Sealey customer support.
8. Specifiche tecniche
Below are the technical specifications for the Sealey RD2500 Oil Filled Radiator:
| Caratteristica | Specificazione |
|---|---|
| Marca | Marea |
| Modello | RD2500 |
| Caratteristica speciale | Riempito d'olio |
| Colore | Bianco |
| Fattore di forma | Piedistallo |
| Uso interno/esterno | Al chiuso |
| Dimensioni del prodotto (P x L x A) | 18.9" x 9.45" x 24.57" |
| Usi consigliati | Home, Office, Workshop |
| Tipo di montaggio | Montaggio a pavimento |
| Tipo di carburante | Elettrico |
| Voltage | 230 Volt |
| Amprabbia | 10.87 Amps |
| Potenza massima in uscita | 2500 Watt |
| Peso dell'articolo | 26.5 libbre |
| Numero di elementi | 11 |

Figure 8.1: The Sealey RD2500 is ErP Compliant, indicating energy efficiency standards.
9. Garanzia e assistenza clienti
Sealey products are manufactured to high standards and are backed by a commitment to quality.

Figure 9.1: Sealey offers a Lifetime Guarantee on certain products. Please refer to Sealey's official websito per termini e condizioni specifici.
For warranty claims, technical assistance, or to purchase replacement parts, please contact Sealey customer support directly. Refer to the official Sealey websito o nella documentazione di acquisto per i dettagli di contatto.


