1. Introduzione
The Sealey SA314 is a heavy-duty air/hydraulic riveter designed for installing blind rivets in various materials, including aluminium, steel, and stainless steel. This tool is trigger-operated and features a hardened steel jaw assembly and a rivet shaft safety cap. It is supplied with five different riveting nozzles and two spanners for maintenance.
This manual provides detailed instructions for the proper setup, operation, maintenance, and troubleshooting of your SA314 riveter to ensure safe and effective use.
2. Informazioni sulla sicurezza
Always observe general workshop safety rules when using power tools. Failure to do so may result in personal injury or damage to the tool.
- Protezione degli occhi: Always wear approved eye protection when operating this tool.
- Protezione dell'udito: Wear appropriate hearing protection during extended use.
- Alimentazione d'aria: Ensure the air supply pressure does not exceed 90 psi (6.2 bar). Disconnect the air supply before changing accessories, servicing, or when the tool is not in use.
- Area di lavoro: Keep the work area clean, tidy, and well-lit. Ensure adequate ventilation.
- Condizione dell'utensile: Do not use the tool if any parts are damaged or missing. Do not modify the tool.
- Rivet Shafts: Be aware of ejected rivet shafts. Ensure the safety cap is in place and clear the collector regularly.
- Gestione: Keep hands and body clear of the riveter head during operation. Do not point the tool at yourself or others.
3. Prodotto finitoview e componenti
The Sealey SA314 riveter is designed for robust performance in demanding applications. Its air/hydraulic mechanism provides strong pulling force for various rivet sizes.

Figura 1: Fronte view of the Sealey SA314 Heavy-Duty Air/Hydraulic Riveter, showing the nozzle, trigger, and main body.
Componenti inclusi:
- Sealey SA314 Air/Hydraulic Riveter
- Five Riveting Nozzles (sizes: 3/32" (2.4mm), 1/8" (3.2mm), 5/32" (4mm), 3/16" (4.8mm), 1/4" (6.4mm))
- Two Spanners for nozzle changes

Figura 2: lato view of the riveter, highlighting the nozzle attachment area and the transparent spent rivet shaft collector.
4. Specifiche
| Produttore | Marea |
| Numero di modello | SA314 |
| Dimensioni del prodotto | Dimensioni: 11 x 19.4 x 30 cm |
| Peso dell'articolo | 1.88 kg |
| Materiale | Acciaio legato |
| Capacità del rivetto | Up to 1/4" (6.4mm) for Aluminium, Steel, Stainless Steel |
| Dimensioni degli ugelli incluse | 3/32" (2.4mm), 1/8" (3.2mm), 5/32" (4mm), 3/16" (4.8mm), 1/4" (6.4mm) |
5. Impostazione
5.1. Collegamento dell'alimentazione dell'aria
- Ensure the air compressor is off and the air line is depressurized.
- Connect a suitable air hose (minimum 3/8" I.D.) to the air inlet port at the base of the riveter. The air inlet is typically a 1/4" BSP thread.
- It is recommended to install an in-line air filter/regulator/lubricator unit between the air compressor and the riveter to ensure clean, lubricated air at the correct pressure.
- Set the air pressure to a maximum of 90 psi (6.2 bar).
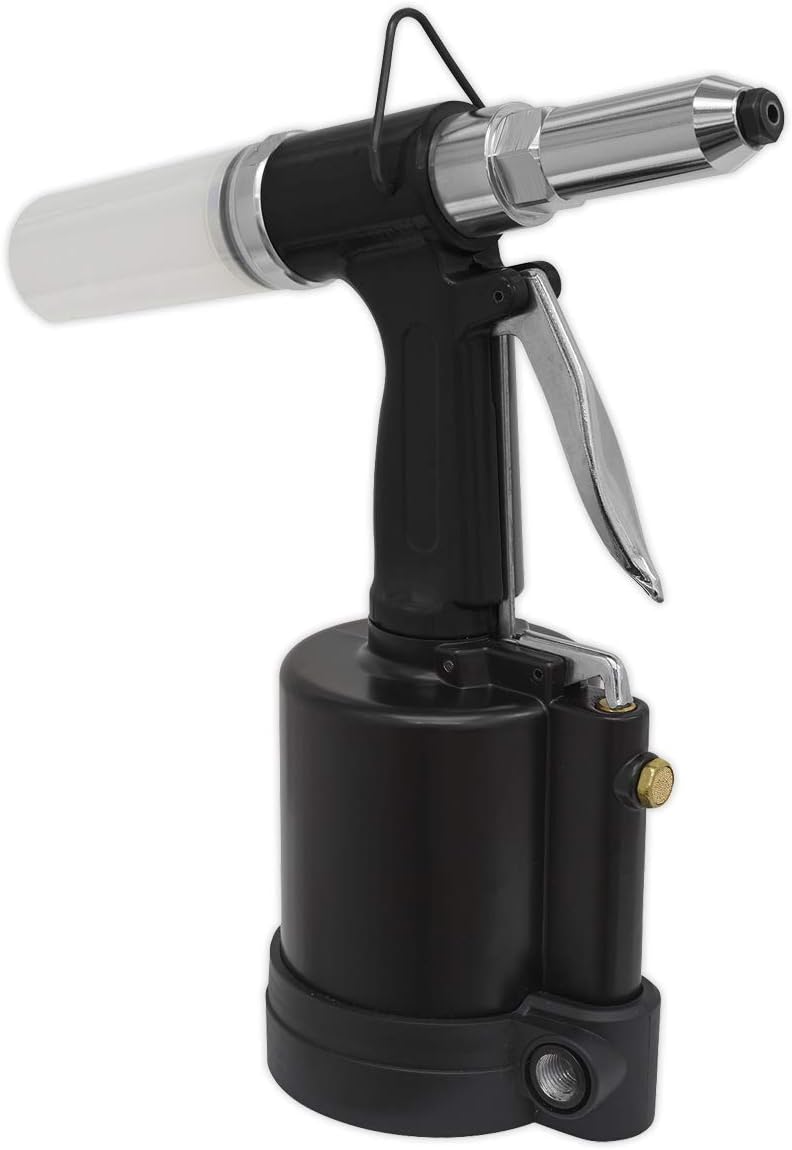
Figura 3: lato view of the riveter, indicating the air inlet connection point at the bottom.
5.2. Nozzle Selection and Installation
- Select the correct nozzle size that matches the diameter of the rivet you intend to use. The rivet body should fit snugly into the nozzle.
- Unscrew the existing nozzle (if any) from the riveter head using one of the supplied spanners.
- Screw the chosen nozzle firmly into place by hand, then tighten it securely with the spanner. Do not overtighten.
6. Istruzioni per l'uso
Follow these steps for safe and effective riveting:
- Preparare il pezzo da lavorare: Drill a hole in the materials to be joined that is slightly larger than the rivet body diameter. Ensure the surfaces are clean and flush.
- Inserire il rivetto: Insert the rivet into the pre-drilled hole.
- Load Riveter: Slide the selected nozzle of the riveter over the rivet shaft until the nozzle is flush against the head of the rivet and the workpiece.
- Azionare il grilletto: Press the trigger fully to activate the air/hydraulic mechanism. The riveter will pull the rivet shaft, deforming the rivet body to create a secure joint. Continue holding the trigger until the rivet shaft breaks off.
- Rilascio Trigger: Release the trigger. The spent rivet shaft will be ejected into the transparent collector at the rear of the tool.
- Ripetere: For multiple rivets, repeat the process.
Importante: The transparent collector at the rear of the tool is designed to catch spent rivet shafts. Regularly check and empty this collector to prevent blockages and ensure proper tool function.
7. Manutenzione
Una manutenzione regolare garantisce la longevità e le prestazioni ottimali della rivettatrice.
- Scollegare l'aria: Always disconnect the riveter from the air supply before performing any maintenance or cleaning.
- Lubrificazione: If an in-line lubricator is not used, add a few drops of air tool oil into the air inlet daily before use.
- Pulizia: Keep the tool clean and free from debris. Wipe down the exterior with a clean cloth.
- Nozzle and Jaw Inspection: Periodically inspect the nozzle and the internal jaw assembly for wear or damage. Worn jaws can lead to rivets jamming or failing to set correctly. Replace worn parts as necessary using genuine Sealey replacement parts.
- Spent Rivet Shaft Collector: Regularly empty the transparent collector to prevent accumulation of broken rivet shafts, which can impede tool operation.
- Magazzinaggio: When not in use, store the riveter in a clean, dry, and safe place, out of reach of children.
8. Risoluzione Dei Problemi
If you encounter issues with your Sealey SA314 riveter, refer to the following common problems and solutions:
| Problema | Possibile causa | Soluzione |
|---|---|---|
| Rivet shaft jams in the jaws. | Worn or dirty jaw assembly; incorrect nozzle size; insufficient air pressure. | Clean or replace jaw assembly; ensure correct nozzle for rivet diameter; check air pressure and supply. |
| Riveter does not pull rivet completely or has low power. | Low air pressure; insufficient air volume; lack of lubrication; internal seal failure. | Check air supply pressure and hose diameter; add air tool oil; contact a qualified service agent for seal inspection. |
| Air leaks from the tool. | Raccordi allentati; O-ring o guarnizioni danneggiati. | Tighten all air fittings; inspect and replace damaged seals or O-rings. |
| Spent rivet shafts are not ejected. | Collector is full; blockage in the ejection path. | Empty the spent rivet shaft collector; clear any blockages. |
If problems persist after attempting these solutions, contact Sealey customer support or a qualified service technician.
9. Garanzia e supporto
This Sealey product is manufactured to high standards and is subject to a warranty against manufacturing defects. For specific warranty terms and conditions, please refer to the documentation provided with your purchase or visit the official Sealey websito.
For technical support, spare parts, or service inquiries, please contact your authorized Sealey dealer or the Sealey customer service department. When contacting support, please have your model number (SA314) and purchase details readily available.


