1. Introduzione
This manual provides instructions for the installation, configuration, and operation of your ASUS RT-N13U Wireless-N Router. The RT-N13U is a versatile networking device capable of functioning as a wireless router, an access point, or a wireless repeater. It also features a USB 2.0 port for enhanced functionalities such as printer sharing, FTP hosting, network storage, and direct BitTorrent downloading.
Please read this manual thoroughly before using the device to ensure proper setup and optimal performance.
2. Prodotto finitoview
2.1 Caratteristiche principali
- EZ All-in-One Printer Sharing: Utilize the USB port to share a printer across your network.
- EZ Switch: Easily switch between Router, Repeater, and Access Point modes with a single touch.
- Enhanced Download Master: Scaricamento files directly to a connected USB hard drive even when your computer is off.
- Wireless-N Connectivity: Supports 802.11b/g/n standards for high-speed wireless networking.
- 4 LAN Ports: Provides four 10/100 Mbps Ethernet ports for wired connections.
- Diagnostic and Bandwidth Management Tools: Includes Dr. Surf and EZQoS for network monitoring and quality of service management.
2.2 Contenuto della confezione
- ASUS RT-N13U Wireless-N Router
- Adattatore di alimentazione
- Cavo Ethernet
- Guida rapida
- Support CD (containing user manual and utilities)
2.3 Interfaccia hardware
Familiarize yourself with the ports, buttons, and LED indicators on your RT-N13U router.
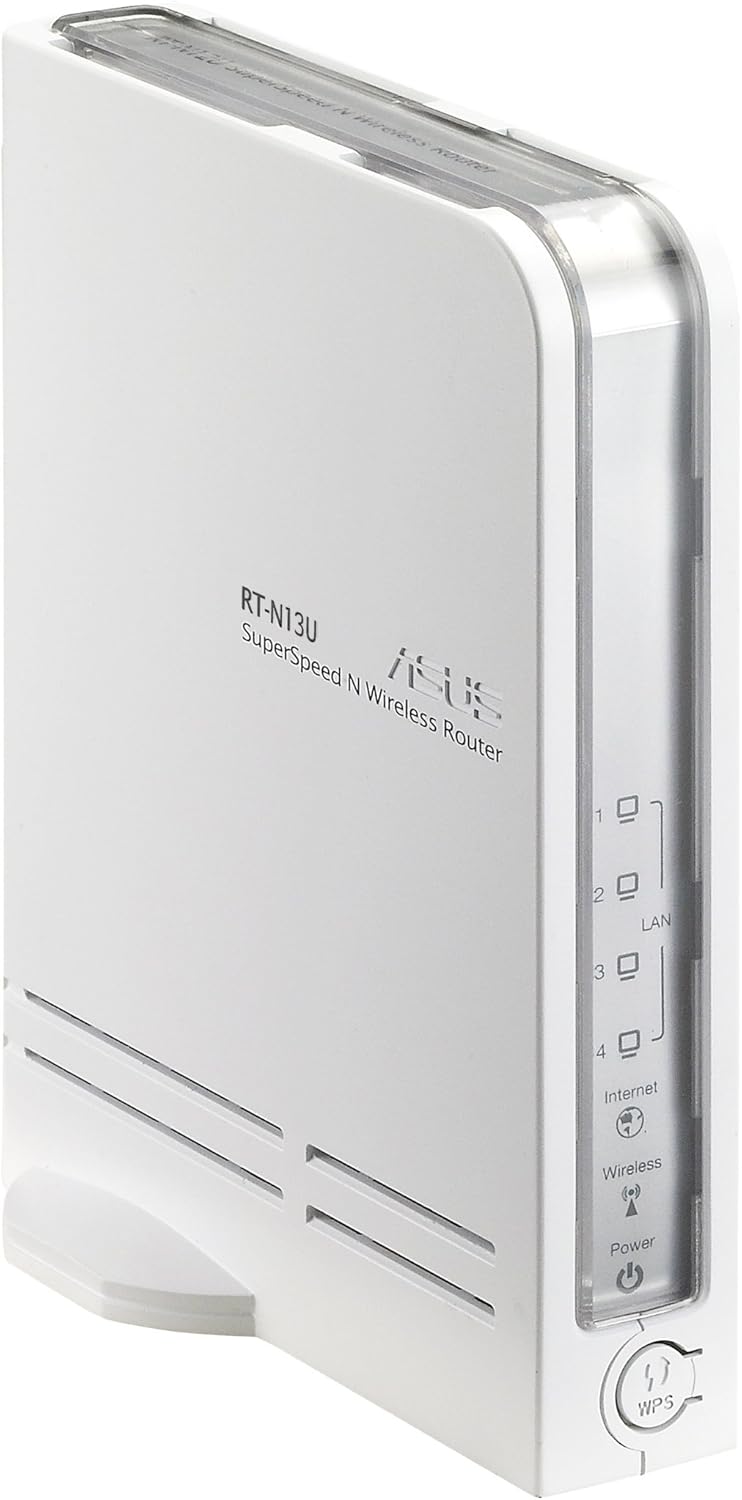
Figura 1: Anteriore e laterale View of the ASUS RT-N13U Router. This image shows the front panel with LED indicators for Power, Wireless, Internet, and LAN ports (1-4), along with the WPS button.

Figura 2: Posteriore View of the ASUS RT-N13U Router. This image displays the rear panel, including the USB 2.0 port, four LAN ports (yellow), one Internet (WAN) port (blue), and the power input port.
Indicatori LED:
- LED di potenza: Indica lo stato di alimentazione. Verde fisso per funzionamento normale.
- LED senza fili: Indicates wireless activity. Blinks when data is being transmitted wirelessly.
- LED Internet: Indicates internet connection status. Solid green for connected, blinking for activity.
- LAN 1-4 LEDs: Indicate activity on the respective LAN ports. Solid green for connected, blinking for activity.
- LED WPS: Indica lo stato della configurazione protetta Wi-Fi.
Porte e pulsanti:
- Porta USB 2.0: For connecting USB devices such as printers or external storage.
- Porte LAN (1-4): Collega dispositivi cablati come computer o console di gioco.
- Porta Internet (WAN): Si collega al modem per accedere a Internet.
- Porta di alimentazione: Si collega all'adattatore di alimentazione incluso.
- Pulsante WPS: Avvia la configurazione protetta Wi-Fi per una facile connessione wireless.
- Pulsante di reset: (Typically a small pinhole button) Used to restore factory default settings.
- EZ Switch: A physical switch to change the device's operating mode (Router, AP, Repeater).
3. Impostazione
3.1 Connessione hardware iniziale
- Connect the power adapter to the router's Power port and plug it into a power outlet.
- Connect one end of the Ethernet cable to the Internet (WAN) port of the RT-N13U and the other end to your modem's Ethernet port.
- (Optional) For initial configuration, connect your computer directly to one of the LAN ports (1-4) on the router using an Ethernet cable.
- Power on your modem, then power on the RT-N13U router. Wait for the Power, Internet, and Wireless LEDs to stabilize.
3.2 Modalità di configurazione
The RT-N13U supports three operating modes, selectable via the EZ Switch:
- Modalità router: The default mode, where the device acts as a gateway for your network, providing internet access and managing local network traffic.
- Modalità punto di accesso (AP): Extends an existing wired network by adding wireless connectivity. In this mode, internet features are typically disabled, and the device acts as a wireless hub.
- Modalità ripetitore: Extends the range of an existing wireless network by receiving and re-transmitting the wireless signal.
Select the desired mode using the physical EZ Switch on the router before proceeding with software configuration.
3.3 Web Accesso all'interfaccia
- Aprire un web browser (e.g., Chrome, Firefox, or IE8/Edge; IE9 beta may have compatibility issues).
- Nella barra degli indirizzi, digitare l'indirizzo IP predefinito del router (comunemente
192.168.1.1orrouter.asus.com) e premere Invio. - Inserisci il nome utente e la password predefiniti (in genere
adminfor both). Refer to the label on the bottom of your router if these defaults do not work. - Follow the on-screen setup wizard.
3.4 Internet Connection Setup (Router Mode)
If the EZ UI setup feature does not automatically configure your internet connection, manual steps may be required, especially for certain Internet Service Providers (ISPs).
- Gather Information:
- Your computer's MAC address (Physical Address). On Windows, open Command Prompt and type
ipconfig /all. - Your ISP's DNS server addresses. If connected via Ethernet, use
ipconfig /allto find "DNS Servers".
- Your computer's MAC address (Physical Address). On Windows, open Command Prompt and type
- Access Network Map: Nel router web interface, navigate to the "Network Map" or "EZ-UI" section.
- Configurazione manuale: If the connection fails, the system may prompt for manual configuration.
- Utilizzare il Clona MAC feature. Some ISPs tie your internet service to a specific MAC address. Cloning your computer's MAC address to the router can resolve connectivity issues.
- Manually enter your ISP's DNS server addresses if required.
- Apply Settings and Restart: Apply the new settings. The router will restart. Your computer may temporarily lose connection. Reconnect to the router.
- Power Cycle (If Needed): If the internet connection is still not established:
- Power off the wireless router.
- Power off your modem/ISP's box.
- Attendere 5 minuti.
- First, power on the modem/ISP's box and wait for it to fully boot.
- Then, power on the ASUS RT-N13U router.
- Check for internet connectivity.
Note: For optimal wireless performance, ensure the wireless radio is set to "N only" mode in the router's settings if all your devices support 802.11n.
4. Funzionamento
4.1 Collegamento dei dispositivi
Connessioni cablate:
Connect Ethernet-enabled devices (e.g., desktop computers, smart TVs, gaming consoles) to the yellow LAN ports (1-4) on the back of the router using Ethernet cables.
Connessioni wireless:
- Sul tuo dispositivo wireless (laptop, smartphone, tablet), cerca le reti Wi-Fi disponibili.
- Select the network name (SSID) of your ASUS RT-N13U (default SSID is usually "ASUS" or "ASUS_RT-N13U").
- Enter the network security key (password). This can be found on a label on the router or in the router's web interfaccia.
- Alternatively, press the WPS button on the router and then activate WPS on your wireless device within two minutes for a quick connection.
4.2 USB Features
The USB 2.0 port on the RT-N13U provides additional functionalities:
Condivisione stampante:
Connect a compatible USB printer to the USB 2.0 port. Configure printer sharing through the router's web interface to allow multiple computers on your network to print to it.
Scarica Master:
Connect a USB storage device (e.g., external hard drive, flash drive) to the USB 2.0 port. The Download Master feature allows you to initiate downloads (including BitTorrent) directly to the connected storage device, even when your computer is turned off. This feature typically works only when the router is in Router Mode.
Note: Ensure the USB storage device is formatted correctly and recognized by the router. For BitTorrent downloads, you may need to provide the exact URL location for the downloader to function properly.
5. Manutenzione
5.1 Aggiornamenti firmware
Regularly updating the router's firmware is crucial for performance improvements, security enhancements, and bug fixes. Visit the official ASUS support website for the RT-N13U model to download the latest firmware. Follow the instructions provided with the firmware update package carefully to avoid damaging the device.
Note: Firmware updates can resolve many common issues and improve compatibility with various devices and services.
5.2 Ripristino delle impostazioni di fabbrica
If you encounter persistent issues or forget your login credentials, you can restore the router to its factory default settings. This will erase all custom configurations.
- Con il router acceso, individua il pulsante Reset (spesso un piccolo foro) sul dispositivo.
- Utilizzare una graffetta o un oggetto appuntito simile per tenere premuto il pulsante Reset per circa 5-10 secondi.
- Release the button when the Power LED starts blinking rapidly or all LEDs briefly flash.
- The router will restart with factory default settings. You will need to reconfigure it from scratch.
6. Risoluzione Dei Problemi
6.1 Problemi comuni e soluzioni
- Nessuna connessione internet:
- Controllare tutti i collegamenti dei cavi (dal modem alla porta WAN del router, dal router alla porta LAN del computer).
- Perform a power cycle on both your modem and router (unplug, wait 5 minutes, plug modem first, then router).
- Verify your ISP settings in the router's web interface, especially if MAC cloning or specific DNS servers are required.
- Ensure the router is in the correct operating mode (Router Mode for internet access).
- Impossibile accedere al router Web Interfaccia:
- Assicurati che il tuo computer sia connesso al router (via cavo o wireless).
- Verify the IP address (e.g.,
192.168.1.1) is correct. - Prova un'altra web browser.
- Disattiva temporaneamente qualsiasi firewall o software antivirus sul tuo computer.
- Se hai dimenticato la password, esegui un ripristino delle impostazioni di fabbrica (vedi Sezione 5.2).
- Velocità wireless lenta o connessioni interrotte:
- Assicurarsi che il firmware del router sia aggiornato.
- Check for wireless interference from other devices (cordless phones, microwaves).
- Adjust the wireless channel in the router settings.
- Position the router in a central location, away from obstructions.
- If all devices support 802.11n, set the wireless mode to "N only" for higher speeds.
- Dispositivo USB non riconosciuto:
- Ensure the USB device is properly connected and powered (if external power is required).
- Controllare il router web interface for USB device status and configuration.
- Verify compatibility of the USB device with the router.
- Ensure the router is in Router Mode for USB features like Download Master.
6.2 Significato degli indicatori LED
| Indicatore LED | Stato | Descrizione |
|---|---|---|
| Energia | Verde solido | Il dispositivo è acceso e funziona normalmente. |
| Spento | Il dispositivo è spento. | |
| Senza fili | Verde solido | La funzione wireless è abilitata. |
| Verde lampeggiante | Wireless data transmission is active. | |
| Internet | Verde solido | Connesso a Internet. |
| Verde lampeggiante | Internet data transmission is active. | |
| Spento | Nessuna connessione Internet. | |
| LAN 1-4 | Verde solido | Un dispositivo è collegato alla porta LAN corrispondente. |
| Verde lampeggiante | Data transmission is active on the corresponding LAN port. | |
| WPS | lampeggiante | WPS connection process is active. |
7. Specifiche
| Caratteristica | Dettaglio |
|---|---|
| Nome del modello | RT-N13U |
| standard wireless | 802.11b/g/n |
| Banda di frequenza | Banda singola (2.4 GHz) |
| Tecnologia di connettività | Senza fili, Ethernet |
| Porte Ethernet | 4 x LAN 10/100 Mbps, 1 x WAN 10/100 Mbps |
| Porta USB | 1 porte USB 2.0 |
| Tipo di antenna | Interno |
| Caratteristiche speciali | Access Point Mode, Repeater Mode, WPS, Printer Sharing, Download Master |
| Dimensioni del prodotto | 10 x 8.88 x 3.75 pollici |
| Peso dell'articolo | 5.3 once (circa 150 grammi) |
| Produttore | Asus |
| Prima data disponibile | 28 settembre 2009 |
8. Informazioni sulla sicurezza
- Use only the power adapter provided with the device. Using an incompatible adapter may damage the device and void your warranty.
- Non esporre il dispositivo ad acqua, umidità o temperature estreme.
- Posizionare il dispositivo in un'area ben ventilata per evitare il surriscaldamento.
- Non aprire il dispositivo casing. La manutenzione deve essere eseguita solo da personale autorizzato.
- Tenere il dispositivo lontano da forti campi elettromagnetici.
9. Garanzia e supporto
Per informazioni sulla garanzia, supporto tecnico e ulteriore assistenza, visitare il supporto ufficiale ASUS website or contact ASUS customer service. Details can typically be found on the ASUS websito o nella documentazione inclusa nel prodotto.
Supporto ASUS Websito: www.asus.com/support/