1. Introduzione
This manual provides detailed instructions for the installation, operation, and maintenance of your AZZA Solano 1000R CSAZ-1000R Full Tower Computer Case. Please read this manual thoroughly before beginning installation to ensure proper setup and to maximize the performance and longevity of your system components.
2. Caratteristiche del prodotto
- Gestione termica ottimizzata: Features multiple fans for superior cooling, including a 230mm top fan, a 230mm side fan, two 140mm front fans, and a 120mm rear fan.
- Bottom-Mounted Power Supply: Designed for improved thermal separation and stability, allowing installation facing up or down.
- Gestione avanzata dei cavi: Pre-drilled motherboard tray and ample space behind for organized cable routing, enhancing airflow and aesthetics.
- Tool-Less Design: Thumb screws for easy installation of optical drives and hard disk drives.
- Comodo I/O frontale: USB and audio ports, along with an eSATA port, located on the top panel for easy access.
- Interni spaziosi: Full tower design accommodates large components, including extended graphics cards and tall CPU coolers.
- Design estetico: Black exterior with a vibrant red painted interior and red LED fans.
3. Contenuto della confezione
Si prega di verificare che tutti gli articoli siano presenti nel pacco:
- AZZA Solano 1000R CSAZ-1000R Full Tower Case
- Scatola degli accessori (contenente viti, distanziatori, fascette, ecc.)
- Manuale dell'utente (questo documento)
4. Componente suview
4.1 Esterno Views
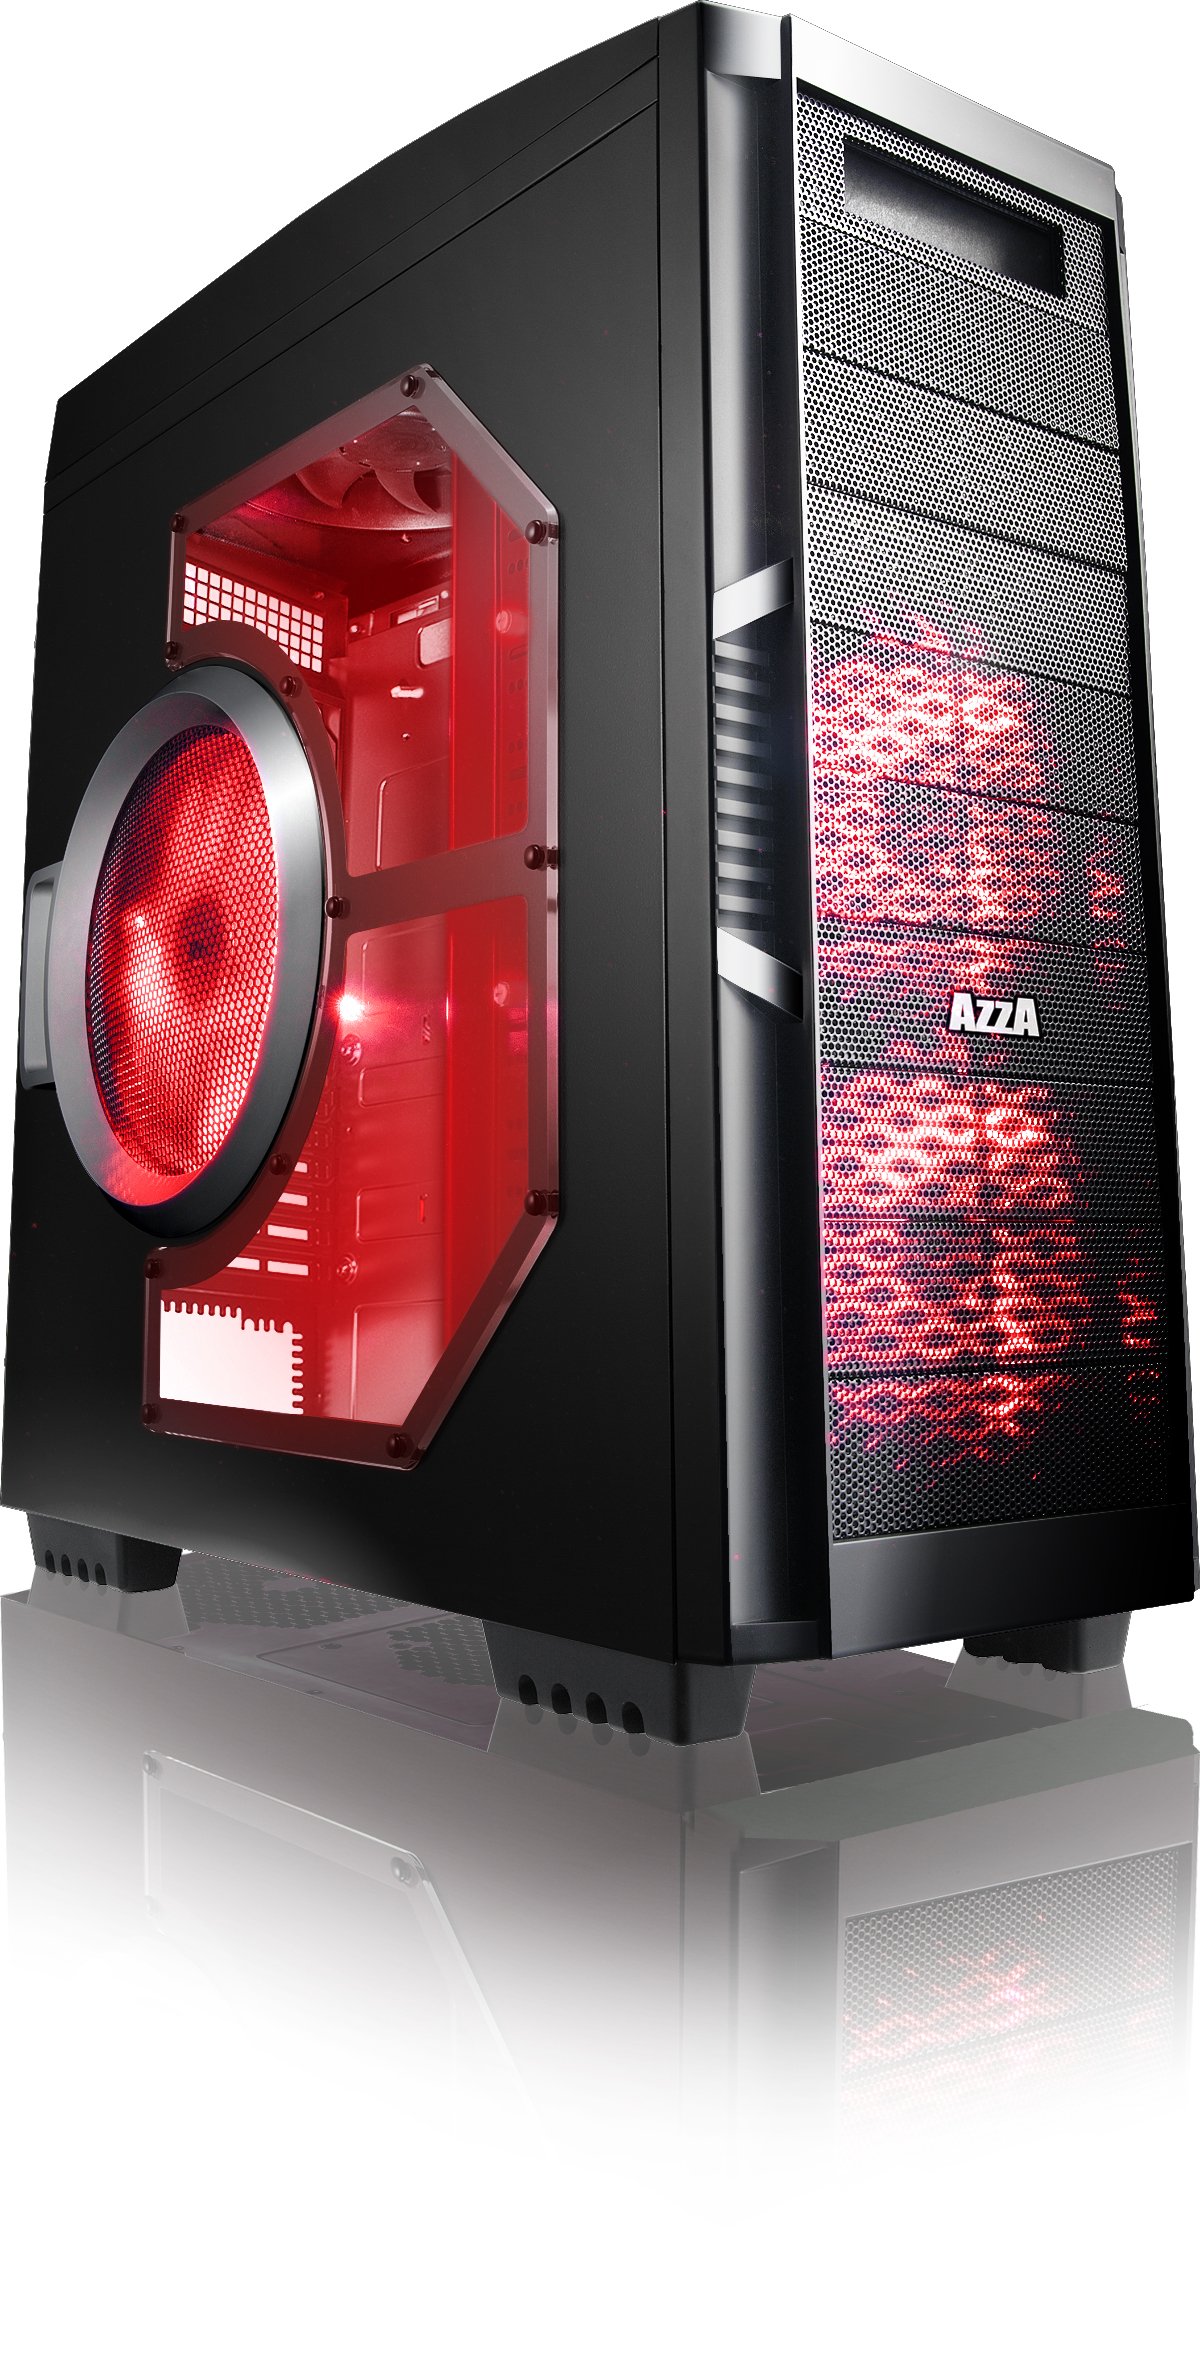
Figura 4.1: Lato anteriore view of the AZZA Solano 1000R case, showcasing the red LED fans on the front and side panel.

Figura 4.2: Fronte view of the AZZA Solano 1000R case, highlighting the two 140mm red LED intake fans behind the mesh panel.

Figura 4.3: lato view of the AZZA Solano 1000R case, showing the large 230mm red LED side panel fan and the transparent window.

Figure 4.4: Top-front angled view of the AZZA Solano 1000R case, showing the top ventilation grille, front I/O panel with USB and audio ports, and power button.
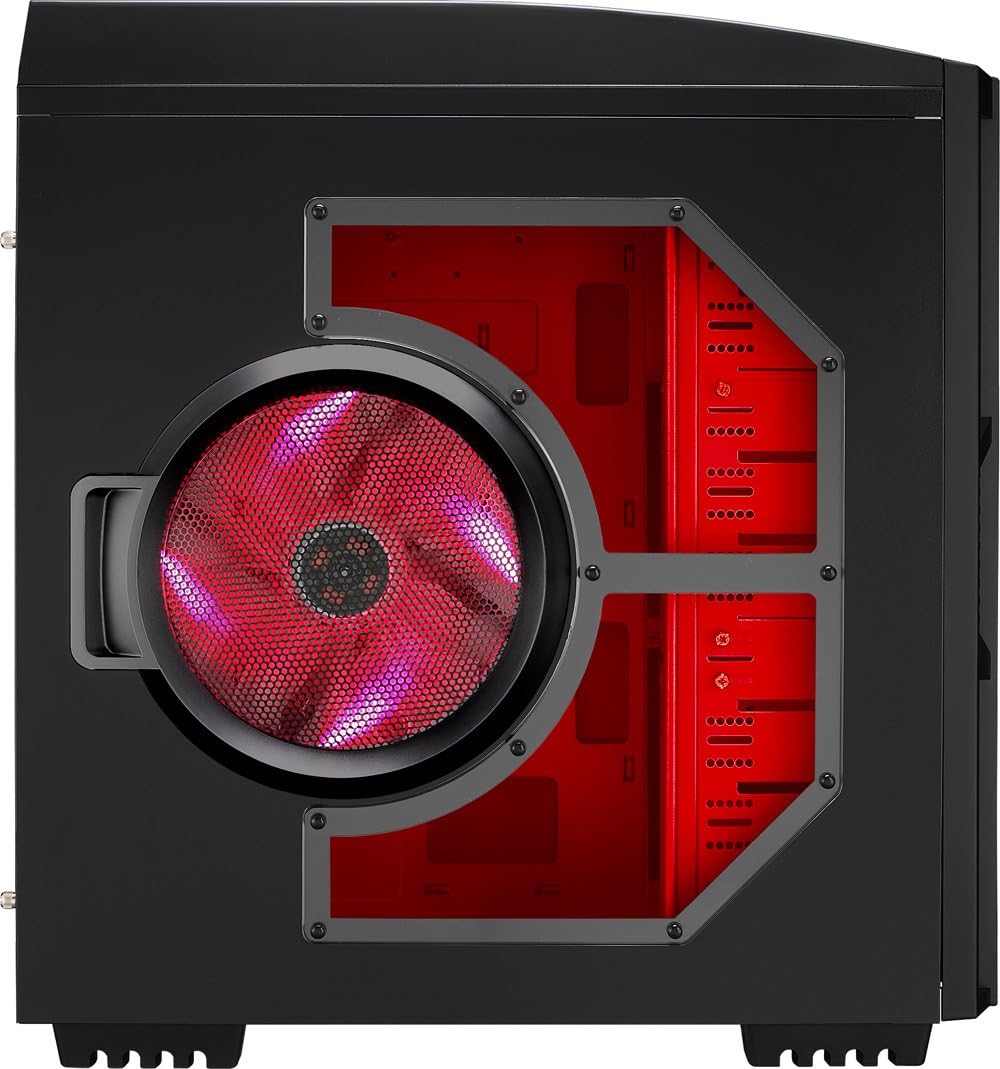
Figura 4.5: Lato posteriore view of the AZZA Solano 1000R case, displaying the red interior, rear exhaust fan, and expansion slots.
4.2 Interno Views

Figura 4.6: Interno view of the AZZA Solano 1000R case with the left side panel removed, revealing the red painted motherboard tray, drive bays, and cable routing cutouts.

Figura 4.7: Interno angolato view of the AZZA Solano 1000R case, focusing on the multiple 5.25" and 3.5" drive bays.

Figura 4.8: Interno angolato view of the AZZA Solano 1000R case, showing the rear 120mm exhaust fan, expansion slots, and the extensive drive bay structure.

Figura 4.9: Interno view of the AZZA Solano 1000R case with the right side panel removed, showing the space behind the motherboard tray for cable management.
5. Guida all'installazione
Prima di iniziare l'installazione, assicurarsi che l'area di lavoro sia pulita e priva di elettricità statica. Si consiglia di indossare un braccialetto antistatico.
5.1 Preparazione del caso
- Posizionare la custodia su una superficie piana e stabile.
- Remove the side panels by unscrewing the thumb screws at the rear of the case and sliding the panels backward.
5.2 Installazione della scheda madre
- Installare la schermatura I/O fornita con la scheda madre nell'apertura sul retro del case.
- Align the motherboard with the pre-installed standoffs. If necessary, install additional standoffs according to your motherboard's form factor.
- Carefully place the motherboard onto the standoffs, ensuring the I/O ports align with the shield.
- Fissare la scheda madre con le viti appropriate presenti nella scatola degli accessori.
5.3 Installazione dell'alimentatore
- Position the power supply unit (PSU) in the bottom-rear compartment of the case. You can orient it with the fan facing up or down, depending on your cooling preference and PSU design.
- Fissare l'alimentatore al case utilizzando le viti fornite con l'alimentatore.
5.4 Installazione dell'unità di archiviazione (HDD/SSD)
- For 3.5" HDDs, slide the drive into an available drive bay until it clicks into place. Use the provided thumb screws for additional security if desired.
- For 2.5" SSDs, an adapter bracket (not included) may be required to fit into the 3.5" bays. Secure the SSD to the adapter, then install the adapter into a 3.5" bay.
- Connect the SATA data and power cables to your installed drives.
5.5 Optical Drive Installation
- Remove the desired 5.25" front bay cover from the case.
- Slide the optical drive into the bay from the front until it aligns with the screw holes.
- Secure the optical drive using the provided thumb screws.
- Connect the SATA data and power cables to the optical drive.
5.6 Installazione della scheda di espansione
- Rimuovere le coperture degli slot di espansione necessari nella parte posteriore del case.
- Insert your graphics card or other expansion card into the appropriate PCIe/PCI slot on your motherboard.
- Secure the card with the provided screw or tool-less latch mechanism.
5.7 Gestione dei cavi
Utilize the cutouts and space behind the motherboard tray to route and organize your cables. This improves airflow and gives your build a cleaner appearance. Use cable ties from the accessory box to bundle cables.
5.8 Collegamento degli I/O del pannello frontale
Connect the front panel cables (USB, Audio, Power Switch, Reset Switch, Power LED, HDD LED) to the corresponding headers on your motherboard. Refer to your motherboard manual for exact header locations.
6. Funzionamento
6.1 Accensione/spegnimento
Press the power button located on the top panel to turn your system on or off. A power LED will illuminate when the system is active.
6.2 Controllo della ventola
The case features a fan speed control switch (L/M/H) at the rear, primarily for the top, side, and rear fans. Adjust this switch to balance cooling performance and noise levels according to your preference.
7. Manutenzione
7.1 Pulizia
Regular cleaning helps maintain optimal airflow and component longevity.
- Esterno: Pulire le superfici esterne con un panno morbido, damp stoffa. Evitare detergenti abrasivi.
- Filtri antipolvere: The case includes mesh filters at the bottom. Periodically remove and clean these filters to prevent dust buildup.
- Interno: Use compressed air to remove dust from inside the case, especially from fans and heatsinks. Ensure the system is powered off and unplugged before cleaning the interior.
8. Risoluzione Dei Problemi
- Il sistema non si accende: Ensure all power cables (24-pin ATX, 8-pin CPU, GPU power) are securely connected. Verify the PSU switch is in the 'ON' position. Check front panel power switch connection to the motherboard.
- I ventilatori non girano: Check fan power connections to the motherboard or fan controller. Ensure the fan speed switch is not set to 'Off' or 'Low' if fans are not spinning at all.
- Side Panel Not Closing: If a large CPU cooler or tall components prevent the side panel from closing, especially due to the side fan, consider relocating the side fan to the exterior of the panel if possible, or ensure your cooler fits within the case's clearance specifications.
- Cable Management Difficulty: If the rear panel bulges due to thick cables, try rerouting cables more efficiently or using flatter cables where possible.
9. Specifiche
| Caratteristica | Dettaglio |
|---|---|
| Numero di modello | CSAZ-1000R |
| Tipo di caso | Torre completa |
| Colore | Nero/Rosso |
| Dimensioni del prodotto (L x P x A) | 19.7 x 8.1 x 21.5 pollici (500 x 206 x 546 mm) |
| Peso dell'articolo | 24 libbre (10.89 kg) |
| Metodo di raffreddamento | Aria |
| Tipo di montaggio dell'alimentatore | Montaggio inferiore |
| Porte USB totali | 2 (USB 2.0) + 1 (eSATA) |
| Supporto del fattore di forma del disco rigido | 3.5 pollici |
| Ventilatori inclusi | 2x 230mm (Top, Side), 2x 140mm (Front), 1x 120mm (Rear) |
10. Garanzia e supporto
Per informazioni sulla garanzia e supporto tecnico, fare riferimento al sito ufficiale AZZA webo contattare il rivenditore locale. Conservare la prova d'acquisto per eventuali reclami in garanzia.


