1. Introduzione
This instruction manual provides essential information for the safe and efficient use of your THOMSON CE-26 Cassette/SD/USB Audio System. Please read this manual thoroughly before operating the device and retain it for future reference. The CE-26 allows you to play audio from cassettes, USB drives, and SD/MMC cards, as well as record audio directly from cassettes or external sources to MP3 format on USB or SD/MMC media.
2. Prodotto finitoview
Familiarize yourself with the components and controls of your CE-26 audio system.

Figura 2.1: pannello frontale View. This image displays the front of the THOMSON CE-26 unit, showing the cassette deck, control buttons, display screen, USB port, SD/MMC card slot, and volume knob.
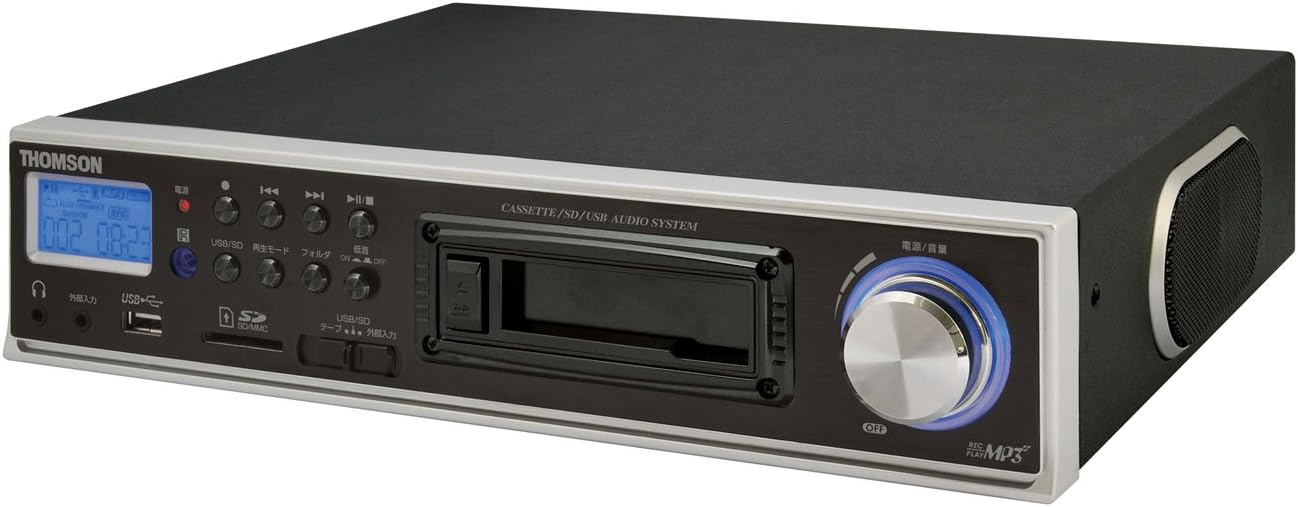
Figura 2.2: Angolato View. This image shows the THOMSON CE-26 from an angled perspective, highlighting the integrated side speaker and the overall compact design.

Figura 2.3: Unità di controllo remoto. This image displays the included remote control for the THOMSON CE-26, featuring buttons for search, display, record, playback mode, program, folder navigation, and USB/SD selection.

Figura 2.4: Caratteristica Overview Diagramma. This diagram illustrates the key functionalities of the THOMSON CE-26, including direct recording from cassette to USB/SD, MP3/WMA playback, USB/SD memory copying, AUX input, built-in speaker, and remote control.
Controlli del pannello frontale:
- Pulsante di accensione: Accende o spegne l'unità.
- Schermo di visualizzazione: Shows track information, mode, and time.
- Registratore a cassette: For inserting and playing audio cassettes.
- Porta USB: Connect USB flash drives for playback or recording.
- Slot per scheda SD/MMC: Insert SD or MMC cards for playback or recording.
- Controlli di riproduzione: Riproduci, Pausa, Interrompi, Avanzamento rapido, Riavvolgi, Salta traccia.
- Pulsante di registrazione: Avvia la registrazione.
- Pulsante Modalità: Switches between Cassette, USB, SD, and AUX input modes.
- Manopola del volume: Regola il livello di uscita audio.
- Jack per cuffie: Per l'ascolto privato.
- Ingresso AUX: Collegare dispositivi audio esterni.
3. Impostazione
- Collegamento elettrico: Collegare il cavo di alimentazione CA all'ingresso di alimentazione dell'unità e quindi a una presa a muro standard.
- Accensione iniziale: Press the Power button to turn on the unit. The display will illuminate.
- Inserimento di supporti:
- cassette: Open the cassette door and insert an audio cassette with the open edge facing upwards. Close the door securely.
- Chiavetta USB: Insert a USB flash drive into the USB port. Ensure it is formatted to FAT32.
- Scheda SD/MMC: Insert an SD or MMC card into the card slot until it clicks into place. Ensure it is formatted to FAT32.
- External Audio Device (Optional): To use the AUX input, connect an external audio source (e.g., smartphone, CD player) to the AUX IN jack using a 3.5mm audio cable.
4. Istruzioni per l'uso
4.1. Riproduzione di cassette
- Inserire una cassetta.
- Press the "Mode" button until "Cassette" mode is selected (or the cassette deck automatically starts playing).
- Premere il pulsante Riproduci (►) sull'unità o sul telecomando.
- Regolare il volume utilizzando la manopola del volume.
- Use Fast Forward (►►) or Rewind (◄◄) per navigare nel nastro.
- Press Stop (■) to end playback.
4.2. Riproduzione USB/SD
- Insert a USB drive or SD/MMC card containing MP3 or WMA audio files.
- Press the "Mode" button to select "USB" or "SD" mode. The unit will automatically scan and begin playing the first track.
- Usa Riproduci/Pausa (►/∥), Fermare (■), Next Track (► ►|), and Previous Track (|◄◄) per controllare la riproduzione.
- The "Folder" buttons on the remote can be used to navigate between folders on the USB/SD media.
4.3. Recording Audio to MP3 (Cassette to USB/SD)
This feature allows you to convert your cassette tapes into digital MP3 files.
- Insert a blank or desired USB drive/SD card into the respective slot.
- Inserire la cassetta che si desidera registrare.
- Press the "Mode" button to select "Cassette" mode.
- Start playing the cassette tape.
- Press the "Record" button on the unit or remote. The recording indicator will light up, and the unit will begin converting the cassette audio to MP3 format on the selected USB/SD media.
- To stop recording, press the "Stop" button. The recorded MP3 file verranno salvati sulla tua unità USB o sulla tua scheda SD.
- Nota: There might be a slight delay between pressing record and the actual start of recording. It is recommended to start recording slightly before the desired audio begins to avoid cutting off the start of a track.
4.4. Recording Audio to MP3 (AUX Input to USB/SD)
Record audio from an external device connected via the AUX input.
- Connect your external audio device to the AUX IN jack.
- Insert a blank or desired USB drive/SD card.
- Premere il pulsante "Mode" per selezionare la modalità "AUX".
- Avvia la riproduzione sul tuo dispositivo audio esterno.
- Press the "Record" button on the unit or remote. The recording indicator will light up, and the unit will begin converting the AUX audio to MP3 format on the selected USB/SD media.
- To stop recording, press the "Stop" button.
4.5. Copiatura Files Between USB and SD/MMC
The CE-26 allows direct copying of MP3/WMA files between a USB drive and an SD/MMC card.
- Ensure both a USB drive and an SD/MMC card are inserted into their respective slots.
- Select either "USB" or "SD" mode using the "Mode" button, depending on which source you want to copy da.
- Vai a file or folder you wish to copy.
- Press and hold the "Copy" button (often labeled "USB/SD Copy" or similar) on the unit or remote. Follow any on-screen prompts to confirm the copy operation.
- The display will indicate when the copying process is complete.
5. Manutenzione
- Pulizia: Utilizzare un panno morbido e asciutto per pulire l'esterno dell'unità. Non utilizzare detergenti liquidi o materiali abrasivi.
- Cura del registratore a cassette: Periodically clean the cassette head and pinch rollers with a specialized cassette head cleaner to ensure optimal audio quality and prevent tape damage.
- Magazzinaggio: Quando non si utilizza l'unità per lunghi periodi, scollegare il cavo di alimentazione e conservarla in un luogo fresco e asciutto, lontano dalla luce solare diretta e da temperature estreme.
6. Risoluzione Dei Problemi
| Problema | Possibile causa | Soluzione |
|---|---|---|
| Nessun potere | Cavo di alimentazione non collegato; presa di corrente non attiva. | Assicurarsi che il cavo di alimentazione sia collegato saldamente. Controllare che la presa di corrente funzioni. |
| Nessun suono durante la riproduzione | Volume troppo basso; Modalità selezionata non corretta; Cuffie collegate. | Increase volume. Select the correct input mode (Cassette, USB, SD, AUX). Disconnect headphones if using speakers. |
| Cassette tape not playing or recording correctly | Tape tangled or damaged; Cassette heads dirty; Incorrect tape direction. | Check tape condition. Clean cassette heads and pinch rollers. Ensure tape is inserted correctly. |
| Recording stops prematurely or has gaps | USB drive/SD card full; Media format issue; Intermittent power. | Ensure sufficient storage space. Use FAT32 formatted media. Check power connection stability. |
| Poor audio quality from USB/SD | Corrotto files; Low bitrate MP3/WMA files. | Try different audio fileS. Garantire files non sono danneggiati. |
| Il telecomando non funziona | Batteries depleted; Obstruction between remote and unit; Incorrect angle. | Sostituire le batterie del telecomando. Assicurarsi che il ricevitore IR dell'unità sia ben visibile. |
7. Specifiche
| Caratteristica | Dettaglio |
|---|---|
| Marca | TOMSONITA |
| Numero di modello | CE-26 |
| Supporti multimediali | Cassette Tape, USB Memory, SD/MMC Card |
| Formati audio supportati | MP3, WMA (playback); MP3 (recording) |
| Funzione di registrazione | Direct digital recording from Cassette to MP3, AUX to MP3 |
| Connettività | USB Port, SD/MMC Card Slot, AUX Input (3.5mm), Headphone Output (3.5mm) |
| Altoparlante incorporato | SÌ |
| Telecomando | Incluso |
| Dimensioni (circa) | Dimensioni: 35.4 x 33.2 x 12 cm |
| Peso (circa) | 3.02 kg |
8. Garanzia e supporto
For warranty information and technical support, please refer to the warranty card included with your product or contact THOMSON customer service directly. Keep your purchase receipt as proof of purchase.
For further assistance, please visit the official THOMSON websito o contattare i centri di assistenza autorizzati.


