1. Introduzione
The Polk Audio SWA500 Power Amplifier is engineered to provide dedicated power for Polk Audio CSW Series built-in subwoofers. This Class D digital amplifier delivers 500 watts into 4 ohms, ensuring robust and distortion-free bass performance. Its design prioritizes long-term reliability and efficient operation. This manual provides essential information for the safe and effective installation, operation, and maintenance of your SWA500 amppiù vivace.
2. Importanti istruzioni di sicurezza
- Leggere attentamente queste istruzioni prima di utilizzare il amppiù vivace.
- Conservare queste istruzioni per riferimento futuro.
- Prestare attenzione a tutte le avvertenze riportate sul prodotto e nel presente manuale.
- Follow all instructions for safe use and installation.
- Non utilizzare questo apparecchio vicino all'acqua o all'umidità.
- Pulire solo con un panno asciutto.
- Non ostruire le aperture di ventilazione. Installare secondo le istruzioni del produttore.
- Non installare vicino a fonti di calore come radiatori, bocchette di riscaldamento, stufe o altri apparecchi (inclusi amplificatori) che producono calore.
- Non vanificare lo scopo di sicurezza della spina polarizzata o di tipo con messa a terra. Una spina polarizzata ha due lame, una più larga dell'altra. Una spina di tipo con messa a terra ha due lame e un terzo polo di messa a terra. La lama larga o il terzo polo sono forniti per la tua sicurezza. Se la spina fornita non si adatta alla tua presa, consulta un elettricista per la sostituzione della presa obsoleta.
- Proteggere il cavo di alimentazione per evitare che venga calpestato o schiacciato, in particolare in corrispondenza delle spine, delle prese di corrente e del punto in cui esce dall'apparecchio.
- Utilizzare solo accessori/componenti specificati dal produttore.
- Scollegare l'apparecchio durante i temporali o quando non viene utilizzato per lunghi periodi di tempo.
- Affidare tutti gli interventi di assistenza a personale di assistenza qualificato. L'assistenza è richiesta quando l'apparecchio è stato danneggiato in qualsiasi modo, ad esempio se il cavo di alimentazione o la spina sono danneggiati, se è stato versato del liquido o sono caduti degli oggetti nell'apparecchio, se l'apparecchio è stato esposto a pioggia o umidità, se non funziona normalmente o se è caduto.
AVVERTIMENTO: Per ridurre il rischio di incendi o scosse elettriche, non esporre questo apparecchio alla pioggia o all'umidità.
3. Configurazione e connessioni
Prima di effettuare qualsiasi collegamento, assicurarsi che amplifier is powered off and unplugged from the AC outlet. The SWA500 is designed to power up to two Polk Audio CSW Series subwoofers of the same model.
3.1. SPEX Circuit Card Installation
The SWA500 amplifier utilizes SPEX circuit cards to optimize its performance for specific CSW subwoofer models. Ensure the correct SPEX card for your subwoofer model is inserted into the designated slot on the rear panel of the amplifier. These cards provide custom frequency shaping for optimal bass response.
3.2. Collegamenti del pannello posteriore
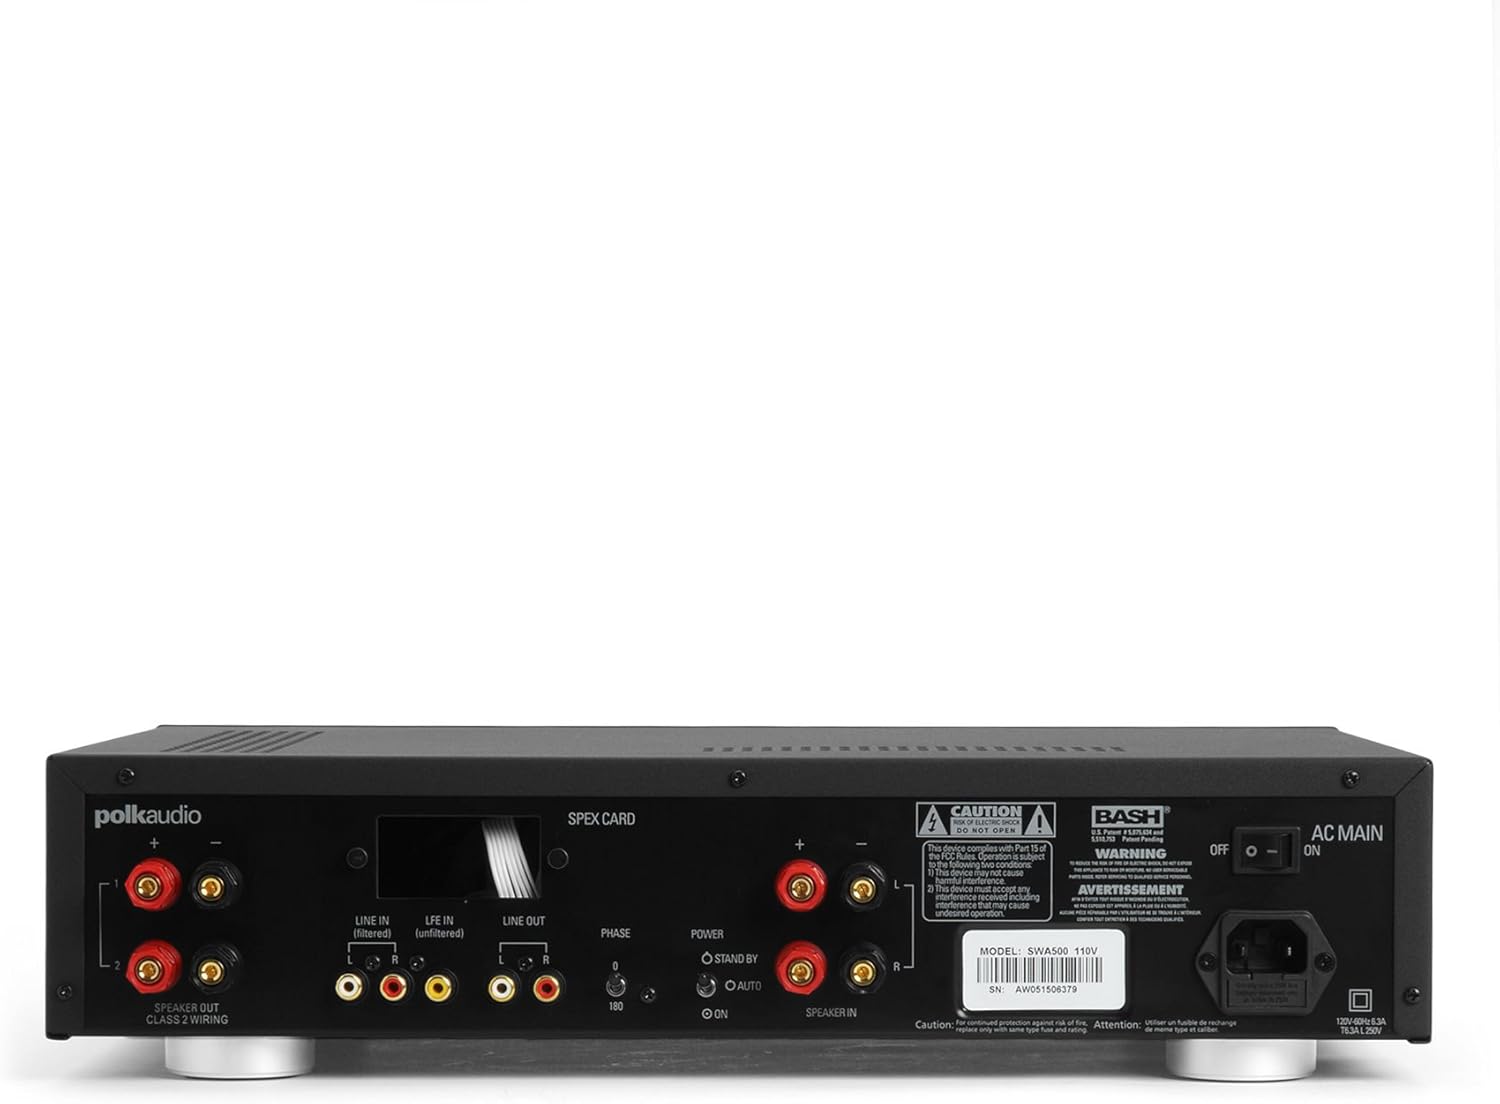
Figure 1: Rear panel of the SWA500 amplifier, illustrating various connection points including Line In, Line Out, Speaker Out, SPEX Card slot, Phase switch, Power mode switch, and AC Main input.
- Line In (Filtered/Unfiltered): Connect your audio source (e.g., AV receiver's subwoofer output) to the appropriate Line In jacks using RCA cables. The "Filtered" input applies a low-pass filter, while "Unfiltered" bypasses it, useful if your source provides its own filtered signal.
- Uscita: These RCA outputs can be used to pass the audio signal to another amplificatore o dispositivo.
- Uscita altoparlante: Connect your Polk Audio CSW subwoofer(s) to these terminals using appropriate speaker wire. Ensure correct polarity (+ to + and - to -). The SWA500 supports Class 2 wiring.
- Interruttore di fase: Adjust this switch (0° or 180°) to optimize the subwoofer's phase with your main speakers for seamless sound integration.
- Interruttore della modalità di alimentazione: Select between "ON" (always on), "AUTO" (turns on when an audio signal is detected), or "STANDBY" (low power mode, awaiting signal).
- CA Principale: Connect the supplied power cord to this input and then to a suitable AC power outlet.
4. Funzionamento
Once all connections are made and the amplifier is plugged in, you can begin operating your SWA500.
4.1. Controlli del pannello frontale

Figure 2: Front panel of the SWA500 amplifier, featuring the Power button, Protection indicator, Low Pass Filter control, and Volume control.
- Pulsante di accensione: Premere per girare il amplifier acceso o spento. La spia di alimentazione si accende quando l'unità è accesa.
- Indicatore di protezione: This light illuminates if the amplifier enters protection mode due to overheating or an electrical fault. If this occurs, turn off the amplificatore, controllare i collegamenti e lasciarlo raffreddare prima di riavviarlo.
- Low Pass Filter (80Hz - 120Hz): This knob adjusts the upper frequency limit of the subwoofer's output. Adjust this to blend the subwoofer's sound seamlessly with your main speakers. Start with a setting around 80Hz and adjust by ear.
- Volume (Min - Max): This knob controls the overall output level of the subwoofer. Adjust to achieve the desired bass intensity relative to your main speakers.
4.2. Regolazione iniziale del suono
Begin with the Low Pass Filter set to a mid-point (e.g., 100Hz) and the Volume knob at a low setting. Play a familiar piece of music or movie scene. Gradually increase the Volume until the bass is noticeable but not overpowering. Then, fine-tune the Low Pass Filter and Phase switch to achieve the most natural and integrated sound with your main speakers. The goal is for the subwoofer to enhance the low frequencies without drawing attention to its location.
5. Manutenzione
- Pulizia: Disconnect the power cord before cleaning. Use a soft, dry cloth to wipe the exterior surfaces of the amplificatore. Non utilizzare detergenti liquidi o spray aerosol.
- Ventilazione: Assicurarsi che le aperture di ventilazione sul amplifier are not blocked. Proper airflow is crucial for preventing overheating and maintaining long-term reliability.
- Magazzinaggio: Se si memorizza il amplifier for an extended period, unplug it from the power outlet and store it in a cool, dry place, away from direct sunlight and extreme temperatures.
6. Risoluzione Dei Problemi
If you experience issues with your SWA500 amplifier, consultare la seguente guida alla risoluzione dei problemi:
| Problema | Possibile causa | Soluzione |
|---|---|---|
| Nessuna spia di alimentazione | Power cord not connected; AC outlet not active; Power switch off. | Ensure power cord is securely connected. Check AC outlet with another device. Press the front panel power button. |
| Nessun suono dal subwoofer | Incorrect input connection; Speaker wires loose or incorrect polarity; Volume too low; SPEX card missing or incorrect; Amplifier in standby/auto mode without signal. | Verify RCA input connections. Check speaker wire connections and polarity. Increase volume. Ensure correct SPEX card is installed. Set Power Mode switch to "ON" for testing. |
| Distorted or poor quality sound | Volume too high; Incorrect Low Pass Filter setting; Phase mismatch; Damaged speaker wire or subwoofer. | Reduce volume. Adjust Low Pass Filter. Toggle Phase switch (0°/180°). Inspect speaker wires and subwoofer for damage. |
| Protection indicator illuminated | Overheating; Short circuit in speaker wiring; Ampcolpa del lificatore. | Spegnere amplifier and allow to cool. Check speaker wiring for shorts. If problem persists, contact customer support. |
7. Specifiche
- Modello: SWA500
- Potenza in uscita: 500 watt su 4 ohm
- AmpTipo lificatore: Classe D digitale
- Compatibilità: Designed for Polk Audio CSW Series built-in subwoofers (requires specific SPEX circuit card)
- Filtro passa basso: Adjustable (Front Panel)
- Controllo del volume: Adjustable (Front Panel)
- Controllo di fase: 0°/180° (Rear Panel)
- Modalità di alimentazione: ON, AUTO, STANDBY (Rear Panel)
- Dimensioni del prodotto: 1 x 1 x 1 inches (approximate, as per provided data)
- Peso dell'articolo: 12.25 libbre
- Produttore: Audio Polk
- Data prima disponibilità: 18 aprile 2005
8. Garanzia e supporto
For specific warranty information, please refer to the warranty card included with your product or visit the official Polk Audio websito. Conservare la ricevuta d'acquisto come prova d'acquisto per eventuali reclami in garanzia.
If you require technical assistance or have questions not covered in this manual, please contact Polk Audio customer support. Contact information can typically be found on the official Polk Audio websul sito o sulla confezione del prodotto.
Polk Audio Ufficiale Websito: www.polkaudio.com