1. Introduzione
Grazie per l'acquistoasing the Dual MP 301 Mini Stereo System. This versatile audio system combines modern and classic audio technologies, allowing you to enjoy music from various sources including CDs, vinyl records, cassette tapes, MP3 files via USB/SD, and radio. This manual provides essential information for the safe and efficient operation of your device. Please read it thoroughly before use and retain it for future reference.
2. Istruzioni di sicurezza
- Garantire l'alimentazione voltage corrisponde all'etichetta di classificazione sull'unità.
- Non esporre l'unità alla pioggia o all'umidità per evitare incendi o scosse elettriche.
- Non ostruire le aperture di ventilazione. Mantenere uno spazio adeguato attorno all'unità per un corretto flusso d'aria.
- Evitare di posizionare l'unità vicino a fonti di calore o alla luce diretta del sole.
- Non aprire il casing. Affidare tutti gli interventi di manutenzione a personale qualificato.
- Scollegare l'unità durante i temporali o quando non viene utilizzata per lunghi periodi.
3. Contenuto della confezione
Verificare che tutti gli articoli siano presenti nel pacco:
- Main Unit (Dual MP 301)
- Antenna FM
- 2 x Speakers (with cables)
- Telecomando (batterie non incluse)
- Manuale d'uso
4. Prodotto finitoview
4.1. Fronte View del Sistema
This image displays the complete Dual MP 301 Mini Stereo System, including the central unit and two external speakers. The central unit features a control panel, display, CD changer, dual cassette deck, and front-facing USB/SD card slots. The speakers are two-way, designed to deliver balanced audio output.

4.2. Pannello di controllo e display
This close-up shows the main control panel of the Dual MP 301. It features an LCD display, various function buttons (e.g., CD/USB, Tape, Tuner/Band, Phono), volume knob, and navigation controls. The display provides information on the current mode, track, station, and time.

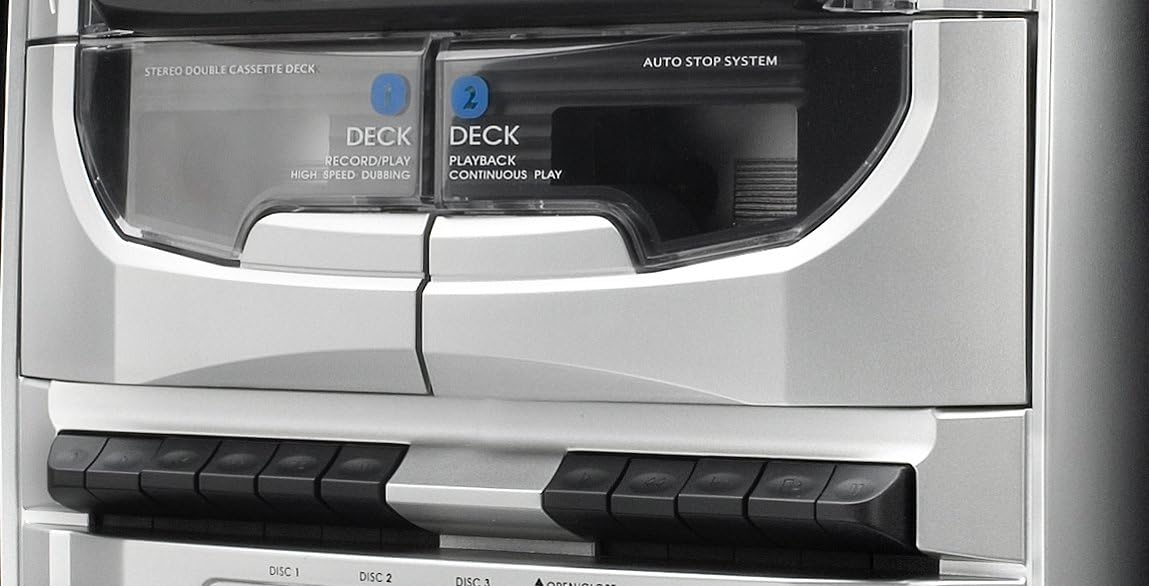
4.3. Dual Cassette Deck
This image highlights the dual mechanical cassette deck. Deck 1 is for record/play and high-speed dubbing, while Deck 2 is for playback and continuous play. The 'Auto Stop System' ensures tape protection. Below the decks are the control buttons for cassette operations.
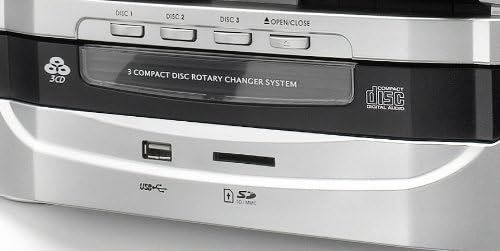
4.4. CD Changer and USB/SD Ports
Un dettagliato view of the 3-compact disc rotary changer system, allowing multiple CDs to be loaded. Below the CD tray, the front panel includes a USB port and an SD/MMC card slot for playing MP3 files and recording audio.
4.5. Controllo remoto
This image shows the remote control unit for the Dual MP 301. It provides convenient access to all major functions, including power, source selection, volume, playback controls, radio tuning, and special features like EQ and sleep timer.

5. Impostazione
5.1. Collegamento degli altoparlanti
- Locate the speaker terminals on the rear of the main unit.
- Connect the speaker wires from the left speaker to the 'L' terminals and from the right speaker to the 'R' terminals. Ensure correct polarity (positive to positive, negative to negative).
5.2. Connecting the FM Antenna
- Connect the supplied FM antenna to the 75-ohm antenna connection port on the rear of the unit.
- Estendere completamente l'antenna e posizionarla in modo da ottenere una ricezione ottimale.
5.3. Collegamento elettrico
- Assicurarsi che tutti i collegamenti siano sicuri.
- Collegare il cavo di alimentazione a una presa a muro adatta.
6. Funzionamento
6.1. Accensione/spegnimento e selezione della modalità
- Premere il tasto IN ATTESA button on the unit or remote to power on or off.
- Utilizzare il FUNZIONE or source buttons (e.g., lettore CD/USB, NASTRO, ACCORDATORE/BANDA, FONO) to select the desired audio source.
6.2. Funzionamento del lettore CD
- Premere il tasto APRI/CHIUDI pulsante per aprire il vassoio del CD.
- Place up to three CDs onto the respective disc trays (DISC 1, DISC 2, DISC 3).
- Premere APRI/CHIUDI di nuovo per chiudere il vassoio.
- Selezionare CD mode. The system will automatically detect and play the first CD.
- Utilizzo SALTA DISCO to switch between loaded CDs.
- Utilizzo RIPRODUCI/PAUSA, FERMARE, SALTA SU/GIÙ per il controllo della riproduzione.
- The system supports CD, CD-R/RW, and MP3 CD formats.
6.3. Funzionamento del lettore di cassette
- Premere il tasto NASTRO pulsante per selezionare la modalità cassetta.
- Open the cassette deck door by pressing the APRIRE pulsante.
- Insert a cassette tape into Deck 1 (Record/Play) or Deck 2 (Playback).
- Use the playback controls (Play, Stop, Fast Forward, Rewind) located below the decks.
- To record, ensure a blank tape is in Deck 1, select the desired source (Radio, CD, USB/SD, Phono), and press the DOCUMENTAZIONE pulsante sul ponte 1.
- For high-speed dubbing, insert the source tape into Deck 2 and a blank tape into Deck 1, then follow the dubbing instructions in the full manual.
6.4. Funzionamento del giradischi
- Lift the turntable cover.
- Metti un disco in vinile sul piatto.
- Selezionare la velocità appropriata (33, 45 o 78 giri/min) utilizzando l'interruttore di selezione della velocità.
- Move the tone arm to the desired position on the record. The turntable will start automatically (auto-stop feature).
- At the end of the record, the turntable will stop automatically.
6.5. Funzionamento radiofonico
- Premere il tasto ACCORDATORE/BANDA button to select FM or MW radio.
- Utilizzare il ACCORDATURA +/- buttons to manually tune to a station or press and hold for automatic scanning.
- To save a station, press MEMORIA, quindi utilizzare PRE-UP/DN per selezionare un numero preimpostato e premere MEMORIA di nuovo per confermare.
- The RDS function provides station information where available.
6.6. Riproduzione e registrazione USB/SD
- Inserire una chiavetta USB o una scheda SD/MMC nell'apposito slot.
- Selezionare USB or SD mode. The system will automatically play compatible MP3 files.
- To record from Vinyl, Cassette, or CD to USB/SD, select the source, then press the RICORDA button while in USB/SD mode.
6.7. Funzioni orologio e sveglia
- The LCD display shows the current time. Refer to the full manual for detailed instructions on setting the clock.
- The integrated alarm and timer functions allow you to set the system to turn on at a specific time, for example, to wake up to radio or CD music.
6.8. Uso delle cuffie
- Connect 3.5mm headphones to the headphone jack on the front panel for private listening.
- Regola il volume a un livello confortevole.
7. Manutenzione
- Pulizia: Per pulire l'unità, utilizzare un panno morbido e asciutto. Non utilizzare detergenti liquidi o spray.
- Polvere: Regularly dust the turntable and cassette deck areas to prevent accumulation that could affect performance.
- Lente CD: Use a specialized CD lens cleaner if playback issues occur.
- Stilo: Handle the turntable stylus with care. Replace it if worn to prevent damage to records.
8. Risoluzione Dei Problemi
- Nessun potere: Check if the power cord is securely plugged in and the wall outlet is functional.
- Nessun suono: Ensure speakers are correctly connected, volume is up, and the correct source is selected. Check headphone connection if applicable.
- CD/Cassette/Vinyl Not Playing: Ensure the media is inserted correctly and is clean. For vinyl, check stylus condition and tone arm placement.
- Scarsa ricezione radio: Adjust the FM antenna position. Check for local interference.
- Il telecomando non funziona: Check battery polarity and replace batteries if necessary. Ensure no obstacles are between the remote and the unit's sensor.
9. Specifiche
| Marca | Doppio |
| Numero di modello | MP 301 |
| Colore | Argento |
| Tecnologia di connettività | USB |
| Caratteristiche speciali | CD Recorder, Integrated Speaker (Note: Product description indicates external speakers, 'Integrated Speaker' might refer to the system's audio output capability) |
| Dispositivi compatibili | Smartphone, Tablet, Lettore MP3 |
| Tipo di altoparlante | Stereo (2-way speakers) |
| Fonte di alimentazione | AC Power (Product description mentions 'Alimenté par batterie' which is 'Battery powered', but this is likely an error given the 100W output and typical mini-system design. Assumed AC power.) |
| Potenza in uscita | Up to 100 Watts (peak) |
| Standard supportati | MP3 |
| Compatibilità Bluetooth | NO |
| Formati audio supportati | CD, Vinyl Records |
| Velocità del giradischi | 33/45/78 giri/min |
| Sintonizzatore radio | RDS-PLL-FM/MW (30 FM, 10 MW presets) |


