1. Introduzione
Grazie per l'acquistoasing the Hello Kitty KT2064 AM/FM Projection Alarm Clock Radio. This device combines a digital alarm clock with an AM/FM radio and a unique projection feature, allowing you to display the time on your ceiling or wall. Please read this manual carefully to ensure proper operation and to fully utilize all features of your new alarm clock radio.

Immagine 1.1: anteriore view of the Hello Kitty KT2064 Projection Alarm Clock Radio, showing the digital display and the Hello Kitty design.
2 Caratteristiche
- Caratteristica di proiezione: Projects the time onto your ceiling or wall with adjustable focus and up to 120-degree pivot angle.
- Dual Alarm Options: Wake up to either a buzzer alarm or your favorite radio station.
- Radio AM/FM: Integrated radio tuner for listening to broadcast stations.
- Funzione snooze: Allows for an additional 9 minutes of sleep before the alarm sounds again.
- Sleep to Radio: Set a timer (up to 2 hours) for the radio to play before automatically turning off.
- Batteria di backup: Mantiene le impostazioni dell'ora e della sveglia durante lo spegnimentotages (requires 3 CR2025 button cell batteries, not included).
- LED Time Display: Clear red LED display for current time.
3. Contenuto della confezione
Si prega di controllare la confezione per verificare la presenza dei seguenti elementi:
- Hello Kitty KT2064 Projection Alarm Clock Radio Unit
- Adattatore di alimentazione CA.
- Manuale dell'utente (questo documento)
Note: 3 CR2025 button cell batteries for backup are not included and must be purchased separately.
4. Impostazione
4.1 Collegamento di alimentazione
- Unpack the alarm clock radio and its accessories.
- Connect the AC power adapter to the DC input jack located on the back of the unit.
- Plug the other end of the AC power adapter into a standard wall outlet. The unit will power on, and the LED display will light up.
4.2 Installing Backup Batteries
Installing backup batteries ensures that your time and alarm settings are retained during a power outage.
- Individuare il vano batterie nella parte inferiore o posteriore dell'unità.
- Aprire il coperchio del vano batterie.
- Insert 3 CR2025 button cell batteries, observing the correct polarity (+ and - markings).
- Chiudere saldamente il coperchio del vano batterie.

Immagine 4.2: posteriore view of the alarm clock radio, showing control buttons and potential location for battery compartment.
5. Istruzioni per l'uso
5.1 Impostazione dell'ora
- Premere e tenere premuto il tasto IMPOSTAZIONE DELL'ORA button (or similar button, refer to unit markings) for approximately 3 seconds until the hour digits begin to flash.
- Utilizzare il ORA or + / - pulsanti per regolare l'ora. Prestare attenzione all'indicatore AM/PM.
- Premere il tasto IMPOSTAZIONE DELL'ORA nuovamente il pulsante. Le cifre dei minuti lampeggeranno.
- Utilizzare il MINUTO or + / - pulsanti per regolare i minuti.
- Premere il tasto IMPOSTAZIONE DELL'ORA ancora una volta per confermare e uscire dalla modalità di impostazione dell'ora.
5.2 Impostazione della sveglia (Sveglia 1 e Sveglia 2)
This unit supports two independent alarms.
- Premere e tenere premuto il tasto AL1 SET button (for Alarm 1) or AL2 SET button (for Alarm 2) for approximately 3 seconds until the hour digits of the alarm time begin to flash.
- Utilizzare il ORA or + / - pulsanti per regolare l'ora della sveglia.
- Premere il rispettivo AL IMP nuovamente il pulsante. Le cifre dei minuti lampeggeranno.
- Utilizzare il MINUTO or + / - pulsanti per regolare i minuti della sveglia.
- Premere il tasto AL IMP button again to select the alarm source: BUZZER or RADIO. Utilizzare il + / - buttons to toggle.
- Premere il tasto AL IMP ancora una volta per confermare e uscire dalla modalità di impostazione della sveglia.
- Per attivare/disattivare un allarme, premere il tasto AL1 ACCESO/SPENTO or AL2 ACCESO/SPENTO button (or similar) repeatedly until the alarm indicator appears/disappears on the display.
5.3 Using the Radio
- Premere il tasto RADIO ACCESA/SPENTA pulsante per accendere la radio.
- Premere il tasto AM/FM pulsante per passare dalla banda AM a quella FM.
- Utilizzare il SINTONIA+ E SINTONIZZARE- pulsanti per sintonizzarsi manualmente sulla stazione desiderata.
- For automatic scanning, press and hold SINTONIA+ or SINTONIZZARE- for a few seconds until the radio finds the next clear station.
- Regolare il volume utilizzando il VOLUME+ E VOLUME - pulsanti.
- Per spegnere la radio, premere il RADIO ACCESA/SPENTA di nuovo il pulsante.
5.4 Funzione di proiezione
- Locate the projector lens on top of the unit.
- Premere il tasto PROIETTORE ACCESO/SPENTO button to activate the time projection.
- Adjust the angle of the projector head (up to 120 degrees) to direct the time display onto your ceiling or wall.
- Ruotare il MESSA A FUOCO ring around the projector lens to achieve a clear image.
- To turn off the projection, press the PROIETTORE ACCESO/SPENTO di nuovo il pulsante.

Image 5.4: The alarm clock radio actively projecting the time and Hello Kitty logo onto a surface.
5.5 Funzione posticipa
Quando suona la sveglia, premere il tasto grande POSTICIPARE button (usually located on top of the unit). The alarm will pause for approximately 9 minutes and then sound again.
5.6 Sleep to Radio Function
This feature allows you to fall asleep to the radio, which will automatically turn off after a set period.
- Turn on the radio and tune to your desired station.
- Premere il tasto SONNO button repeatedly to cycle through the available sleep timer durations (e.g., 120, 90, 60, 30, 15 minutes, or OFF). The selected duration will appear on the display.
- The radio will play for the chosen duration and then automatically turn off.
6. Manutenzione
- Pulizia: Pulire l'unità con un panno morbido e asciutto. Non utilizzare detergenti abrasivi o solventi.
- Esposizione all'acqua: Tenere l'unità lontana dall'acqua o da umidità eccessiva.
- Temperatura: Evitare di esporre l'unità a temperature estreme o alla luce solare diretta.
- Sostituzione della batteria: Replace backup batteries annually or when the low battery indicator appears to ensure continuous functionality during power outages.
7. Risoluzione Dei Problemi
| Problema | Possibile causa | Soluzione |
|---|---|---|
| L'unità non si accende. | Adattatore di alimentazione non collegato o presa difettosa. | Ensure the power adapter is securely plugged into the unit and a working wall outlet. Test the outlet with another device. |
| Le impostazioni dell'ora/sveglia vengono perse dopo lo spegnimentotage. | Le batterie di riserva sono scariche o non installate. | Install new CR2025 button cell batteries or replace existing ones. |
| La proiezione è sfocata. | La messa a fuoco non è regolata correttamente. | Ruotare il MESSA A FUOCO ring around the projector lens until the image is clear. |
| La ricezione radiofonica è scarsa. | Antenna non estesa o interferenza. | Extend the FM wire antenna fully. For AM, try repositioning the unit. Avoid placing near electronic devices that may cause interference. |
| L'allarme non suona. | L'allarme non è attivato o è impostato in modo errato. | Ensure the alarm is set and activated (alarm indicator visible). Check alarm volume if set to radio. |
8. Specifiche
| Marca | Ciao Kitty |
| Numero di modello | KT2064P |
| Tipo di visualizzazione | LED digitale |
| Fonte di alimentazione | Adattatore di alimentazione CA. |
| Batteria di backup | 3 x CR2025 Button Cell (not included) |
| Frequenza Radio | AM/FM (FM up to 108 MHz) |
| Dimensioni del prodotto (L x P x A) | 14.5 x 11.9 x 17.3 cm (circa 5.7 x 4.7 x 6.8 pollici) |
| Peso del prodotto | 885 g (circa 1.95 libbre) |
| Angolo di proiezione | Fino a 120 gradi |
| Durata del posticipo | 9 minuti |
| Timer di spegnimento | Fino a 2 ore |
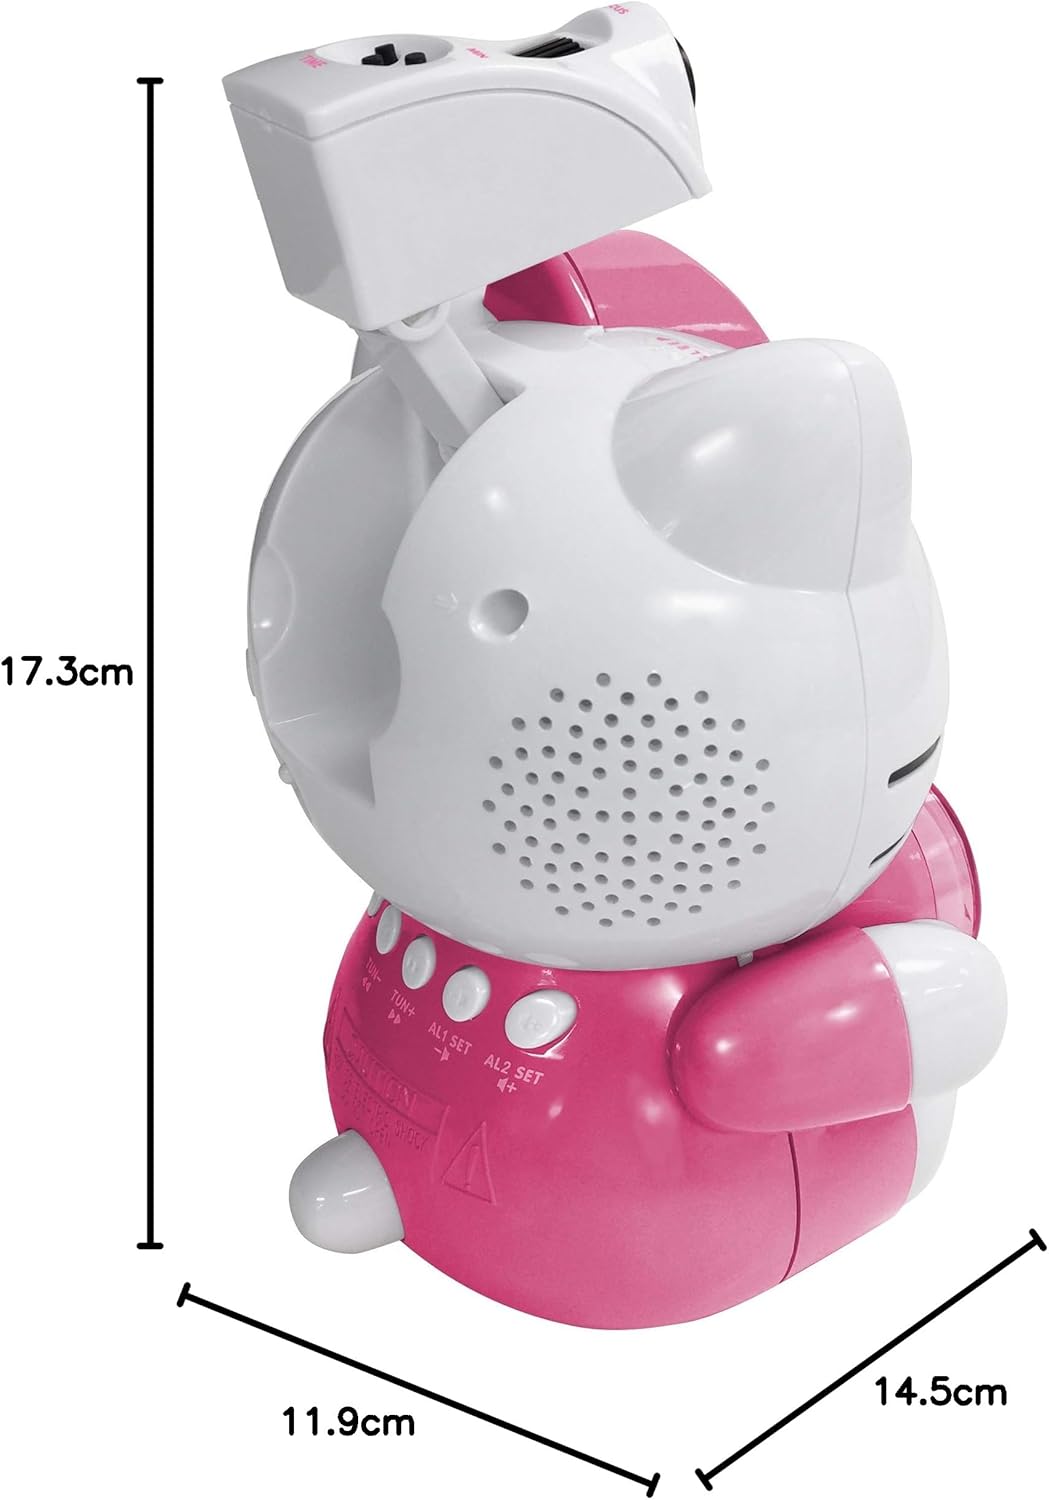
Image 8.1: Dimensions of the Hello Kitty KT2064 Projection Alarm Clock Radio.
9. Garanzia e supporto
This product comes with a standard manufacturer's warranty. For specific warranty details, please refer to the documentation provided at the time of purchase or contact your retailer. If you encounter any issues not covered in the troubleshooting section, please contact customer support for assistance.
For support inquiries, please visit the official Hello Kitty product support websito o contattare il distributore locale.


