Introduzione
Thank you for choosing the VUPOINT Solutions PDS-ST441-VP Magic Wand Portable Scanner. This compact and versatile device allows you to easily scan color and monochromatic images, documents, and magazines on the go. With its high resolution capabilities and convenient preview display, it's an ideal tool for digitizing your important papers and visuals.
Contenuto della confezione
Si prega di controllare il contenuto della confezione per assicurarsi che siano presenti tutti gli articoli:
- VUPOINT Solutions PDS-ST441-VP Magic Wand Portable Scanner
- Cavo USB 2.0
- 2 batterie AA (incluse)
- Panno per la pulizia
- Borsa da trasporto
- Manuale dell'utente (questo documento)
Prodotto finitoview
Familiarize yourself with the components of your Magic Wand Portable Scanner.
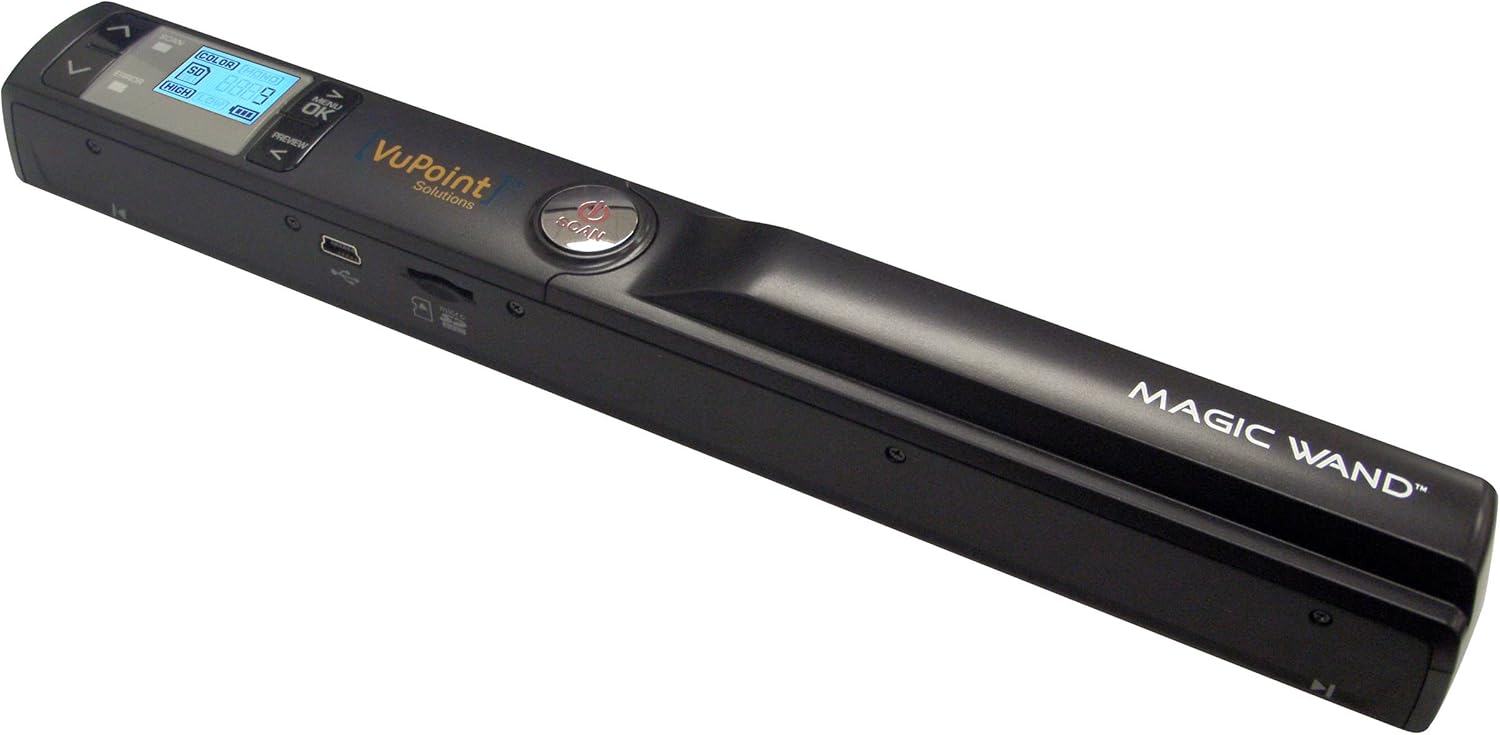
Figura 1: The VUPOINT Magic Wand Portable Scanner, showcasing its sleek black design, integrated color display, and control buttons. The scanner features a USB port and a microSD card slot on its side.
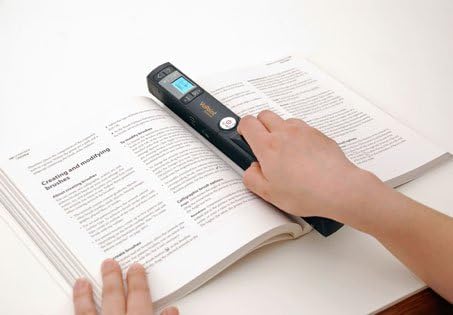
Figura 2: A user demonstrating the portable scanner in action, gliding it across an open book page. This illustrates the handheld nature and ease of use for digitizing printed materials.
Caratteristiche principali:
- Portable design for on-the-go scanning.
- 1" CSTN LCD display for previewing scans.
- Multiple resolution settings: 300 DPI (Standard), 600 DPI (High), and 900 DPI (Fine).
- Supports JPEG and PDF file formati.
- 2x, 4x, 8x preview zoom capability.
- Connettività USB 2.0 per il trasferimento dati.
Impostare
1. Installazione della batteria
- Individuare il coperchio del vano batteria sullo scanner.
- Far scorrere il coperchio per aprirlo.
- Inserire due (2) batterie AA, assicurandosi della corretta polarità (+/-) come indicato all'interno del vano.
- Chiudere saldamente il coperchio del vano batterie.
2. Inserimento della scheda MicroSD
The scanner requires a microSD card (not included, unless specified in package) to store scanned images.
- Locate the microSD card slot on the side of the scanner.
- Gently insert the microSD card into the slot with the gold contacts facing down, until it clicks into place.
- Per rimuoverla, spingere delicatamente la scheda finché non scatta, quindi rilasciarla per espellerla.
3. Accensione iniziale
Press and hold the Power button until the display turns on. The scanner is now ready for use.
Istruzioni per l'uso
1. Accensione/Spegnimento
- Per accendere: Premere e tenere premuto il tasto Energia finché lo schermo LCD non si illumina.
- Per spegnere: Premere e tenere premuto il tasto Energia button until the LCD screen turns off. The scanner will also automatically power off after a period of inactivity to conserve battery.
2. Impostazione della modalità di scansione e della risoluzione
Use the buttons next to the display to navigate and select settings:
- Impostazione DPI: Premere il tasto DPI button to cycle through 300 DPI (Std), 600 DPI (High), and 900 DPI (Fine). Higher DPI results in better quality but larger file dimensioni.
- Modalità colore: Premere il tasto Colore/Mono button to switch between Color and Monochromatic (Black & White) scanning.
- File Formato: Some models allow switching between JPEG and PDF. Refer to your scanner's display for this option.
3. Esecuzione di una scansione
- Place the document or image you wish to scan on a flat, stable surface.
- Tenere saldamente lo scanner con entrambe le mani.
- Allineare la finestra di scansione dello scanner con il bordo superiore del documento.
- Premere il tasto SCANSIONE button once to start scanning. The scan indicator light will illuminate.
- Slowly and steadily glide the scanner downwards across the document, maintaining even pressure. Avoid tilting or lifting the scanner.
- Once you reach the end of the document, press the SCANSIONE button again to stop scanning. The scan indicator light will turn off.
- The scanned image will be saved to the microSD card.
Mancia: For best results, practice scanning on a few scrap documents to get a feel for the optimal speed and pressure.
4.Previewing Scans
Use the built-in 1" CSTN LCD display to preview your scanned images. Use the navigation buttons to scroll through saved files. The display supports 2x, 4x, and 8x zoom for detailed inspection.
5. Trasferimento Fileda un computer
There are two primary methods to transfer your scanned files:
- Connessione USB diretta:
- Collega lo scanner al computer utilizzando il cavo USB in dotazione.
- Lo scanner apparirà come un'unità disco rimovibile sul tuo computer.
- Open the drive to access the "DCIM" folder, where your scanned images are stored.
- Copia e incolla il filenella posizione desiderata sul computer.
- Using a MicroSD Card Reader:
- Safely eject the microSD card from the scanner.
- Insert the microSD card into a compatible card reader connected to your computer.
- Access the card as a removable drive and transfer your files.
Manutenzione
1. Pulizia dello scanner
- Prima di procedere alla pulizia, assicurarsi che lo scanner sia spento.
- Use the provided cleaning cloth or a soft, lint-free cloth to gently wipe the exterior of the scanner.
- For the scanning glass/lens, use a specialized lens cleaning solution and a microfiber cloth. Do not use abrasive cleaners or solvents.
- Regularly clean the paper path and rollers to prevent dust and debris from affecting scan quality.
2. Cura della batteria
- Rimuovere le batterie se lo scanner non viene utilizzato per un periodo prolungato per evitare perdite.
- Use high-quality alkaline or rechargeable AA batteries for optimal performance.
3. Conservazione
Store the scanner in a cool, dry place, away from direct sunlight, extreme temperatures, and high humidity. Use the provided carrying pouch for protection during transport.
Risoluzione dei problemi
| Problema | Possibile causa | Soluzione |
|---|---|---|
| Lo scanner non si accende. | Batterie scariche o esaurite; inserimento errato delle batterie. | Sostituire le batterie o assicurarsi che siano inserite con la polarità corretta. |
| Scarsa qualità di scansione (strisce, immagini sfocate). | Dirty scanning lens/rollers; uneven scanning speed; document movement. | Clean the scanner lens and rollers. Scan slowly and steadily. Ensure document is flat and still. |
| Impossibile salvare le scansioni. | MicroSD card full; card not inserted correctly; card error. | Elimina vecchio files or use a new/empty microSD card. Reinsert the card. Format the card (this will erase all data). |
| Scanner non riconosciuto dal computer. | Loose USB connection; faulty USB cable; driver issue. | Assicurati che il cavo USB sia collegato correttamente. Prova una porta USB o un cavo diverso. Riavvia il computer. |
Specifiche
| Caratteristica | Dettaglio |
|---|---|
| Dimensioni del prodotto | 10.1 x 1.2 x 1.1 pollici |
| Peso dell'articolo | 4.8 once |
| Numero di modello | PDS-ST441-VP |
| Batterie | 2 batterie AA (incluse) |
| Tipo di supporto | USB |
| Tipo di scanner | Documento |
| Marca | VuPoint |
| Tecnologia di connettività | USB |
| Risoluzione | 300 DPI, 600 DPI, 900 DPI |
| Dimensioni del foglio | Lettera, A4 |
| Requisiti minimi di sistema | Finestre 7 |
| Codice UPC | 874121003710 |
Garanzia e supporto
For warranty information and technical support, please refer to the warranty card included with your product or visit the official VuPoint Solutions websito. Conservare la ricevuta d'acquisto come prova d'acquisto per eventuali reclami in garanzia.
For further assistance, you may contact VuPoint Solutions customer service through their official channels.


