Introduzione
This manual provides detailed instructions for the operation and maintenance of your Eton Grundig G2 AM/FM/Shortwave Radio Recorder. Please read this manual thoroughly before using the device to ensure proper function and longevity.
Contenuto della confezione
Verificare che tutti gli articoli siano presenti nel pacco:
- Eton Grundig G2 Radio Recorder
- Cavo di alimentazione
- Batteria ricaricabile
- Manuale dell'utente (questo documento)
Prodotto finitoview
Familiarize yourself with the various components and controls of your Grundig G2 radio.

Figura 1: Comandi e display del pannello frontale. This image shows the front of the Eton Grundig G2 radio, highlighting the LCD display, dual speakers, numeric keypad, and various function buttons for power, volume, tuning, and mode selection.

Figure 2: Portable Use Examplui. The radio is shown being held by two hands, demonstrating its compact and portable design suitable for use in various environments, such as outdoor events.

Figura 3: Pannello posteriore e vano batteria. This image displays the back of the radio, including the battery cover, product information, and ventilation grilles.

Figure 4: Top Panel with Micro SD Slot. A close-up of the top edge of the radio, showing the Micro SD card slot for media playback and recording storage.
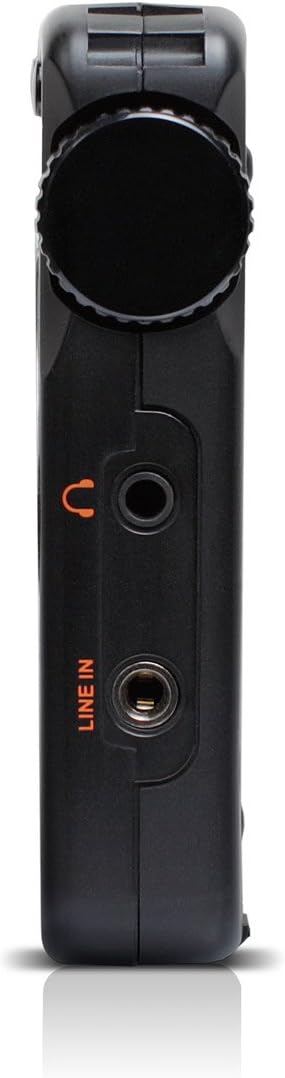
Figure 5: Left Side Panel. Questo view highlights the headphone jack and line-in audio input on the left side of the device.

Figure 6: Right Side Panel. This image shows the USB port, microphone input, and power switch located on the right side of the radio.
Impostare
1. Installazione e ricarica della batteria
- Locate the battery compartment on the rear of the radio (refer to Figure 3).
- Open the compartment cover and insert the provided rechargeable battery, ensuring correct polarity.
- Chiudere saldamente il coperchio del vano batterie.
- Connect the power cord to the radio's power input and a suitable power outlet. The radio will begin charging. Allow approximately four hours for a full charge during initial use.
2. Accensione iniziale
- Ensure the battery is installed or the power cord is connected.
- Premere il tasto Energia button (usually located on the top left of the front panel) to turn on the radio.
- Il display LCD si illuminerà.
Istruzioni per l'uso
Accensione/spegnimento
Premere il tasto Energia pulsante per accendere o spegnere l'unità.
Regolazione del volume
Utilizzare il V- E V+ buttons to decrease or increase the volume level.
Radio Tuning (AM/FM/SW)
The Grundig G2 offers five tuning methods:
- Selezione della banda: Premere il tasto FM, MW (AM), or SW buttons to select the desired frequency band.
- Jog Tuning: Rotate the tuning knob (often labeled MENU/INVIO or similar) to manually scan frequencies.
- Sintonizzazione manuale: Utilizzare il Freccia su/giù pulsanti per regolare la frequenza passo dopo passo.
- Sintonizzazione automatica: Premere e tenere premuto il tasto Freccia su/giù pulsanti per cercare automaticamente la stazione disponibile successiva.
- ATS (Auto Tuning Storage): Premere e tenere premuto il tasto IMPOSTATO button to automatically scan and store strong stations in the current band.
- Sintonizzazione della memoria: Use the numeric keypad (0-9) to directly enter a stored station number or frequency.
Station Memory Storage
Per memorizzare una stazione:
- Sintonizzati sulla stazione desiderata.
- Premere il tasto IMPOSTATO button. The memory location number will flash on the display.
- Use the numeric keypad or tuning knob to select a memory location.
- Premere IMPOSTATO again to confirm. The station is now stored.
The radio supports up to 248 station memory storage locations.
MP3 and WMA Playback
The Grundig G2 can play MP3 and WMA audio fileda una scheda Micro SD.
- Insert a Micro SD card containing MP3/WMA files into the Micro SD slot (refer to Figure 4).
- Premere il tasto RADIO/MP3 button to switch to MP3 mode.
- Utilizzare il Riproduci/Pausa, Traccia successiva/precedente pulsanti per controllare la riproduzione.
Funzione di registrazione
The radio supports recording of radio broadcasts and external audio via the microphone or line-in input.
- Assicurarsi che sia inserita una scheda Micro SD.
- To record radio: Tune to the desired station. Press the RICORDA pulsante (se disponibile, o una combinazione come MENU/INVIO then select record).
- To record via microphone: Ensure the radio is in recording mode. Speak into the built-in microphone.
- To record via line-in: Connect an external audio source to the LINEA IN jack (refer to Figure 5). Ensure the radio is in recording mode.
- Premere il tasto FERMARE button to end recording. Recordings are saved to the Micro SD card.
Impostazioni della lingua
The radio supports multiple display languages. To change the language:
- Premere il tasto MENU/INVIO pulsante.
- Navigate through the menu options using the tuning knob or arrow buttons until you find "Language" or a similar setting.
- Select the desired language and confirm.
Manutenzione
- Pulizia: Utilizzare un panno morbido e asciutto per pulire l'esterno della radio. Non utilizzare detergenti liquidi o materiali abrasivi.
- Magazzinaggio: When not in use for extended periods, store the radio in a cool, dry place. Remove the battery if storing for several months.
- Cura della batteria: Recharge the battery regularly to maintain its lifespan. Avoid fully discharging the battery frequently.
- Antenna: Handle the telescopic antenna with care to prevent damage.
Risoluzione dei problemi
| Problema | Possibile causa | Soluzione |
|---|---|---|
| La radio non si accende. | Battery is discharged or not installed correctly. Power cord is not connected. | Ensure battery is charged and correctly inserted. Connect the power cord. |
| Ricezione radiofonica scadente. | Weak signal. Antenna not extended. Interference from other electronics. | Extend the telescopic antenna fully. Reposition the radio. Move away from interfering devices. |
| Formato MP3/WMA filenon sta giocando. | Micro SD card not inserted or corrupted. Incorrect file formato. | Ensure Micro SD card is properly inserted. Verify files are MP3 or WMA format. Try a different Micro SD card. |
| La registrazione non funziona. | No Micro SD card inserted. Card full. | Inserisci una scheda Micro SD. Elimina la vecchia fileper liberare spazio. |
| Il display mostra un'ora errata. | Time not set or ATS not used. | Manually set the time or use the ATS function on an FM station that broadcasts RDS time data. |
Specifiche
| Numero di modello | NG2B |
| Dimensioni (L x P x A) | 7.5 x 3.5 x 0.8 pollici |
| Peso | 9.6 once |
| Bande radio supportate | AM, FM, Shortwave (SW) |
| Metodi di ottimizzazione | Jog, Manual, Auto, Memory, ATS |
| Preset di memoria | 248 stazioni |
| Riproduzione audio | MP3, WMA (via Micro SD card) |
| Registrazione | Radio broadcasts, Microphone, Line-in |
| Connettività | USB |
| Fonte di alimentazione | Rechargeable Battery, Corded Electric |
| Componenti inclusi | Power Cord, Battery |
Garanzia e supporto
For warranty information and technical support, please refer to the official Eton or Grundig webo contattare il servizio clienti. Conservare la prova d'acquisto per eventuali reclami in garanzia.
Nota: i termini specifici della garanzia possono variare in base alla regione e al rivenditore.