1. Introduzione
This manual provides detailed instructions for the assembly, operation, and maintenance of your Sauder Palladia Credenza, Model 412079. Please read all instructions carefully before beginning assembly or use to ensure proper function and longevity of your furniture.
Caratteristiche principali:
- Top surface with full-length cord pass-through for convenient device charging.
- Sliding top and faux drawer fronts on full-extension ball bearing slides, revealing compartmentalized storage for electronics.
- Adjustable shelf behind each door for flexible storage configurations.
- Storage areas behind doors designed to accommodate computer or media components.
- Pull-out, adjustable center shelf for printer or other office equipment.
2. Informazioni sulla sicurezza
Durante il montaggio e l'uso, osservare le seguenti norme di sicurezza:
- Si consiglia il montaggio da parte di due persone: Due to the size and weight of the components, assembly by two adults is strongly recommended to prevent injury and damage to the product.
- Utilizzo su superficie piana: Assemble and place the credenza on a flat, level surface to ensure stability and prevent tipping.
- Tecniche di sollevamento corrette: When moving the credenza, lift with your legs, not your back, and seek assistance for heavy components.
- Fissare tutti i dispositivi di fissaggio: Ensure all screws, cams, and other fasteners are securely tightened according to the assembly instructions. Periodically check and retighten as needed.
- Limiti di peso: Do not exceed the recommended weight limits for shelves and the top surface. Overloading can cause structural failure.
- Gestione del cavo: Utilize the integrated cord management features to prevent tripping hazards and ensure proper ventilation for electronic devices.
- Bambini e animali domestici: Keep small children and pets away from the assembly area. Small parts can be a choking hazard.
3. Contenuto della confezione
Verify that all components are present before beginning assembly. Refer to the included assembly instructions for a detailed list of parts and hardware.
- Istruzioni di montaggio
- Hardware kit (screws, cams, dowels, etc.)
- Engineered wood panels and components
4. Istruzioni di montaggio
Assembly is required for this product. Please follow the step-by-step instructions provided in the separate assembly manual included in your package. The process typically involves:
- Disimballaggio e ispezione: Carefully unpack all components and inspect for any damage. Report any damaged or missing parts immediately to customer support.
- Identificare le parti: Lay out all panels and hardware, matching them to the diagrams in the assembly manual.
- Montare la struttura di base: Begin by assembling the main frame and base of the credenza.
- Installare ripiani e divisori: Insert fixed and adjustable shelves, and any internal dividers.
- Fissare le cerniere delle porte e le porte: Secure hinges to the doors and then attach doors to the credenza frame. Adjust as necessary for proper alignment.
- Install Sliding Mechanisms: Attach the full-extension ball bearing slides for the top and faux drawer fronts.
- Fissare il pannello posteriore: Secure the back panel to the credenza.
- Ultimi ritocchi: Install handles, level the unit, and clean any dust or debris.

Figure 4.1: Product Dimensions. The credenza measures 29.61 inches in height, 62.05 inches in width, and 22.01 inches in depth.

Figure 4.2: Detail of the full-extension ball bearing slide. These slides ensure smooth operation of the sliding top and faux drawer fronts.
5. Istruzioni per l'uso
5.1. Sliding Top and Hidden Storage
The top surface of the credenza, along with the two faux drawer fronts, is designed to slide forward on full-extension ball bearing slides. This action reveals a hidden compartment for cord management and storage of electronic devices such as laptops, tablets, and phones.
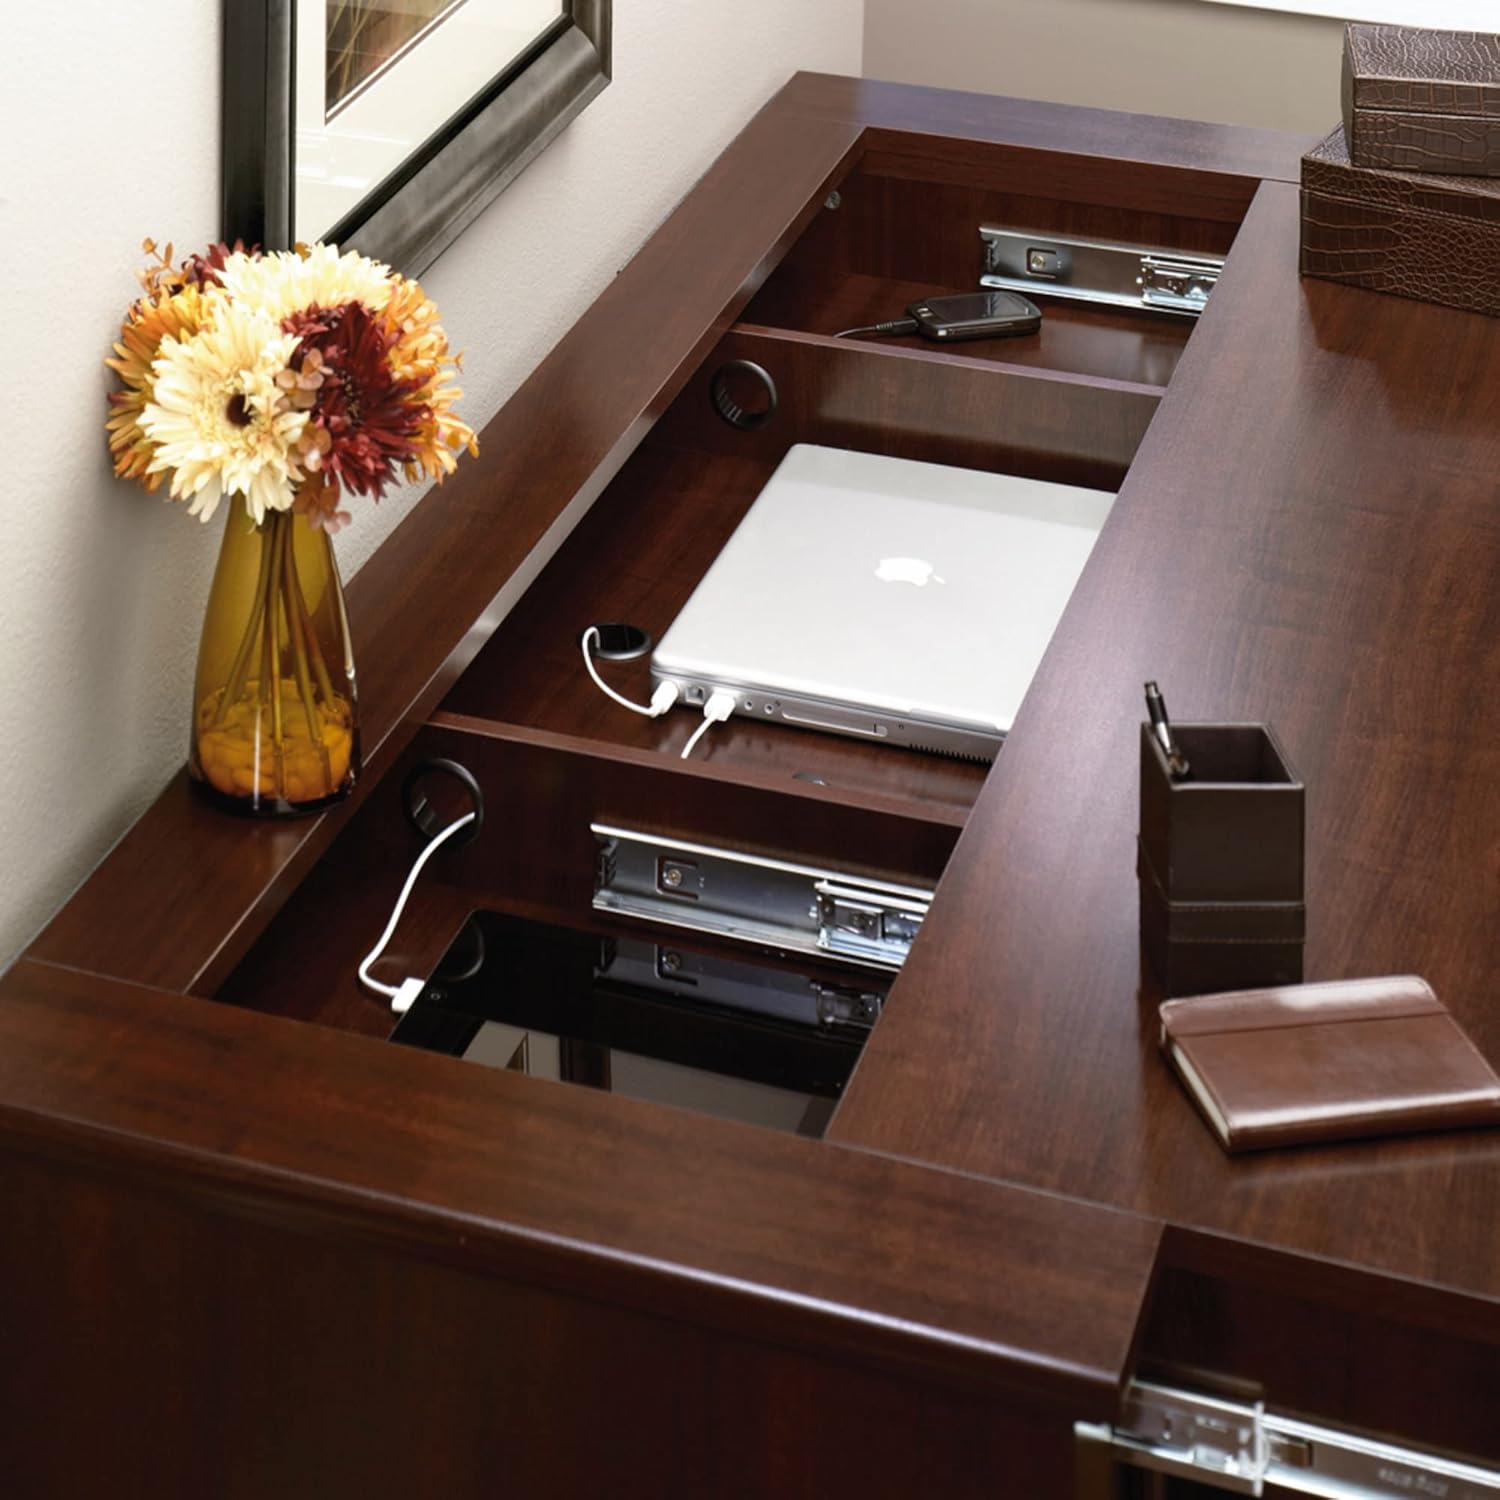
Figure 5.1: The credenza top slides open to reveal a spacious storage area, ideal for laptops and other devices.
5.2. Cord Management and Charging
The hidden compartment includes integrated cord pass-throughs to facilitate easy tabletop charging of mobile devices. Route power cords through these openings to keep your charging area organized and clutter-free.

Figure 5.2: Integrated cord management allows for neat routing of charging cables for various devices.
5.3. Ripiani regolabili
Behind each of the two doors, there is a storage area with an adjustable shelf. To adjust the shelf height, remove the shelf and reposition the shelf pins to the desired level. Ensure all four pins are securely inserted before placing the shelf back.
5.4. Pull-Out Printer Shelf
The center section of the credenza features a pull-out shelf, specifically designed to accommodate a printer or other office equipment. This shelf also offers adjustability for optimal positioning.

Figure 5.3: The pull-out shelf provides easy access for a printer or other office devices.
6. Manutenzione
6.1. Pulizia
- Pulire le superfici con un panno morbido, damp panno. Evitare detergenti abrasivi o prodotti chimici aggressivi, che possono danneggiare la finitura.
- In caso di fuoriuscite, asciugare immediatamente con un panno pulito e asciutto.
6.2. Assistenza generale
- Evitare di appoggiare oggetti caldi direttamente sulla superficie. Utilizzare sottobicchieri o cuscinetti protettivi.
- Keep the credenza away from direct sunlight and heat sources to prevent fading or warping.
- Periodically check and tighten all hardware to ensure structural integrity.
7. Risoluzione Dei Problemi
7.1. Credenza is Wobbly
- Ensure the credenza is placed on a level surface.
- Check all cam locks and screws to ensure they are fully tightened.
7.2. Sliding Top/Drawers Do Not Operate Smoothly
- Inspect the ball bearing slides for any obstructions or debris.
- Ensure the slides are properly aligned and securely attached.
- Avoid overloading the hidden compartment, which can impede movement.
7.3. Doors Are Misaligned
- Adjust the hinges according to the instructions in the assembly manual. Most hinges allow for vertical, horizontal, and depth adjustments.
7.4. Parti mancanti o danneggiate
- Refer to the warranty and support section for information on obtaining replacement parts.
8. Specifiche
| Attributo | Dettaglio |
|---|---|
| Marca | Sauder |
| Numero di modello | 412079 |
| Colore | Select Cherry Finish |
| Dimensioni (P x L x A) | 22.01" x 62.05" x 29.61" |
| Peso | 171 libbre |
| Materiale | Legno ingegnerizzato |
| Tipo di finitura | Select Cherry Finish |
| Tipo di montaggio | Libera installazione |
| Tipologia di camera | Soggiorno, Ufficio |
| Stile della porta | Drawer (faux) |
| Numero di ripiani | 2 (regolabile) |
| Numero di scomparti | 2 (behind doors) |
| Assemblaggio richiesto | SÌ |
| Caratteristica speciale | Adjustable Shelf, Cord Management, Sliding Top |
9. Garanzia e supporto
9.1. Informazioni sulla garanzia
Sauder products typically come with a limited warranty covering defects in materials and workmanship. Please refer to the warranty card included with your product or visit the official Sauder websito per termini e condizioni di garanzia specifici.
9.2. Assistenza clienti
For assistance with assembly, missing parts, or any other product-related inquiries, please contact Sauder customer support. They offer various support options:
- Chat dal vivo: On-demand support available through the Sauder websito.
- Assembly Tip Videos: Helpful video guides for assembly.
- Parti di ricambio: Quick shipping for replacement parts.
- Domestic Call Center: Ready to assist with your questions.
Visitare il Sauder Store on Amazon or the official Sauder websito per i dettagli di contatto e ulteriori risorse di supporto.
10. Video di prodotto
No relevant official product videos from the seller were available for embedding in this manual.


