Introduzione
This instruction manual provides detailed guidance for the assembly, handling, and care of your Tamiya M109A6 Paladin Self-Propelled Artillery plastic model kit. Please read all instructions carefully before beginning assembly to ensure a successful and enjoyable building experience. This kit is designed for model enthusiasts and requires precision and attention to detail.
Informazioni sulla sicurezza
- Piccole parti: Questo kit contiene piccole parti che potrebbero rappresentare un rischio di soffocamento. Tenere fuori dalla portata dei bambini piccoli.
- Strumenti affilati: Assembly requires the use of sharp tools such as hobby knives and nippers. Exercise caution to prevent injury.
- Adesivi e vernici: Use model-specific adhesives and paints in a well-ventilated area. Follow the manufacturer's safety instructions for these products.
- Protezione degli occhi: Consider wearing eye protection during cutting and sanding operations.
Parts List and Preparation
Before starting assembly, carefully check all parts against the included parts diagram in your kit. Ensure all components are present and undamaged. Remove parts from sprues using appropriate tools, carefully trimming any excess plastic (flash). Lightly sand any rough edges for a smooth finish.
Installazione e assemblaggio
Follow the step-by-step assembly instructions provided in the kit's manual. Pay close attention to part numbers and orientation. Test-fit parts before applying adhesive. Allow sufficient drying time for glue before proceeding to the next step.
Sequenza dell'Assemblea Generale:
- Lower Hull Assembly: Begin with the chassis and suspension components. Attach road wheels and drive sprockets.
- Assemblea della pista: Carefully assemble the track links. Ensure proper tension and alignment.
- Upper Hull and Turret Assembly: Construct the main body and turret sections. Integrate interior details if applicable.
- Main Gun Assembly: Assemble the barrel and breech mechanism. Ensure smooth movement if designed to articulate.
- Detailing and Accessories: Add smaller components such as tools, stowage, and crew figures.
- Painting and Decals: Apply paint according to your desired scheme. Once dry, apply decals as indicated in the kit's guide.

Image: An assembled Tamiya M109A6 Paladin model, showcasing the overall structure and details from a front-right angle.

Immagine: Un dettaglio view of the commander's hatch area, including a crew figure in the open hatch.
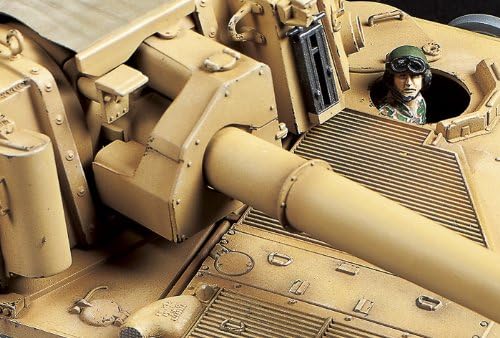
Image: A close-up shot of the main gun barrel and the front section of the turret, highlighting texture and detail.

Immagine: Un'immagine aerea view of the rear of the model, displaying additional equipment and stowage attached to the hull.
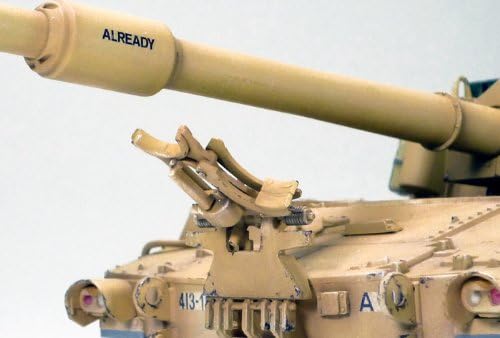
Immagine: Un fronte diretto view of the main gun barrel, showing markings or text applied to it.
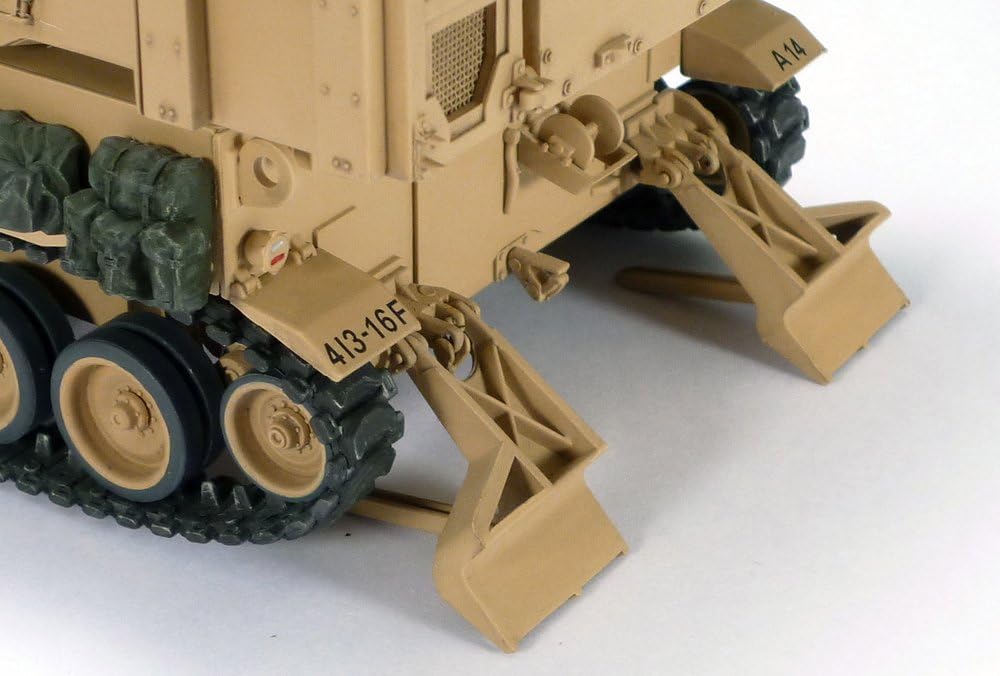
Image: The rear section of the model, focusing on the spades used for stabilizing the artillery piece during firing.

Immagine: Un dettaglio view of the track links and road wheels, showing the intricate suspension system.
Funzionamento e visualizzazione
Once assembled, your Tamiya M109A6 Paladin model is intended for static display. Handle the model with care, avoiding excessive force on delicate parts. To maintain its appearance, display the model in a stable, dust-free environment away from direct sunlight and extreme temperatures, which can cause warping or paint fading.
Manutenzione
- Pulizia: Dust the model regularly with a soft brush or a can of compressed air. Avoid using harsh chemicals or abrasive materials, which can damage paint and plastic.
- Magazzinaggio: If storing the model, place it in a protective container to prevent dust accumulation and accidental damage. Ensure it is stored in a cool, dry place.
- Riparazioni: In case of minor damage, use model adhesive to reattach broken parts. For paint touch-ups, use matching model paints.
Risoluzione dei problemi
- Parti non adatte: Some model kits, including re-boxed kits, may have minor fit issues. Carefully trim or sand mating surfaces for a better fit. Avoid forcing parts together.
- Tensione del binario: If tracks appear too tight or too loose, re-evaluate the assembly steps. Ensure all road wheels and idlers are correctly positioned.
- Problemi di applicazione delle decalcomanie: Ensure the surface is clean and smooth before applying decals. Use decal setting solutions for better adhesion and to conform to irregular surfaces.
- Paint Adhesion: Clean plastic parts thoroughly before painting to remove mold release agents or oils. Use a primer for optimal paint adhesion.
Specifiche
| Numero di modello | 300037012 |
| Marca | TAMIYA |
| Tipo di prodotto | Plastic Model Kit (Self-Propelled Artillery) |
| Scala | 1/35 (Standard for Tamiya armor models) |
| Dimensioni del prodotto | 15.39 x 9.8 x 2.4 pollici (dimensioni della scatola) |
| Peso dell'articolo | 1.15 libbre |
| Produttore | Tamiya |
Informazioni sulla garanzia
As a plastic model kit, this product typically does not come with a functional warranty for the assembled item. However, if you encounter manufacturing defects or missing parts upon initial inspection of the unopened kit, please contact Tamiya customer support or your retailer immediately. Retain your proof of purchase.
Supporto
For further assistance, technical questions, or inquiries regarding replacement parts, please refer to the contact information provided in your kit's packaging or visit the official Tamiya website. Online resources and forums dedicated to model building can also provide valuable tips and community support.
Tamiya Official Websito: www.tamiya.com


