1. Introduzione
This manual provides detailed instructions for the installation, configuration, and operation of your NETGEAR ProSAFE XS712T 12-Port 10GBase-T Gigabit Smart Managed Switch. Designed for small to medium-sized businesses (SMBs), this switch offers high-performance 10-Gigabit connectivity, advanced Layer 2 features, and easy web-based management to meet diverse networking needs.
2. Caratteristiche principali
- Advanced VLAN features such as MAC (Media Access Control), protocol-based VLAN and guest VLAN.
- Advanced QoS (Quality of Service) including Q-in-Q.
- Dynamic VLAN assignment - Increases security by imposing consistent policy and user credentials across the network, regardless of where users connect.
- MLD snooping - Increases network efficiency by forwarding multicast traffic to designated hosts only, rather than flooding multicast packets across all ports.
- Security management.
- IPv6 for management, QoS and ACL.
- Facile da usare Webgestione basata.
3. Contenuto della confezione
Verifica che il pacco contenga i seguenti articoli:
- NETGEAR ProSAFE XS712T 12-Port 10GBase-T Gigabit Smart Managed Switch
- Cavo di alimentazione
- Kit di montaggio su rack (se applicabile)
- Guida all'installazione
4. Prodotto finitoview
The NETGEAR ProSAFE XS712T switch features a robust design with multiple ports and indicators for efficient network management.
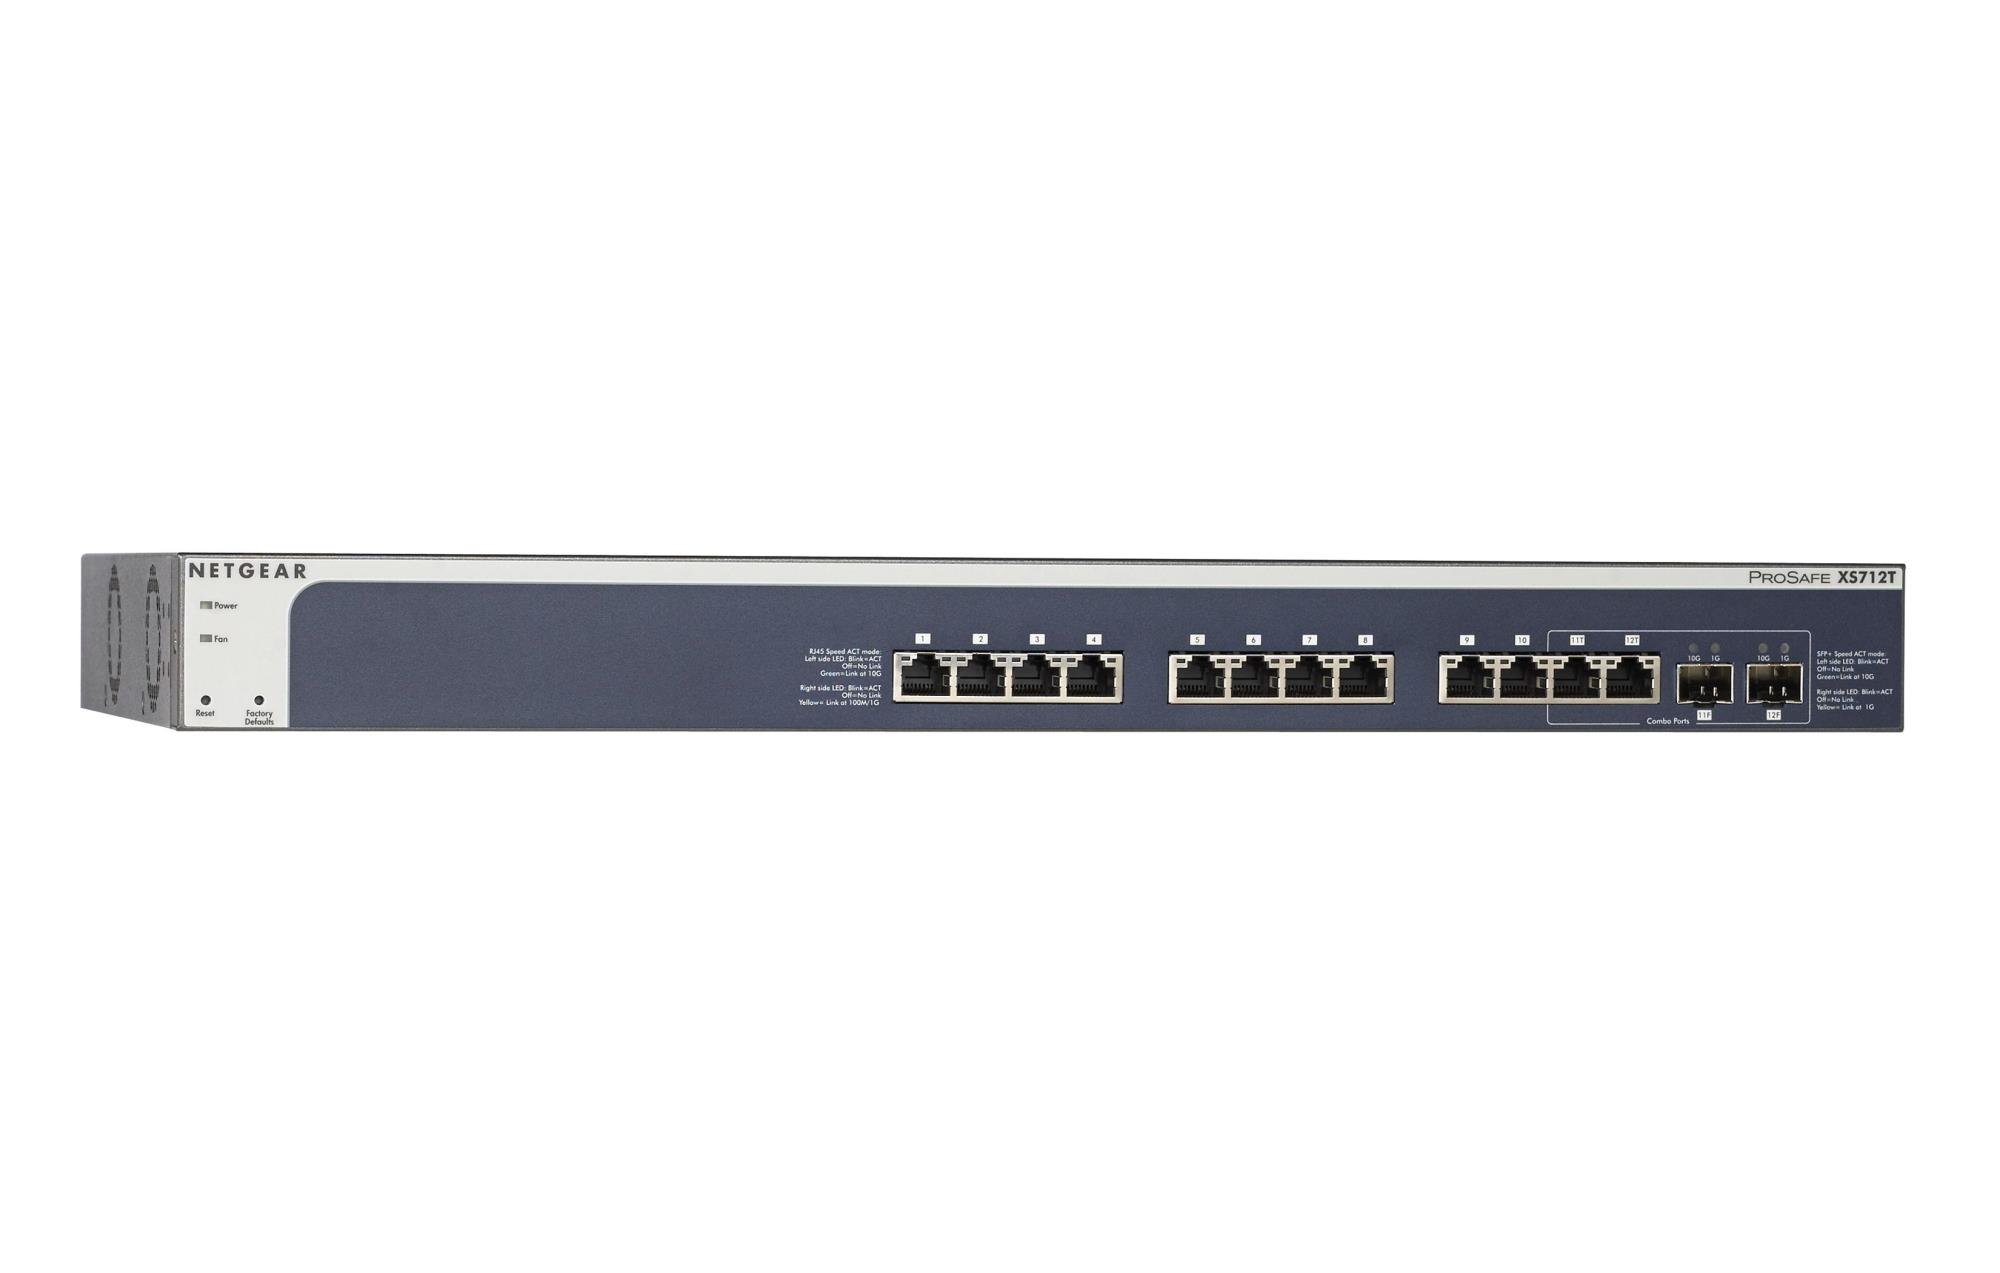
Figure 1: Front Panel of NETGEAR ProSAFE XS712T Switch
This image displays the front panel of the NETGEAR ProSAFE XS712T switch, showing the 12 10GBase-T ports, two combo SFP+ ports, and LED indicators for power, fan status, and port activity. The reset and factory defaults buttons are also visible on the left side.
Componenti del pannello frontale:
- LED di potenza: Indica lo stato di alimentazione del dispositivo.
- LED ventola: Indica lo stato operativo della ventola di raffreddamento.
- Pulsante di reset: Used to restart the switch.
- Pulsante Impostazioni di fabbrica: Used to restore the switch to its factory default settings.
- Porte RJ45 (1-10): 10GBase-T Ethernet ports for high-speed network connections. Each port has associated Link/Act LEDs (Left side LED: Blink=ACT, Off=No Link, Green=Link at 100M/1G; Right side LED: Blink=ACT, Off=No Link, Yellow=Link at 10G).
- Combo Ports (11, 12): These ports can function as either 10GBase-T RJ45 ports or SFP+ fiber ports. Each combo port has associated SFP+ Speed/ACT LEDs (Left side LED: Blink=ACT, Off=No Link, Green=Link at 10G; Right side LED: Blink=ACT, Off=No Link, Yellow=Link at 1G).
5. Impostazione
5.1 Montaggio su rack (opzionale)
If you intend to install the switch in a standard 19-inch equipment rack, use the provided rack-mount kit. Secure the mounting brackets to the sides of the switch using the screws provided. Then, attach the switch to the rack using appropriate rack screws.
5.2 Posizionamento sul desktop
For desktop use, ensure the switch is placed on a flat, stable surface. Allow adequate ventilation around the device to prevent overheating.
5.3 Collegamento di alimentazione
- Collegare un'estremità del cavo di alimentazione in dotazione alla presa di alimentazione CA sul pannello posteriore dello switch.
- Collegare l'altra estremità del cavo di alimentazione a una presa elettrica con messa a terra.
- Verificare che il LED di alimentazione sul pannello frontale si illumini, indicando che lo switch è alimentato.
5.4 Connessioni di rete
- Connect your network devices (servers, workstations, other switches) to the RJ45 ports (1-10) using appropriate Ethernet cables (Cat6a or higher for 10G speeds).
- For fiber optic connections, insert compatible SFP+ transceivers into the combo SFP+ ports (11F, 12F) and connect fiber optic cables.
- Observe the Link/Act LEDs for each connected port. A solid green or yellow light indicates a successful link, and blinking indicates activity.
6. Istruzioni per l'uso
6.1 Funzionamento di base
The NETGEAR ProSAFE XS712T is a plug-and-play device for basic connectivity. Once powered on and connected, it will automatically detect and configure connected devices for optimal performance.
6.2 Web-Gestione basata
Per la configurazione e la gestione avanzate, accedere allo switch webinterfaccia basata su:
- Assicurati che il computer sia collegato allo switch.
- Aprire un web browser and enter the default IP address of the switch (refer to the Quick Start Guide or NETGEAR support for the specific default IP).
- Log in using the default username and password (typically "admin" and "password" or similar, check documentation).
- Dal web interface, you can configure VLANs, QoS settings, security features, and monitor network status.
7. Manutenzione
- Aggiornamenti del firmware: Controllare regolarmente il supporto NETGEAR websito per gli ultimi aggiornamenti del firmware per garantire prestazioni e sicurezza ottimali.
- Pulizia: Mantenere l'interruttore pulito e privo di polvere. Utilizzare un panno morbido e asciutto per la pulizia. Non utilizzare detergenti liquidi o spray.
- Ventilazione: Assicurarsi che le aperture di ventilazione non siano bloccate per evitare il surriscaldamento.
- Gestione dei cavi: Organize network cables to prevent strain on ports and improve airflow.
8. Risoluzione Dei Problemi
- Nessun potere: If the Power LED is off, ensure the power cord is securely connected to both the switch and the electrical outlet. Try a different outlet or power cord.
- Nessun collegamento sulla porta: Controllare la connessione del cavo Ethernet a entrambe le estremità. Provare un cavo o una porta diversi. Assicurarsi che il dispositivo collegato sia acceso e funzioni correttamente.
- Bassa velocità di rete: Verify that you are using appropriate cables (Cat6a or higher for 10G). Check for network congestion or misconfigurations in the switch's settings (e.g., QoS).
- Impossibile accedere Web Interfaccia: Ensure your computer's IP address is in the same subnet as the switch's IP address. Verify the switch's IP address and login credentials. Try resetting the switch to factory defaults if necessary (this will erase all custom configurations).
- Rumore del ventilatore: The switch may generate fan noise during operation, especially under heavy load or in warmer environments. This is normal. Ensure proper ventilation.
9. Specifiche
| Caratteristica | Dettaglio |
|---|---|
| Marca | NETGEAR |
| Numero di modello | XS712T-100NES |
| Numero di porte | 12 (10GBase-T RJ45, 2 Combo SFP+) |
| Velocità di trasferimento dati | 10000 Megabits Per Second (10 Gigabit) |
| Tipo di interfaccia | RJ45, SFP+ |
| Materiale della cassa | Plastica |
| Peso dell'articolo | 1.32 libbre |
| Dimensioni del prodotto | 22.44 x 3.54 x 13.74 pollici |
| Valutazione della temperatura superiore | 40 gradi Celsius |
| Memoria RAM | 2 MB |
| Lingua | Inglese |
10. Garanzia e supporto
For warranty information, technical support, and product registration, please visit the official NETGEAR support website or refer to the warranty card included in your product package. Keep your purchase receipt for warranty claims.
Risorse online:


