1. Introduzione
This manual provides detailed instructions for the proper setup, operation, maintenance, and troubleshooting of your JVC HR-VP58U 4 Head Hi-Fi Stereo VCR. Please read this manual thoroughly before using the unit to ensure optimal performance and safety. Keep this manual for future reference.
2. Informazioni importanti sulla sicurezza
AVVERTIMENTO: To reduce the risk of fire or electric shock, do not expose this appliance to rain or moisture. Do not remove the cover. Refer servicing to qualified personnel only.
- Garantire l'alimentazione voltage corrisponde alla classificazione dell'unità.
- Non ostruire le aperture di ventilazione.
- Evitare di posizionare l'unità vicino a fonti di calore o alla luce diretta del sole.
- Non esporre l'unità a gocce o spruzzi di liquidi.
- Scollegare l'unità durante i temporali o quando non viene utilizzata per lunghi periodi.
3. Contenuto della confezione
Verifica che il pacco contenga i seguenti articoli:
- JVC HR-VP58U VCR Unit
- Telecomando
- Cavo di alimentazione (allegato)
- Audio/Video Cables (RCA type, typically red, white, yellow)
- Manuale di istruzioni (questo documento)
4. Prodotto finitoview
4.1 Pannello frontale

Figura 1: Davanti view of the JVC HR-VP58U VCR with its remote control. The VCR features a power button, tape slot, and front audio/video input jacks.

Figura 2: Dettagliato view of the JVC HR-VP58U VCR's front panel, showing playback controls (Play, Rewind, Fast Forward, Stop/Eject, Pause) and the remote control.
The front panel provides access to essential controls and input jacks for convenient operation. Key features include:
- Pulsante di accensione: Accende o spegne il videoregistratore.
- Tape Slot: Inserire le videocassette VHS per la riproduzione o la registrazione.
- VIDEO (MONO) L-AUDIO-R Jacks: Front panel audio/video input for temporary connections (e.g., camcorder).
- Controlli di riproduzione: Buttons for Play, Stop/Eject, Rewind, Fast Forward, and Pause.
- Display: Shows current channel, time, and operational status.
4.2 Pannello posteriore

Figura 3: Rear panel of the JVC HR-VP58U VCR, displaying the power cord, serial number, and various audio/video input/output ports.
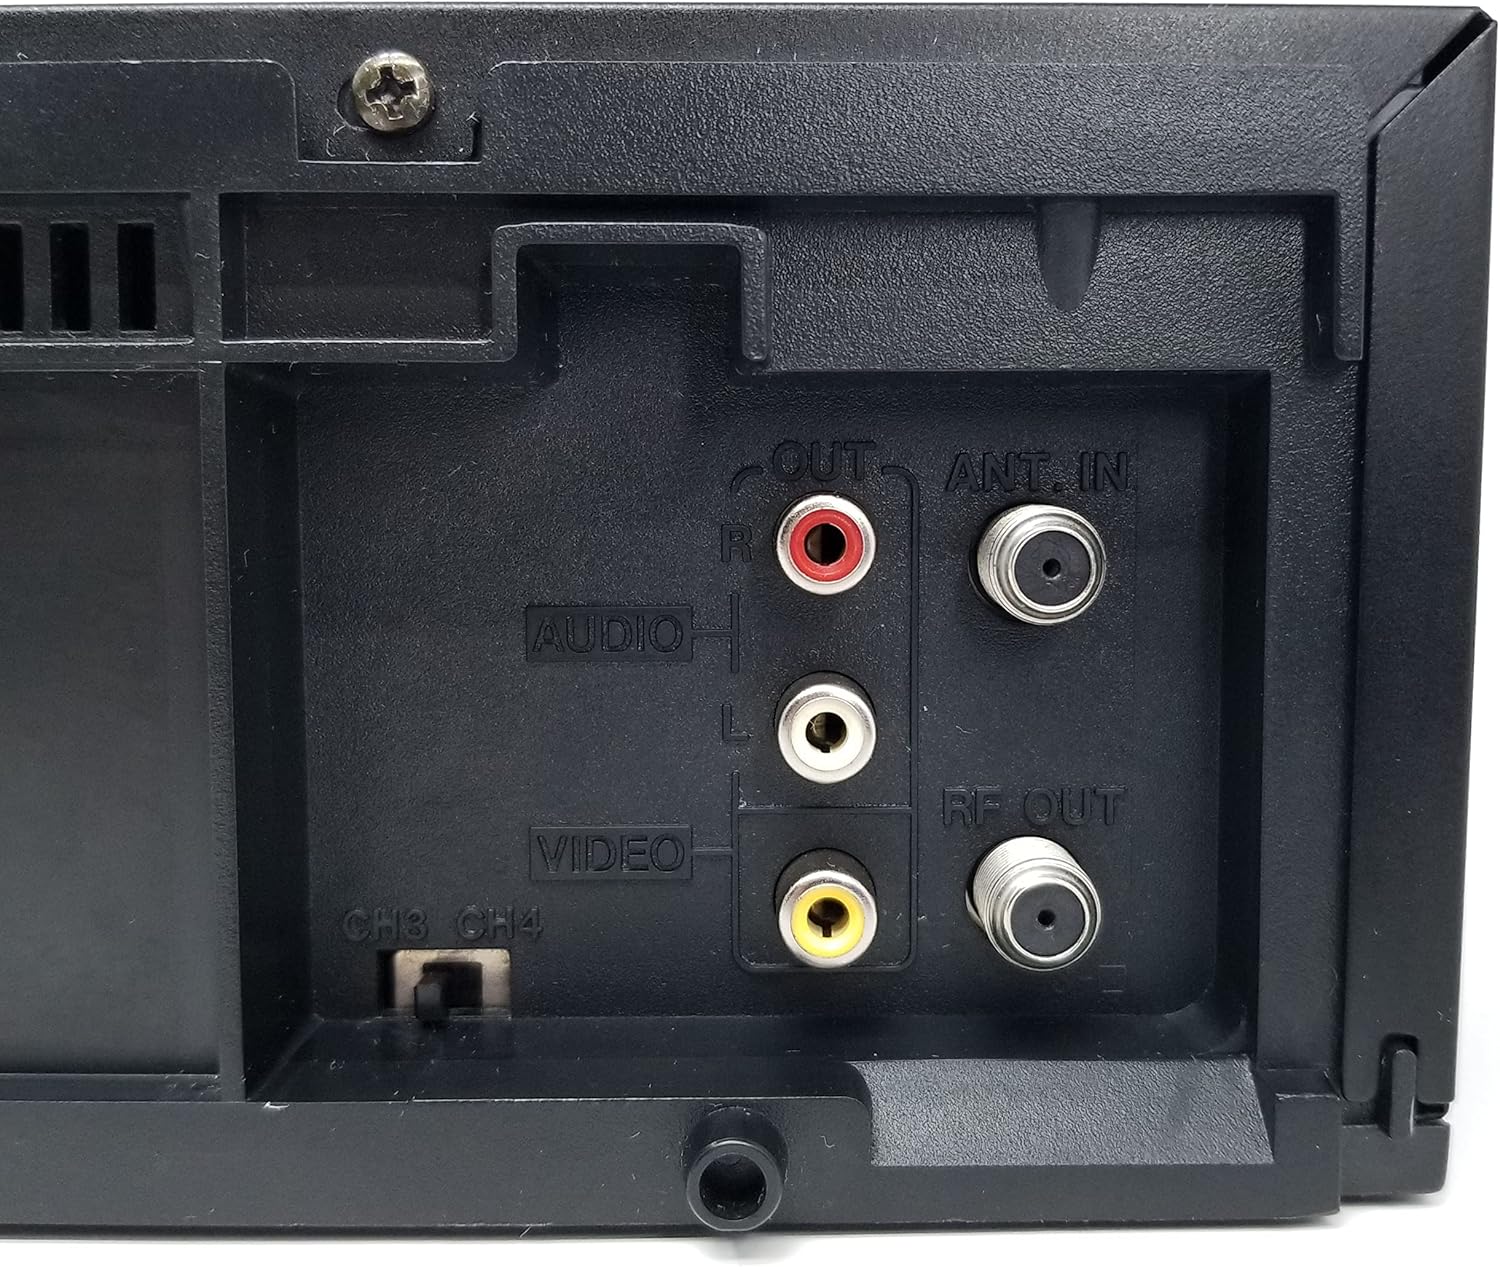
Figura 4: Close-up of the rear audio (red/white RCA), video (yellow RCA), RF OUT, and ANT. IN connections on the JVC HR-VP58U VCR.
The rear panel houses all necessary connections for integrating the VCR into your home entertainment system.
- ANT. IN: Connects to your antenna or cable TV signal.
- USCITA RF: Connects to your TV's antenna input (typically for older TVs).
- AUDIO OUT (L/R) & VIDEO OUT: RCA jacks (red, white, yellow) for connecting to your TV or audio receiver.
- AUDIO IN (L/R) & VIDEO IN: RCA jacks (red, white, yellow) for connecting external devices for recording.
- CH3/CH4 Switch: Selects the RF output channel for your TV.
5. Impostazione
5.1 Collegamento a un televisore
Esistono due metodi principali per collegare il videoregistratore a un televisore:
- Using RCA Audio/Video Cables (Recommended for best quality):
- Connect the yellow VIDEO OUT jack on the VCR to the yellow VIDEO IN jack on your TV.
- Connect the white AUDIO OUT (L) jack on the VCR to the white AUDIO IN (L) jack on your TV.
- Connect the red AUDIO OUT (R) jack on the VCR to the red AUDIO IN (R) jack on your TV.
- Select the corresponding Video Input (e.g., Video 1, AV1) on your TV.
- Using an RF Coaxial Cable (for older TVs or limited inputs):
- Connect your antenna or cable TV signal to the ANT. IN jack on the VCR.
- Connect an RF coaxial cable from the RF OUT jack on the VCR to the ANT. IN jack on your TV.
- Set the CH3/CH4 switch on the VCR's rear panel to either 3 or 4.
- Tune your TV to the corresponding channel (3 or 4) to receive the VCR's signal.
5.2 Collegamento di alimentazione
Plug the attached power cord into a standard AC wall outlet (120V, 60Hz).
6. Istruzioni per l'uso
6.1 Riproduzione di base
- Turn on your TV and select the correct input source (AV input or Channel 3/4).
- Premere il tasto ENERGIA button on the VCR or remote control to turn on the unit.
- Insert a VHS tape into the tape slot. The VCR will automatically load the tape.
- Premere il tasto GIOCARE sul videoregistratore o sul telecomando per avviare la riproduzione.
- Utilizzare il RIVISTA (Riavvolgi) e FF (Fast Forward) buttons to navigate the tape.
- Premere il tasto PAUSA pulsante per interrompere temporaneamente la riproduzione. Premere di nuovo per riprendere.
- Premere il tasto STOP/ESPULSIONE button to stop playback and eject the tape.
6.2 Registrazione
The JVC HR-VP58U allows for recording from various sources.
- Insert a recordable VHS tape with the erase protection tab intact.
- To record from TV: Select the desired TV channel on the VCR.
- To record from external device (e.g., camcorder): Connect the device to the front or rear AUDIO IN/VIDEO IN jacks. Select the appropriate input source on the VCR (e.g., Line 1, L1).
- Premere il tasto RICORDA (Record) button. Recording will begin immediately.
- Premere il tasto FERMARE pulsante per terminare la registrazione.
Refer to the remote control section for advanced recording features like timer recording.
6.3 Funzioni del telecomando
The included remote control provides full functionality for your VCR. Familiarize yourself with its buttons for convenient operation.
- ENERGIA: Turns the VCR on/off.
- NAVETTA PLUS: For variable speed playback and search.
- MENU/OK: Accede e conferma le selezioni del menu.
- CH +/-: Cambia canale o naviga nei menu.
- TV/videoregistratore: Passa dalla modalità TV a quella VCR.
- REC/STOP/PLAY/PAUSE/FF/REW: Standard transport controls.
- TIMER: Accesses timer recording settings.
- DISPLAY: Mostra le informazioni visualizzate sullo schermo.
7. Manutenzione
7.1 Pulizia dell'unità
- Pulire l'esterno del videoregistratore con un panno morbido e asciutto.
- Non utilizzare detergenti liquidi o spray, poiché potrebbero danneggiare la finitura o i componenti interni.
- Per sporco ostinato, leggermente dampBagnare il panno con acqua, quindi asciugarlo immediatamente.
7.2 Tape Head Cleaning
Over time, tape heads can accumulate dirt, leading to poor picture or sound quality. Use a dry-type VHS head cleaning cassette periodically (e.g., every 50-100 hours of use) according to the cleaning cassette's instructions. Avoid wet-type cleaners unless specifically recommended, as they can cause damage if used improperly.
8. Risoluzione Dei Problemi
| Problema | Possibile causa | Soluzione |
|---|---|---|
| Nessun potere | Cavo di alimentazione scollegato; presa non attiva. | Controllare il collegamento del cavo di alimentazione; testare la presa con un altro dispositivo. |
| No picture/sound during playback | Incorrect TV input selected; A/V cables loose or incorrect; dirty tape heads. | Select correct TV input; check all cable connections; use a head cleaning cassette. |
| Tape will not play or eject | Tape jammed; VCR malfunction. | Do not force the tape. Power cycle the VCR. If issue persists, seek professional service. |
| Scarsa qualità dell'immagine (neve, distorta) | Dirty tape heads; worn-out tape; weak signal. | Clean tape heads; try a different tape; check antenna/cable connection. |
| Il telecomando non funziona | Batterie scariche; ostruzione; sensore remoto bloccato. | Replace batteries; remove obstructions; ensure clear line of sight to VCR sensor. |
9. Specifiche
- Modello: HR-VP58U
- Teste: Stereo Hi-Fi a 4 testine
- Sistema video: Formato NTSC
- Alimentazione elettrica: CA 120 V, 60Hz
- Dimensioni (L x A x P): Approximately 19.72 x 8.82 x 13.82 inches (based on package dimensions, actual unit may vary slightly)
- Peso: Circa 8.98 libbre
- Audio: Stereo Hi-Fi
- Ingressi: Front A/V (RCA), Rear A/V (RCA), RF (Coaxial)
- Risultati: Rear A/V (RCA), RF (Coaxial)
10. Garanzia e supporto
For warranty information or technical support, please refer to the documentation provided at the time of purchase or contact your retailer. If you encounter any issues with the product, it is recommended to contact the seller directly for assistance before attempting repairs.
Note: This product is a JVC HR-VP58U VCR. For specific support related to this model, please have your model number and serial number ready when contacting support.