1. Introduzione
This manual provides detailed instructions for the installation, operation, and maintenance of your Advance Darkside 8303B30 Micro ATX PC Case. Please read this manual thoroughly before beginning installation to ensure proper setup and to maximize the performance and longevity of your system components.
The Advance Darkside ATX Mid-Tower PC case features a top panel with a 2.5/3.5 inch SATA HDD docking station, 2 USB 3.0 ports, and 1 USB 2.0 port. It is designed to accommodate Micro ATX motherboards and offers efficient cooling solutions.
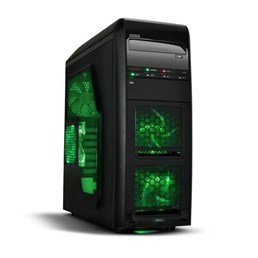
Figura 1: Fronte view of the Advance Darkside 8303B30 PC Case, showcasing its design and front panel features.
2. Caratteristiche del prodotto
- Modello: Advance Darkside 8303B30
- Materiale del telaio: SGCC Steel
- Colore: Black (interior and exterior)
- Compatibilità della scheda madre: Micro-ATX
- Connettività del pannello frontale: 2 x USB 3.0, 1 x USB 2.0, Audio Jacks
- Caratteristiche di archiviazione: Top panel 2.5/3.5 inch SATA HDD docking station
- Sistema di raffreddamento: Five 120mm fans included (two LED fans at the front, one LED fan on the side, one fan at the rear, and one fan at the top). Water cooling ready.
- Supporto scheda grafica: Designed for King Size graphics cards
- Pannello laterale: Plexiglass window
3. Istruzioni per l'installazione
3.1. Preparazione del caso
- Unpack the PC case carefully and remove all packaging materials.
- Posizionare la custodia su una superficie piana e stabile.
- Rimuovere i pannelli laterali svitando le viti a testa zigrinata sul retro del case e facendo scorrere i pannelli all'indietro.
3.2. Installazione dell'alimentatore
- Locate the power supply mounting area at the rear bottom of the case.
- Secure the power supply unit (PSU) using the provided screws. Ensure the PSU fan faces the bottom or top, depending on your PSU and case design for optimal airflow.
3.3. Installazione della scheda madre
- Installare la schermatura I/O nel ritaglio sul retro del case.
- Allineare la scheda madre con i distanziali all'interno del case. Assicurarsi che tutti i distanziali corrispondano ai fori delle viti della scheda madre.
- Fissare la scheda madre con le viti appropriate.
3.4. Installazione dell'unità di archiviazione
- For 3.5-inch HDDs, slide the drive into the drive bay trays. The trays are designed to flex slightly to accommodate the drive without screws in some configurations.
- For 2.5-inch SSDs/HDDs, secure them to the designated mounting points or use adapters if necessary.
- Utilize the top panel SATA docking station for quick access to 2.5/3.5 inch SATA drives. Simply insert the drive into the slot until it clicks into place.
3.5. Installazione della scheda grafica e della scheda di espansione
- Rimuovere le coperture degli slot di espansione necessari nella parte posteriore del case.
- Inserire la scheda grafica o altre schede di espansione negli slot PCIe appropriati sulla scheda madre.
- Fissare le schede con viti o clip di fissaggio.
3.6. Gestione dei cavi
Route all cables (power, SATA, front panel connectors) through the designated cutouts and tie-down points behind the motherboard tray to ensure clean airflow and an organized interior.
4. Istruzioni per l'uso
4.1. Accensione del sistema
- Ensure all components are correctly installed and cables are securely connected.
- Collegare il cavo di alimentazione all'alimentatore e a una presa a muro.
- Premere il pulsante di accensione situato sul pannello frontale del case.
4.2. Using Front Panel Ports
- Porte USB 3.0/2.0: Connect USB devices such as keyboards, mice, external drives, or flash drives.
- Jack audio: Connect headphones, microphones, or speakers.
- HDD Docking Station: Insert a 2.5-inch or 3.5-inch SATA HDD/SSD into the top docking slot for quick data access. Ensure the drive is properly seated.
5. Manutenzione
5.1. Pulizia della custodia
- Pulire regolarmente l'esterno della custodia con un panno morbido eamp stoffa. Evitare detergenti abrasivi.
- Utilizzare aria compressa per rimuovere la polvere dai filtri della ventola e dai componenti interni.
5.2. Manutenzione della ventola
- Periodically check the case fans for dust buildup. Clean them gently with compressed air or a soft brush.
- Assicurarsi che nessun cavo ostruisca le pale della ventola.
6. Risoluzione Dei Problemi
6.1. Il sistema non si accende
- Controllare che il cavo di alimentazione sia collegato saldamente sia all'alimentatore che alla presa a muro.
- Assicurarsi che l'interruttore dell'alimentatore sia in posizione "ON".
- Verificare che il cavo del pulsante di accensione del pannello frontale sia collegato correttamente alla scheda madre.
6.2. Problemi di surriscaldamento
- Ensure all case fans are spinning correctly and are not obstructed.
- Check for excessive dust buildup on fans and heatsinks.
- Verify proper cable management to allow for unobstructed airflow.
6.3. Front Panel USB/Audio Not Working
- Confirm that the front panel USB and audio cables are correctly connected to the corresponding headers on the motherboard.
- Check motherboard drivers for USB and audio.
7. Specifiche
| Caratteristica | Dettaglio |
|---|---|
| Marca | Anticipo |
| Numero di modello | Numero di modello: 8303B30 |
| Colore | Nero |
| Materiale del telaio | Alloy Steel (SGCC Steel) |
| Compatibilità della scheda madre | Micro-ATX |
| Dimensioni (L x P x A) | Dimensioni: 48 x 19.5 x 48.2 cm |
| Peso del prodotto | 5.8 kg |
| Porte del pannello frontale | 2 x USB 3.0, 1 x USB 2.0, Audio Jacks |
| Dock di archiviazione | Top panel 2.5/3.5 inch SATA HDD docking station |
| Ventilatori inclusi | 5 x 120mm (2 front LED, 1 side LED, 1 rear, 1 top) |
| Supporto di raffreddamento | Water cooling ready |
| Pannello laterale | Plexiglas |
| Uso consigliato | Gioco d'azzardo |
8. Garanzia e supporto
8.1. Garanzia del produttore
This product comes with a manufacturer's warranty of 1 year from the date of purchase. Please retain your proof of purchase for warranty claims. The warranty covers defects in materials and workmanship under normal use.
8.2. Assistenza clienti
For technical assistance, troubleshooting, or warranty inquiries, please contact Advance customer support. Refer to the official Advance websito per le informazioni di contatto e le risorse di supporto più aggiornate.


