1. Introduzione
The Akasa Lokstor M23 (Model AK-IEN-04) is a mobile rack designed to accommodate a single 2.5-inch Hard Disk Drive (HDD) or Solid State Drive (SSD). It is engineered to fit into a standard PCI expansion slot of a desktop computer, providing a convenient and secure way to add or swap storage devices. This unit features a tool-free design for easy drive installation and a security lock to protect your data.
2. Informazioni sulla sicurezza
- Always power off your computer and disconnect it from the power source before installing or removing any internal components.
- Maneggiare con cura i componenti elettronici per evitare danni causati da scariche elettrostatiche (ESD). Si consiglia di utilizzare un braccialetto antistatico.
- Ensure proper ventilation within your computer case to prevent overheating of components.
- Do not force components into place. If a component does not fit, recheck the orientation and compatibility.
- Keep small parts, such as screws and keys, out of reach of children.
3. Contenuto della confezione
Verificare che tutti gli articoli siano presenti nel pacco:
- Akasa Lokstor M23 Mobile Rack (AK-IEN-04)
- Security Key(s)
- Viti di montaggio (se applicabile)
- Manuale dell'utente (questo documento)
4. Configurazione e installazione
Follow these steps to install the Akasa Lokstor M23 into your computer system and prepare it for use.
4.1. Installing the Mobile Rack into a PCI Slot
- Prepara il tuo computer: Spegnere il computer, scollegare il cavo di alimentazione e aprire il case del computer.
- Identifica uno slot PCI disponibile: Locate an empty PCI expansion slot at the rear of your computer case. Remove the corresponding metal slot cover.
- Insert the Lokstor M23: Carefully align the Lokstor M23 with the chosen PCI slot. Gently push the unit into the slot until it is firmly seated.
- Mettere in sicurezza l'unità: Use the provided screw (if applicable) to secure the Lokstor M23 to the computer case at the PCI slot bracket.

Figure 1: Akasa Lokstor M23 installed in a computer case, showing the front panel with the Akasa logo and key lock.
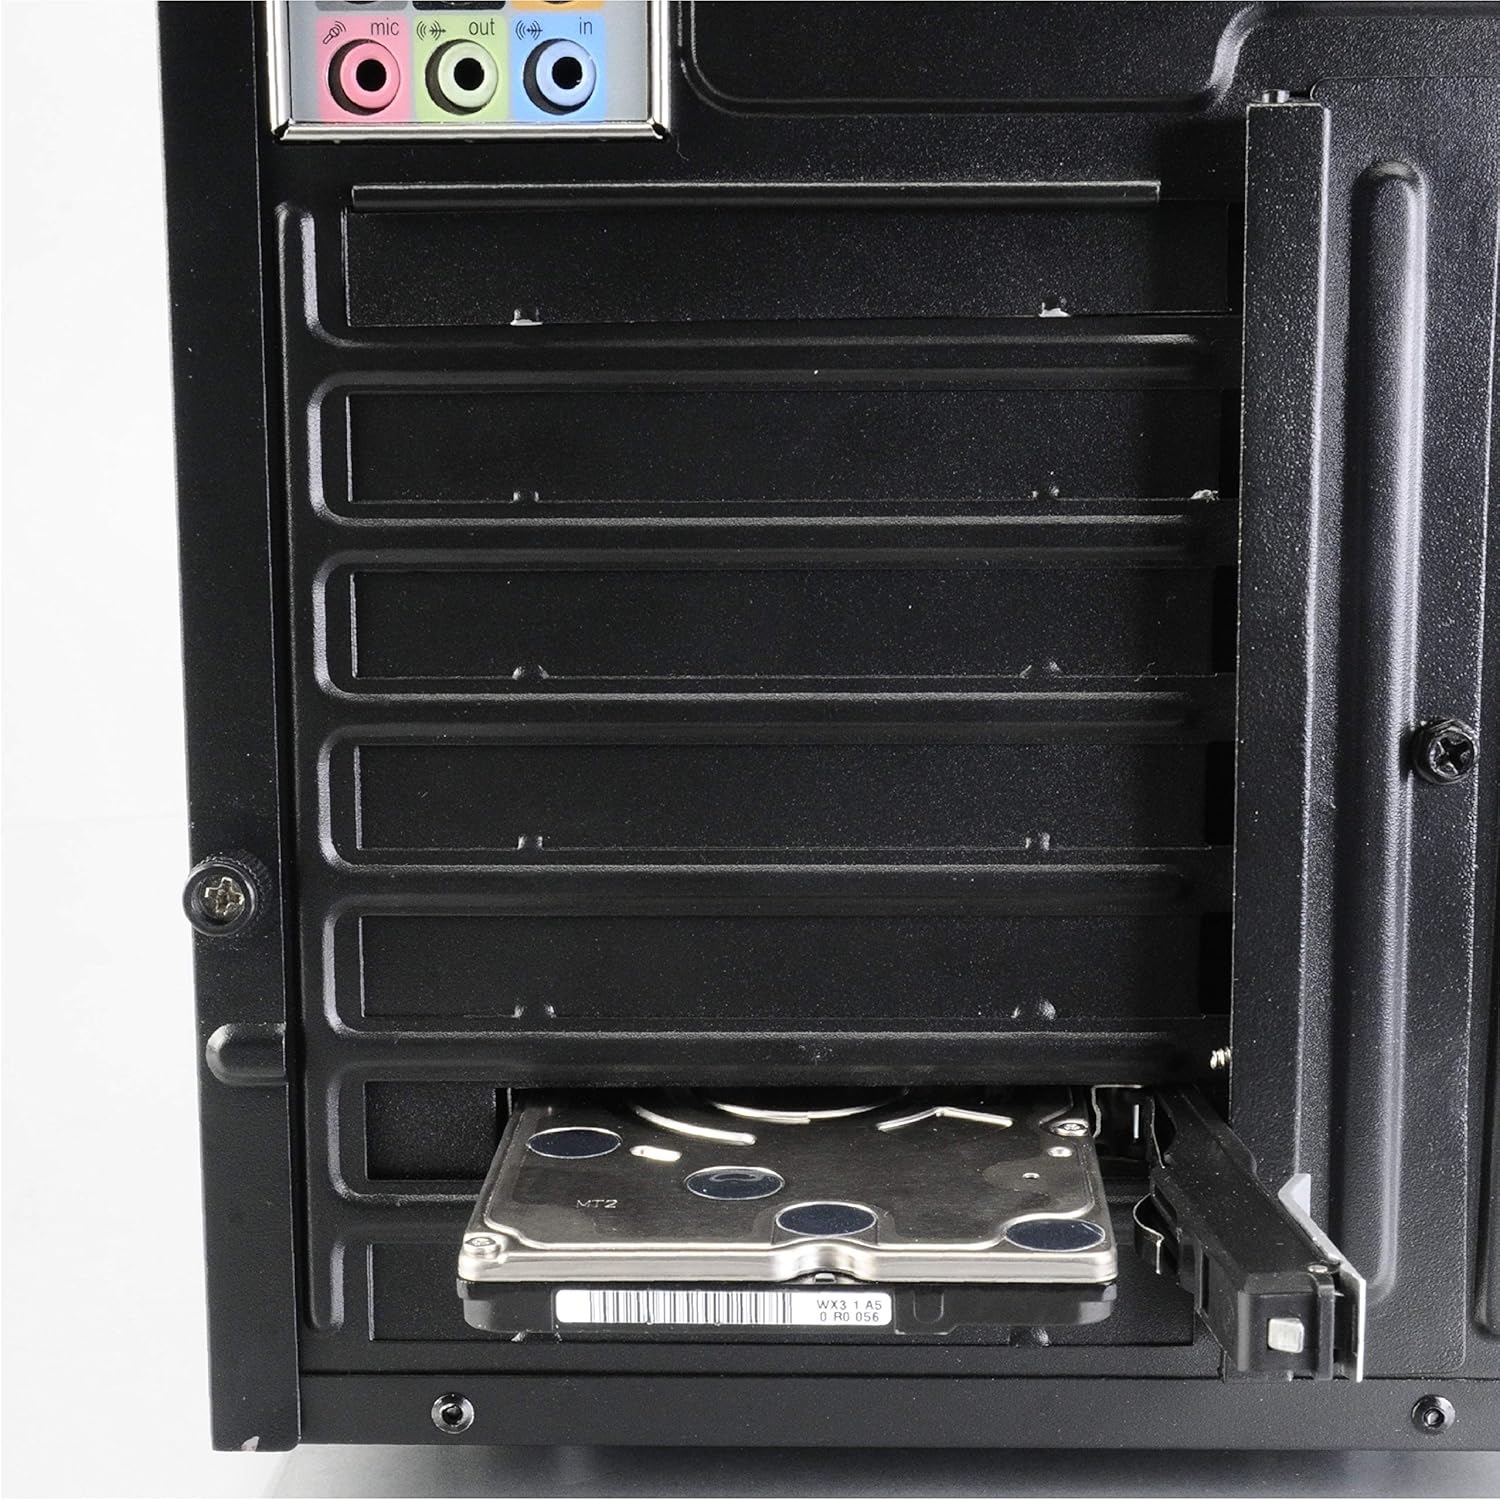
Figura 2: Posteriore view of a computer case demonstrating a 2.5-inch HDD inserted into the Lokstor M23, which is mounted in a PCI slot.
4.2. Installing a 2.5-inch HDD/SSD
The Lokstor M23 features a tool-free design for easy drive installation.
- Unlock the tray: If the tray is locked, use the provided key to unlock it.
- Eject the drive tray: Press the release mechanism (if present) or gently pull the front panel of the Lokstor M23 to slide out the internal drive tray.
- Inserire l'unità: Place your 2.5-inch HDD or SSD into the drive tray. Ensure the SATA data and power connectors on the drive align with the connectors on the tray. The tool-free mechanism should secure the drive in place.
- Slide the tray back: Carefully slide the drive tray with the installed HDD/SSD back into the Lokstor M23 until it clicks into place.
- Collegare i cavi: Connect a SATA data cable from your motherboard to the Lokstor M23's SATA port and a SATA power cable from your power supply unit (PSU) to the Lokstor M23's power port.
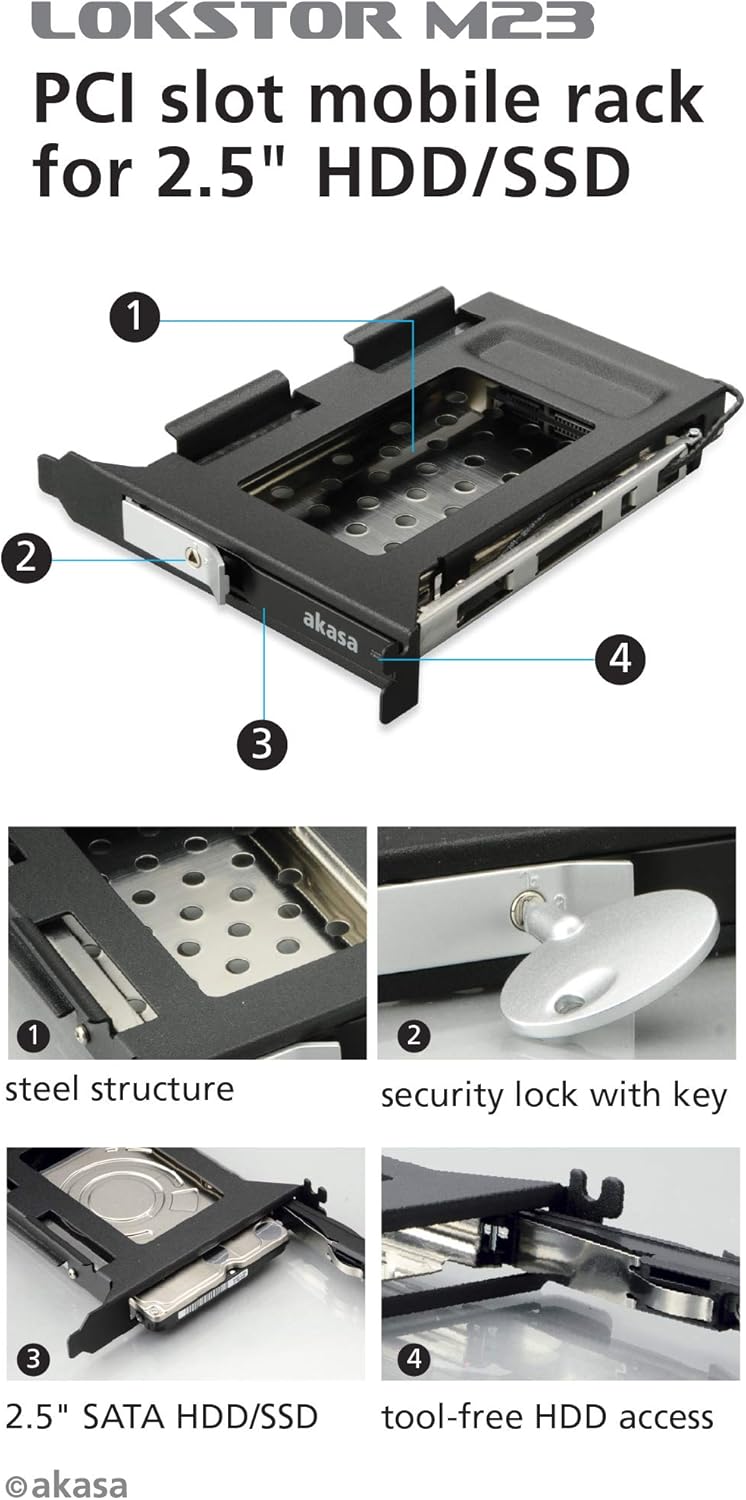
Figura 3: Esploso view diagram highlighting key features: (1) Steel structure, (2) Security lock with key, (3) 2.5" SATA HDD/SSD compatibility, and (4) Tool-free HDD access mechanism.

Figure 4: A 2.5-inch HDD being inserted into the Lokstor M23, illustrating the tool-free installation process.
5. Funzionamento
5.1. Drive Access and Ejection
The Lokstor M23 allows for easy insertion and removal of 2.5-inch SATA drives.
- To insert a drive: Ensure the tray is empty. Slide the 2.5-inch HDD/SSD into the tray until it clicks into place. Then, push the tray back into the Lokstor M23 until it is fully seated.
- To eject a drive: If the drive is locked, unlock it with the key. Gently pull the front panel of the Lokstor M23 to slide out the drive tray. The drive can then be removed from the tray.
5.2. Security Lock Function
The integrated security lock prevents unauthorized removal of the installed drive.
- To lock the drive: Once the drive tray is fully inserted, insert the key into the lock and turn it to the locked position. Remove the key. This secures the drive within the mobile rack.
- Per sbloccare l'unità: Insert the key into the lock and turn it to the unlocked position. The drive tray can now be ejected.

Figura 5: primo piano view of the security lock mechanism with the key inserted, demonstrating its function.
6. Manutenzione
The Akasa Lokstor M23 requires minimal maintenance.
- Pulizia: Utilizzare un panno morbido e asciutto per pulire l'esterno dell'unità. Non utilizzare detergenti liquidi o materiali abrasivi.
- Pulizia interna: Periodically, if dust accumulates inside your computer case, you may use compressed air to gently clear dust from the Lokstor M23, ensuring the computer is powered off and unplugged first.
- Cura delle chiavi: Keep the security key in a safe place. Avoid bending or damaging the key.
7. Risoluzione Dei Problemi
If you encounter issues with your Akasa Lokstor M23, refer to the following common problems and solutions:
| Problema | Possibile causa | Soluzione |
|---|---|---|
| Drive not detected by the system. |
|
|
| Drive tray cannot be ejected. |
|
|
| Bassa velocità di trasferimento dati. |
|
|
8. Specifiche
| Caratteristica | Dettaglio |
|---|---|
| Nome del modello | Lokstor M23 |
| Numero di modello | AK-IEN-04 |
| Tipo di dispositivo | Storage mobile rack |
| Dimensioni dell'unità supportate | 2.5-inch HDD/SSD |
| Interfaccia supportata | SATA-600 (SATA III) |
| Fessura di installazione | Slot PCI |
| Materiale | Plastica, acciaio inossidabile |
| Colore | Nero, acciaio inossidabile |
| Caratteristiche | Key lock, Tool-free HDD access |
| Dimensioni del prodotto (LxWxH) | 4.72 x 5.71 x 0.94 pollici (120 x 145 x 24 mm) |
| Peso dell'articolo | 0.32 once (circa 9 grammi) |
| Piattaforma hardware | PC |
9. Garanzia e supporto
9.1. Informazioni sulla garanzia
Akasa products are covered by a limited warranty against defects in materials and workmanship. The specific warranty period may vary by region and product. Please retain your proof of purchase for warranty claims.
For detailed warranty terms and conditions, please visit the official Akasa websito o contattare il servizio clienti.
9.2. Supporto tecnico
If you require further assistance or encounter issues not covered in this manual, please contact Akasa technical support.
- Akasa Official Websito: www.akasa.com.tw (Si prega di controllare il website for the most current support contact information and resources.)
- Risorse online: The Akasa website may offer FAQs, driver downloads, and additional product information.


