1. Introduzione
This manual provides detailed instructions for the assembly, operation, and maintenance of your Sharkoon VS4-W Series ATX/MicroATX Mid-Tower PC Case, model SHA-VS4-WBK. Please read this manual thoroughly before beginning installation to ensure proper setup and to maximize the lifespan of your product.
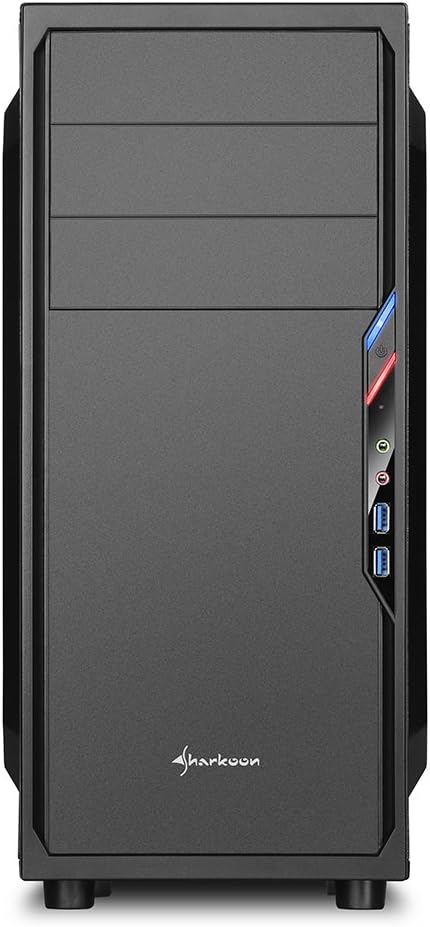
The Sharkoon VS4-W Series is designed for users seeking a cost-effective and functional PC case. It features a full-black aesthetic with an acrylic side window panel, offering a clear view of your internal components. The case supports ATX and Micro-ATX motherboards and provides ample space for various components, including multiple storage drives and long graphics cards.
2. Prodotto finitoview
2.1. Caratteristiche principali
- Pannello laterale in acrilico per la visibilità dei componenti.
- Full-black interior and exterior design.
- Support for ATX and Micro-ATX motherboards.
- Three 5.25-inch drive bays, two with tool-less mechanisms.
- Seven drive bays for storage: three 3.5-inch and four 2.5-inch.
- Generous expansion card space, up to 385mm with 2.5-inch cage removed.
- Cable management space behind the motherboard tray due to a bulged side panel design.
- Supports CPU coolers up to 160mm in height.
- Front I/O panel with 2x USB 3.0 and 2x USB 2.0 ports, plus HD Audio.
- Pre-installed 120mm front fan and 120mm blue LED rear fan.
2.2. Identificazione dei componenti


3. Configurazione e installazione
3.1. Preparazione del caso
- Unpack the PC case and remove all packaging materials.
- Posizionare la custodia su una superficie piana e stabile.
- Rimuovere i pannelli laterali svitando le viti a testa zigrinata sul retro del case.
3.2. Installazione della scheda madre
- Install the I/O shield provided with your motherboard into the cutout at the rear of the case.
- Ensure standoffs are correctly aligned for your ATX or Micro-ATX motherboard. Install additional standoffs if necessary.
- Carefully place the motherboard into the case, aligning it with the standoffs and I/O shield.
- Fissare la scheda madre con le viti.
3.3. Installazione dell'alimentatore
- Mount the power supply unit (PSU) in the designated area at the bottom rear of the case.
- Fissare l'alimentatore con le viti dalla parte posteriore del case.
- Far passare i cavi di alimentazione necessari attraverso gli appositi fori per la gestione dei cavi.
3.4. Installazione dell'unità
- Unità da 5.25 pollici: For tool-less bays, slide the drive in until it clicks into place. For other bays, secure with screws.
- Unità da 3.5 pollici: Slide the 3.5-inch drives into the designated bays and secure them.
- Unità da 2.5 pollici: Mount 2.5-inch SSDs/HDDs onto the dedicated mounting points.
3.5. Installazione della scheda di espansione
- Rimuovere le coperture degli slot PCI necessari dalla parte posteriore del case.
- Insert your graphics card or other expansion cards into the appropriate PCI-E slots on the motherboard.
- Secure the cards with screws. For longer graphics cards, the 2.5-inch drive cage can be removed to provide up to 385mm of space.
3.6. Gestione dei cavi
Utilize the space behind the motherboard tray and the various cable routing holes to organize cables. This improves airflow and aesthetics.
4. Istruzioni per l'uso
Once all components are installed and connected, replace the side panels and secure them with the thumbscrews. Connect your peripherals (monitor, keyboard, mouse, etc.) to the motherboard's I/O ports. Connect the power cable to the PSU and a wall outlet. Press the power button on the front panel to start your system.
5. Manutenzione
5.1. Pulizia
- Regularly clean dust filters (if present) to maintain optimal airflow.
- Use compressed air to remove dust from internal components and fans.
- Pulisci l'esterno della custodia con un panno morbido eamp stoffa. Evitare detergenti abrasivi.
5.2. Manutenzione della ventola
Ensure fans are free from obstructions and spinning correctly. If a fan becomes noisy or stops working, consider replacing it to maintain proper cooling.
6. Risoluzione Dei Problemi
6.1. Il sistema non si accende
- Check all power connections, including the PSU to the wall, and internal connections to the motherboard and components.
- Assicurarsi che il cavo del pulsante di accensione proveniente dal case sia collegato correttamente al connettore del pannello frontale della scheda madre.
- Verificare che l'interruttore dell'alimentatore sia in posizione "ON".
6.2. Poor Airflow/Overheating
- Pulire eventuali filtri antipolvere e componenti interni.
- Ensure fans are operating correctly and oriented for optimal airflow (intake/exhaust).
- Migliorare la gestione dei cavi per ridurre gli ostacoli al flusso d'aria.
6.3. Front Panel USB/Audio Not Working
- Verify that the front panel USB and HD Audio cables are securely connected to the corresponding headers on your motherboard.
7. Specifiche
| Nome del modello | VS4-W Series |
| Numero di modello del prodotto | SHA-VS4-WBK |
| Tipo di caso | Mid Tower |
| Materiale | Acciaio, plastica, acrilico |
| Colore | Nero |
| Compatibilità della scheda madre | ATX, Micro-ATX |
| Alloggiamenti per unità da 5.25" | 3 (2 with tool-less mechanism) |
| 3.5" Internal Drive Bays | 3 |
| Alloggiamenti per unità da 2.5" | 4 |
| Slot di espansione PCI | 7 |
| massimo Lunghezza scheda grafica | 310mm (385mm with 2.5" cage removed) |
| massimo Altezza del dispositivo di raffreddamento della CPU | 160mm |
| massimo Lunghezza alimentatore | 260mm |
| Porte I / O anteriori | 2x USB 3.0, 2x USB 2.0, HD Audio (Mic/Headphone) |
| Ventole preinstallate | Front: 1x 120mm, Rear: 1x 120mm Blue LED |
| Metodo di raffreddamento | Raffreddamento ad aria |
| Dimensioni del prodotto (L x P x A) | Dimensioni: 44.5 x 20 x 43 cm |
| Peso dell'articolo | 3.5 kg |
8. Garanzia e supporto
Per informazioni sulla garanzia e supporto tecnico, fare riferimento al sito ufficiale Sharkoon webo contattare il rivenditore locale. Conservare la prova d'acquisto per eventuali reclami in garanzia.
Official Sharkoon Websito: www.sharkoon.com


