1. Introduzione
This manual provides detailed instructions for the safe and efficient operation of your Crenova XPE350 Mini Portable Projector. Please read this manual thoroughly before using the projector and retain it for future reference. The Crenova XPE350 is designed for home and backyard theater use, offering a compact and portable solution for displaying media from various sources.
2. Prodotto finitoview
The Crenova XPE350 is a mini portable projector featuring a 480x320 resolution and 150 lumens brightness. Its compact design makes it suitable for various environments. Below are key components and features.
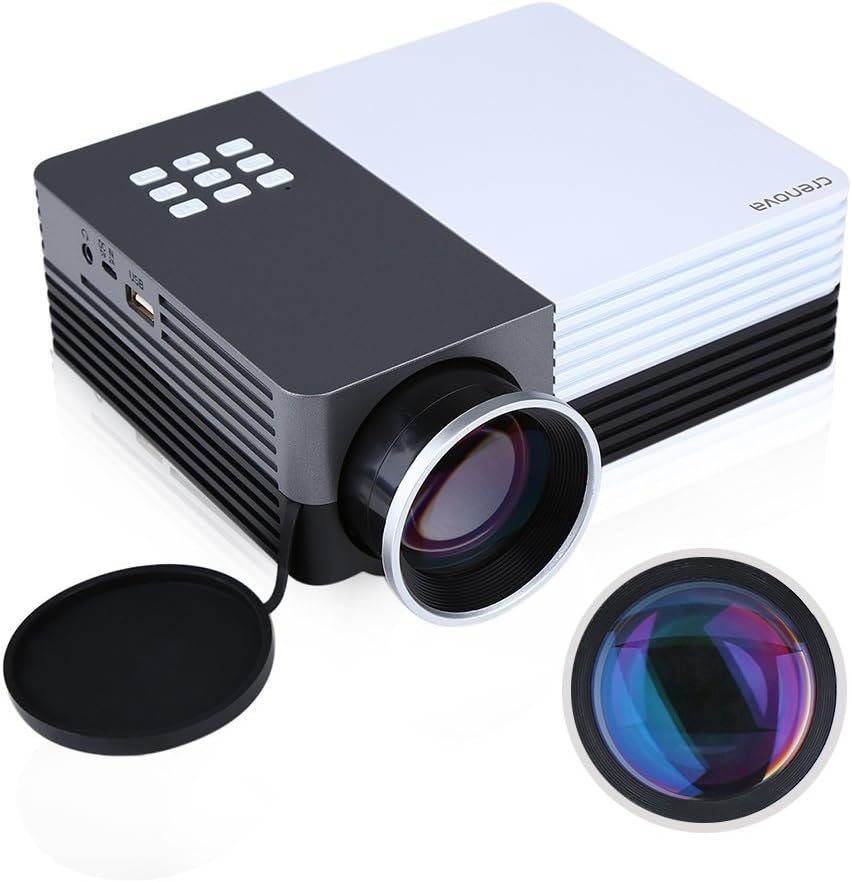
Figura 2.1: Crenova XPE350 Mini Portable Projector. This image shows the overall design of the projector, highlighting its compact form factor and front lens.

Figura 2.2: The Crenova XPE350 projector held in a hand, demonstrating its compact and portable size. A close-up inset highlights the glass lens, indicating clear image projection.
2.3 Contenuto della confezione
Dopo aver disimballato, verificare che tutti gli articoli elencati di seguito siano presenti e in buone condizioni:
- Crenova XPE350 Mini Portable Projector
- Telecomando
- Adattatore di alimentazione CA.
- cavo AV
- Manuale dell'utente (questo documento)

Figura 2.3: Contents of the Crenova XPE350 Projector package. This image displays the projector, remote control, power adapter, AV cable, and the printed user manual.
2.4 Componenti del proiettore
Familiarizza con le varie parti del tuo proiettore:
- Lente: Proietta l'immagine sullo schermo.
- Pulsanti funzione: Control basic projector functions.
- Vents: Per la dissipazione del calore. Assicurarsi che non siano ostruiti.
- Porte di ingresso: VGA, HDMI, AV, USB, SD Card Slot.
- Uscita audio: Jack per cuffie.
- Regolazione trapezoidale: Corregge la distorsione trapezoidale dell'immagine.
- Interfaccia di alimentazione: Si collega all'adattatore di alimentazione CA.

Figura 2.4: Avvicinamento view of the projector's function buttons, lens, and ventilation vents. These are essential for basic control and maintaining optimal operating temperature.

Figura 2.5: Dettagliato view of the Crenova XPE350 projector's various input and output ports, including VGA, HDMI, AV, USB, headphone jack, mobile power input, SD card slot, and power interface. Also visible is the keystone adjustment dial.
3. Impostazione
3.1 Collegamento di alimentazione
- Connect the AC power adapter to the "Power Interface" port on the projector.
- Collegare l'altra estremità dell'adattatore di alimentazione a una presa elettrica adatta.
- La spia di alimentazione sul proiettore si illuminerà.
3.2 Collegamento delle sorgenti di ingresso
The Crenova XPE350 supports various input sources. Choose the appropriate connection method for your device:

Figura 3.1: Diagram illustrating various devices that can be connected to the Crenova XPE350 projector, including laptops, desktop computers, DVD players, game consoles, speakers, mobile hard disks, USB drives, SD cards, digital cameras, tablet PCs, and TV set-top boxes.
- HDMI: For high-definition digital video and audio from devices like laptops, game consoles, or streaming sticks.
- VGA: Per il collegamento a computer dotati di uscita VGA.
- AV: For connecting older devices using the included AV cable (e.g., DVD players, some game consoles).
- USB: Per la riproduzione di contenuti multimediali fileÈ direttamente da un'unità flash USB.
- Scheda SD: Per la riproduzione di contenuti multimediali filedirettamente da una scheda di memoria SD.
- MHL (Mobile High-Definition Link): Some smartphones and tablets with MHL-out function can connect via HDMI for screen mirroring. Note: Most Android smartphones do not support MHL function.

Figura 3.2: Illustration of the MHL (Mobile High-Definition Link) feature, showing how a tablet and smartphone can mirror their screens to the projector. This feature requires the source device to support MHL-out.
3.3 Posizionamento del proiettore
Place the projector on a stable, flat surface. Ensure there is adequate ventilation around the projector to prevent overheating. The distance from the screen will determine the image size.
4. Istruzioni per l'uso
4.1 Accensione/Spegnimento
- Per accendere: Press the power button on the projector or the remote control. The projector lamp si illuminerà.
- Per spegnere: Premere nuovamente il pulsante di accensione. Il proiettore si spegnerà.
4.2 Regolazione della qualità dell'immagine
- Regolazione della messa a fuoco: Rotate the lens ring (refer to Figure 2.4) until the projected image is clear and sharp.
- Correzione trapezoidale: Use the keystone adjustment dial (refer to Figure 2.5) to correct trapezoidal distortion if the projector is not perfectly perpendicular to the screen.
4.3 Selezione della sorgente di input
After connecting your desired input device, press the "Source" button on the remote control or the projector's function panel to cycle through available input options (HDMI, VGA, AV, USB, SD Card) and select the correct one.
4.4 Media Playback (USB/SD Card)
Insert a USB flash drive or SD card into the respective port. The projector's interface will typically prompt you to select the media type (e.g., Photo, Music, Movie, Text) for playback. Navigate using the remote control's arrow keys and "OK" button.
5. Manutenzione
5.1 Pulizia della lente
Pulire delicatamente la lente del proiettore con un panno morbido e privo di lanugine, specificamente progettato per superfici ottiche. Non utilizzare detergenti abrasivi o esercitare una forza eccessiva, poiché ciò potrebbe graffiare la lente.
5.2 Ventilazione
Ensure the projector's ventilation vents (refer to Figure 2.4) are clear of obstructions to allow for proper airflow. Blocked vents can lead to overheating and reduced lamp vita.
5.3 Lamp Vita
The Crenova XPE350 projector features a long-life lamp, estimated at 20,000 hours under normal operating conditions, thanks to its SmartEco technology.

Figura 5.1: Illustration highlighting the Crenova XPE350 projector's long lamp life of 20,000 hours, supported by SmartEco technology, indicating energy efficiency and durability.
6. Risoluzione Dei Problemi
- Nessun potere:
- Assicurarsi che l'adattatore di alimentazione sia collegato saldamente sia al proiettore sia a una presa elettrica funzionante.
- Controllare se la spia di alimentazione è accesa.
- Nessuna immagine:
- Verify that the correct input source is selected (HDMI, VGA, AV, USB, SD).
- Controllare tutti i collegamenti dei cavi tra il proiettore e il dispositivo sorgente.
- Assicurarsi che il dispositivo sorgente sia acceso e che emetta un segnale.
- Immagine sfocata:
- Regolare la ghiera di messa a fuoco sull'obiettivo finché l'immagine non risulta nitida.
- Ensure the projection surface is flat and the projector is at an optimal distance.
- L'immagine è trapezoidale:
- Use the keystone adjustment dial to correct the image shape.
- Posizionare il proiettore il più perpendicolarmente possibile allo schermo.
- Nessun suono:
- Controllare le impostazioni del volume sia sul proiettore che sul dispositivo sorgente.
- If using external speakers, ensure they are properly connected to the headphone jack and powered on.
- For HDMI connections, ensure the source device is sending audio.
- Il telecomando non funziona:
- Assicurarsi che non vi siano ostacoli tra il telecomando e il ricevitore IR del proiettore.
- Sostituire le batterie del telecomando.
7. Specifiche
| Caratteristica | Specificazione |
|---|---|
| Modello | XPE350 |
| Marca | Crenova |
| Risoluzione | 480x320 |
| Luminosità | 150 lumen |
| Lamp Vita | 20,000 hours (SmartEco) |
| Caratteristica speciale | Portatile |
| Fattore di forma | Portatile |
| Tipo di montaggio | Supporto da tavolo |
| Peso dell'articolo | 2.45 libbre |
| Dimensioni del pacco | 11.2 x 7.1 x 4.4 pollici |
| Colore | 150 Lumens-Black |
8. Garanzia e supporto
For warranty information or technical support, please refer to the documentation included with your purchase or contact Crenova customer service. Keep your purchase receipt as proof of purchase for warranty claims.
For further assistance, please visit the official Crenova websito o contattare i loro canali di supporto.


