1. Prodotto finitoview
The Dino-Lite AM4113ZT is a versatile USB digital microscope designed for detailed observation and analysis. It features 1.3-megapixel resolution, offering true optical magnification from 20x to 50x, and up to 200x. This model includes integrated polarized light to reduce glare on reflective surfaces, MicroTouch for convenient image capture, and measurement capabilities through its accompanying software.

Image 1.1: The Dino-Lite AM4113ZT USB Digital Microscope, showcasing il suo design compatto.

Immagine 1.2: Passoview of the Dino-Lite AM4113ZT's primary features, including magnification range, software compatibility, and specialized functions.
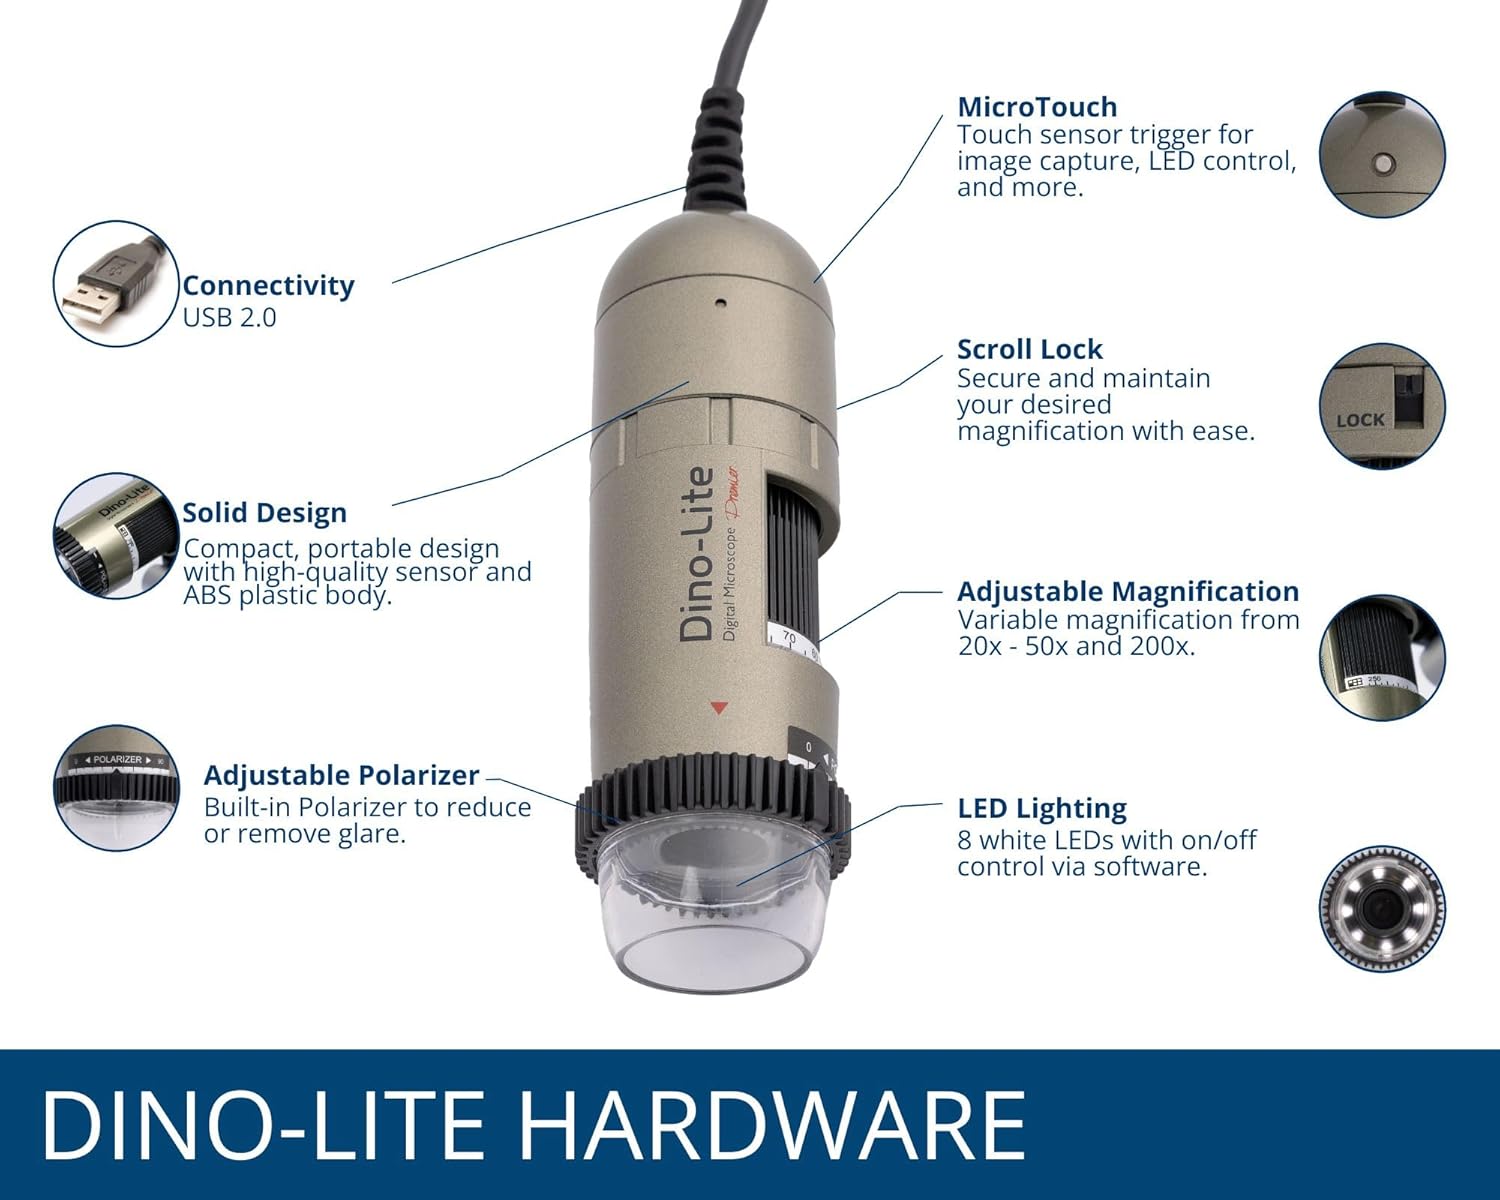
Image 1.3: Detailed illustration of the Dino-Lite AM4113ZT hardware, highlighting its various components and their functions.
2. Contenuto della confezione
Verifica che tutti gli articoli elencati di seguito siano presenti nella confezione del prodotto:
- Dino-Lite AM4113ZT USB Digital Microscope
- Guida rapida
- Software Download Link/Information
- Borsa da trasporto
- Calibration Target + Cover
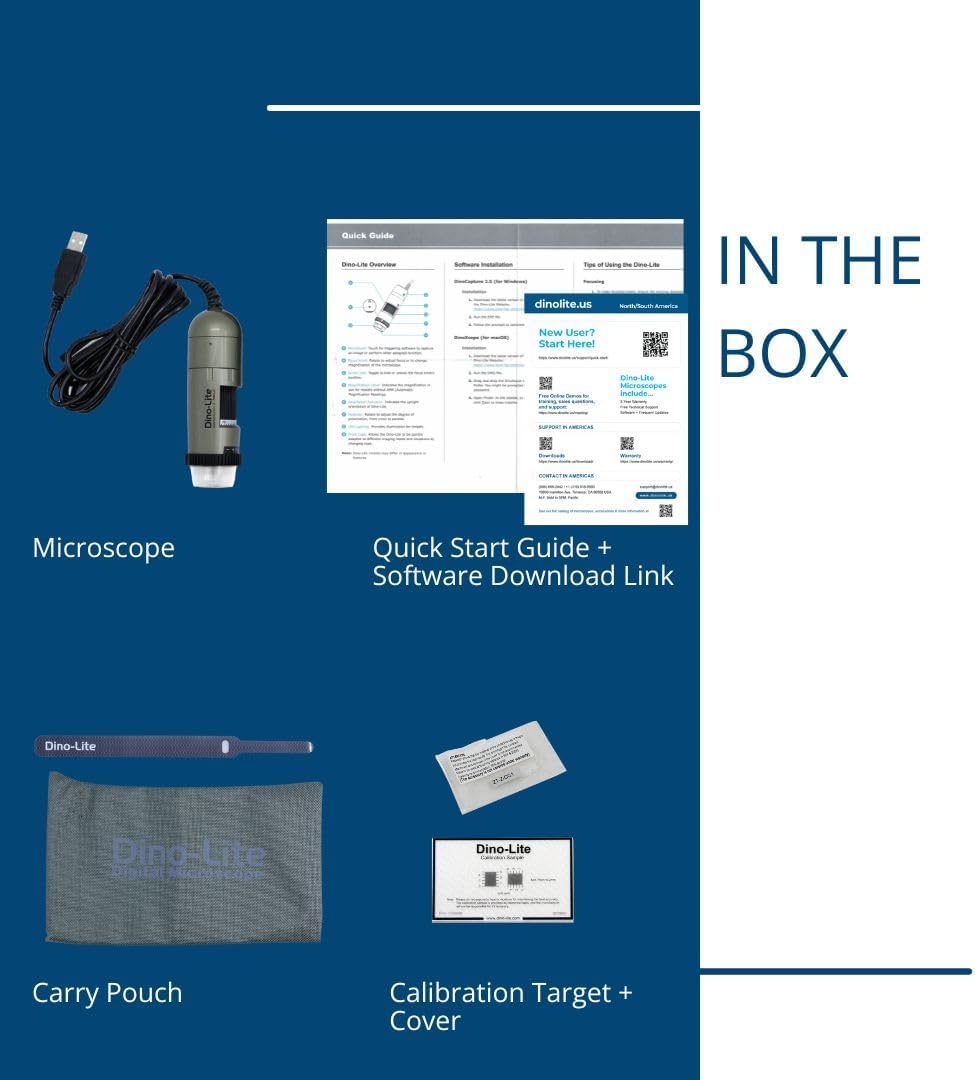
Image 2.1: Visual representation of the items included in the Dino-Lite AM4113ZT product box.
3. Impostazione
3.1 Installazione del software
- Scarica il software: Visit the official Dino-Lite website or use the provided software download link to obtain the latest version of DinoCapture (for Windows) or DinoXcope (for Mac).
- Installa il software: Seguire le istruzioni visualizzate sullo schermo per installare il software sul computer.
- Requisiti di sistema: Ensure your operating system (Windows or Mac) meets the minimum requirements specified by the software.

Image 3.1: The DinoCapture software interface displayed on a laptop, demonstrating its functionality for image capture and analysis.
3.2 Connecting the Microscope
- Connect the USB cable from the Dino-Lite AM4113ZT microscope to an available USB port on your computer.
- The operating system should automatically detect the device.
- Launch the DinoCapture (Windows) or DinoXcope (Mac) software. The microscope's live feed should appear in the software window.
The Dino-Lite AM4113ZT can be used handheld for quick inspections or mounted on an optional stand (sold separately) for more stable and precise observations.

Image 3.2: The Dino-Lite AM4113ZT shown in both handheld use and mounted on a stand, demonstrating its adaptability for various inspection needs.
4. Istruzioni per l'uso
4.1 Regolazione dell'ingrandimento
The AM4113ZT offers variable optical magnification from 20x to 50x, and a fixed 200x magnification. To adjust the magnification:
- Rotate the magnification dial on the microscope body.
- Observe the live image in the software to achieve the desired level of detail.
- For stable observation at a specific magnification, use the scroll lock mechanism to secure the dial.

Image 4.1: Close-up of the magnification dial and scroll lock on the Dino-Lite AM4113ZT.
4.2 Using Polarized Light
The integrated adjustable polarizer helps reduce glare on reflective surfaces, improving image clarity:
- Rotate the polarizer ring located at the front of the microscope.
- Adjust until glare is minimized and surface details become clearer.

Image 4.2: The adjustable polarizer ring, designed to control reflections and enhance image quality.
4.3 Image Capture and LED Control
- MicroTouch: Gently touch the MicroTouch sensor on the microscope body to capture a still image.
- Software Capture: Use the capture button within the DinoCapture/DinoXcope software to take photos or record videos.
- Illuminazione a LED: The microscope features 8 white LEDs. Control their on/off status and brightness through the software interface.
4.4 Funzioni di misura
The DinoCapture/DinoXcope software provides advanced measurement tools:
- After capturing an image, use the software to perform various measurements such as length, area, and angles.
- Ensure proper calibration using the included calibration target for accurate measurements.

Image 4.3: The Dino-Lite AM4113ZT positioned on a stand, illustrating a stable setup for detailed observation and measurement tasks.
5. Manutenzione
5.1 Pulizia
- Lente: Utilizzare un panno morbido e privo di lanugine, specificamente progettato per lenti ottiche, per pulire delicatamente le lenti del microscopio. Evitare materiali abrasivi o sostanze chimiche aggressive.
- Corpo: Wipe the microscope body with a soft, dry cloth. If necessary, a slightly damp cloth with mild soap can be used, followed by a dry cloth. Ensure no liquid enters the device.
- Evitare: Do not use alcohol, benzene, thinners, or other chemical solvents, as they may damage the plastic components.
5.2 Conservazione
- Store the microscope in its protective carry pouch when not in use.
- Conservare il dispositivo in un luogo fresco e asciutto, lontano dalla luce solare diretta, da temperature estreme e da elevata umidità.
- Avoid storing in dusty environments.
6. Risoluzione Dei Problemi
6.1 Nessuna immagine visualizzata
- Assicurarsi che il cavo USB sia collegato saldamente sia al microscopio che al computer.
- Verify that the DinoCapture/DinoXcope software is running and the correct device is selected.
- Prova a connetterti a un'altra porta USB del tuo computer.
- Riavviare il software e/o il computer.
6.2 Blurry or Unfocused Image
- Adjust the magnification dial to bring the object into focus.
- Ensure the microscope is held steady or mounted on a stable stand.
- Check the working distance between the microscope lens and the object. Adjust as needed for optimal focus at the selected magnification.
- Clean the microscope lens if smudges or dust are present.
6.3 Software Issues (Crashing, Freezing)
- Assicurati che il tuo software sia aggiornato all'ultima versione.
- Check your computer's system resources (RAM, CPU) to ensure they meet the software's requirements.
- Chiudere le altre applicazioni che richiedono molto lavoro in esecuzione in background.
- Se il problema persiste, reinstallare il software.
6.4 Glare on Specimen
- Rotate the adjustable polarizer ring on the microscope to minimize reflections.
- Adjust the intensity of the LED lighting through the software.
- Change the angle of the microscope relative to the specimen.
7. Specifiche
| Caratteristica | Dettaglio |
|---|---|
| Nome del modello | AM4113ZT |
| Risoluzione dell'immagine | 1.3 Megapixel (1280 x 1024) |
| Ingrandimento | 20x - 50x, 200x (Optical) |
| Frequenza dei fotogrammi video | Fino a 30 FPS |
| Connettività | USB 2.0 |
| Sorgente luminosa | 8 White LEDs (adjustable via software) |
| Caratteristiche speciali | MicroTouch, Measurement, Adjustable Polarized Light |
| Dispositivi compatibili | Personal Computer, Laptop (Windows/Mac) |
| Dimensioni del prodotto | 6.5 cm L x 7.3 cm P x 2.6 cm A |
| Peso dell'articolo | 0.11 chilogrammi (3.87 once) |
| Materiale | Plastica |
| Voltage | 5 Volts (via USB) |
8. Garanzia e supporto
8.1 Informazioni sulla garanzia
For detailed warranty information regarding your Dino-Lite AM4113ZT USB Digital Microscope, please refer to the warranty card included in your product packaging or visit the official Dino-Lite websito. I termini e le condizioni della garanzia possono variare in base alla regione e alla data di acquisto.
8.2 Supporto tecnico
If you encounter issues not covered in this manual or require further assistance, please contact Dino-Lite customer support. Contact information can typically be found on the official Dino-Lite websito o nella documentazione del prodotto.
- Risorse online: Check the Dino-Lite website for FAQs, driver updates, and additional support materials.
- Contatto: Refer to your product's quick start guide or the manufacturer's website for specific contact details (phone, email, or support portal).


