1. Introduzione
This manual provides detailed instructions for the installation, operation, and maintenance of your Alpine MRV-M500 Class D Mono Car Amplifier. Please read this manual thoroughly before attempting installation or operation to ensure proper use and to prevent damage to the unit or your vehicle's electrical system. The Alpine MRV-M500 is designed to deliver powerful and clear audio performance for your car's subwoofer system.
2. Informazioni sulla sicurezza
- Scollegare la batteria: Always disconnect the negative terminal of your vehicle's battery before beginning any installation work to prevent electrical shorts and potential injury.
- Installazione professionale: If you are unsure about any part of the installation process, it is highly recommended to seek assistance from a qualified professional installer.
- Cablaggio corretto: Use appropriate gauge wiring for power, ground, and speaker connections as specified in this manual to prevent overheating and ensure optimal performance. Incorrect wiring can lead to fire or equipment failure.
- Ventilazione: Assicurare il amplifier is mounted in a location with adequate ventilation to prevent overheating. Do not cover the amplifier with carpets or other materials that could obstruct airflow.
- Livelli del volume: L'esposizione prolungata a livelli di volume elevati può causare danni all'udito. Regolare il volume a un livello sicuro e confortevole.
3. Contenuto della confezione
Verifica che tutti gli articoli siano presenti nel tuo pacco:
- Alpine MRV-M500 Mono Car Amppiù vivace
- Wiring Kit (Power cable, Ground cable, Remote turn-on wire, RCA interconnects, Speaker wire, Fuse holder, Fuse, Terminals, Cable ties)
- Hardware di montaggio (viti)
- Manuale del proprietario (questo documento)

Image 1: Alpine MRV-M500 amplifier and various components of the included wiring kit, including power cables, RCA cables, speaker wire, and mounting hardware.

Image 2: The Alpine MRV-M500 amplifier shown with its mounting brackets and a wiring harness, indicating components for installation.
4. Configurazione e installazione
4.1 Posizione di montaggio
Choose a mounting location that provides adequate ventilation for the amplifier. Avoid mounting in enclosed spaces or directly on carpet. Secure the amplifier firmly to a solid surface using the provided mounting hardware to prevent movement during vehicle operation.
4.2 Collegamenti di cablaggio
Refer to the diagram below and the following instructions for proper wiring. Ensure all connections are secure and insulated.
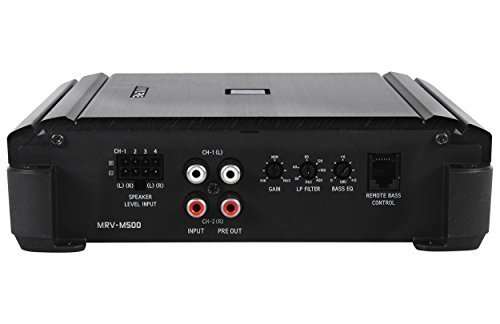
Image 3: Rear panel of the Alpine MRV-M500 amplifier, displaying the various input and control connections including speaker level input, RCA input/pre-out, gain, LP filter, bass EQ, and remote bass control port.
4.2.1 Collegamento di alimentazione
- Connect the power cable (typically red) from the amplifier's +12V terminal to the positive terminal of the vehicle's battery.
- Install the fuse holder within 18 inches (45 cm) of the battery and insert the appropriate fuse (refer to specifications for fuse rating).
4.2.2 Collegamento a terra
- Connect the ground cable (typically black) from the amplifier's GND terminal to a clean, unpainted metal surface on the vehicle's chassis.
- Ensure the ground point is free of paint, rust, or dirt for a good electrical connection. The ground cable should be as short as possible, ideally less than 3 feet (1 meter).
4.2.3 Remote Turn-On Connection
- Connect the remote turn-on wire (typically blue) from the ampterminale REM del lifier all'uscita remota dell'unità principale. Questo filo trasforma il amplifier on and off with your car's audio system.
4.2.4 Input Connection (RCA or Speaker Level)
- Ingresso RCA: Se l'unità principale ha uscite pre-out RCA, collegarle a amplifier's RCA INPUT terminals (CH-1(L) and CH-2(R)).
- Ingresso livello altoparlante: If your head unit does not have RCA pre-outs, use the speaker level input harness. Connect the speaker wires from your head unit's speaker outputs to the corresponding wires on the amplifier's speaker level input harness.
4.2.5 Collegamento degli altoparlanti
- Collega il/i tuo/i subwoofer al/i amplifier's SPEAKER OUTPUT terminals.
- Ensure correct polarity (+ to + and - to -) for optimal sound performance.
4.2.6 Remote Bass Control (Optional)
- If using an optional remote bass control, connect it to the REMOTE BASS CONTROL port on the amppiù vivace.
5. Istruzioni per l'uso
Una volta installato, regolare il ampimpostazioni del filtro per prestazioni audio ottimali.
5.1 Controlli e regolazioni
- GUADAGNO: This control matches the output level of your head unit to the input sensitivity of the amplifier. Start with the gain set to minimum, then slowly increase it until you achieve a clear, undistorted sound at your desired maximum volume from the head unit. Avoid setting the gain too high, as this can introduce distortion.
- LP FILTER (Low Pass Filter): Questo controllo imposta il limite di frequenza superiore per il amplifier's output. For subwoofers, set this to a frequency typically between 50Hz and 120Hz. This ensures that only low-frequency sounds are sent to the subwoofer, improving overall sound clarity.
- EQUALIZZAZIONE DEI BASSI: This control provides a bass boost at a specific frequency. Use sparingly and adjust carefully to avoid distortion or damage to your subwoofer.
- REMOTE BASS CONTROL: If connected, this allows for convenient adjustment of the bass level from the driver's seat.
6. Manutenzione
- Pulizia: Pulire periodicamente il ampl'esterno del filtro con un panno morbido e asciutto. Non utilizzare prodotti chimici aggressivi o detergenti abrasivi.
- Verifiche della connessione: Regularly inspect all wiring connections to ensure they are secure and free from corrosion. Loose connections can lead to poor performance or damage.
- Sostituzione fusibile: Se il amplifier stops working, check the fuse in the external fuse holder. Replace it only with a fuse of the exact same type and rating. Never use a higher-rated fuse.
7. Risoluzione Dei Problemi
Se riscontri problemi con il tuo amplifier, consultare la seguente tabella prima di contattare l'assistenza.
| Problema | Possibile causa | Soluzione |
|---|---|---|
| Nessun potere / Amplifier non si accende | Fusibile bruciato Alimentazione o collegamento di terra allentati Nessun segnale di accensione remoto | Controllare e sostituire il fusibile Verificare che tutti i collegamenti di alimentazione e di terra siano sicuri Check remote wire connection to head unit |
| Nessun suono | Loose RCA or speaker wires Selezione di input errata Guadagno impostato troppo basso | Check all input and output connections Ensure correct input (RCA or speaker level) is used Adjust gain control |
| Suono distorto | Guadagno impostato troppo alto Incorrect LP Filter setting Altoparlante danneggiato | Ridurre l'impostazione del guadagno Adjust LP Filter to appropriate frequency Inspect speaker for damage |
| Amplifier si surriscalda | Ventilazione inadeguata Improper speaker impedance Sustained high volume | Assicurare un corretto flusso d'aria intorno amppiù vivace Verificare che l'impedenza degli altoparlanti corrisponda amplifier's capabilities Ridurre il volume o consentire amplifier to cool |
8. Specifiche
- Modello: MRV-M500
- Produttore: Alpino
- AmpTipo lificatore: Classe D Mono
- Potenza RMS: 500 Watt
- Numero di canali: 1 (Mono)
- Voltage: 14.4 Volt (nominali)
- Tipo di montaggio: Montaggio in superficie
- Numero modello articolo: MRV-M500+RWK81
9. Garanzia e supporto
This Alpine product is covered by a manufacturer's warranty. Please refer to the warranty card included with your product or visit the official Alpine website for detailed warranty terms and conditions. For technical support, service, or further assistance, please contact Alpine customer service.
Assistenza clienti Alpine: Refer to your product packaging or the official Alpine websito per informazioni di contatto aggiornate.


