1. Introduzione
This manual provides essential information for the installation and use of the Fermax 6565 Mounting Plate for Smile Monitors. This product is designed to facilitate the secure and proper mounting of Fermax Smile series monitors, ensuring a stable connection within your intercom system. Please read these instructions carefully before proceeding with installation.
2. Prodotto finitoview
The Fermax 6565 Mounting Plate is a white connector specifically designed for Fermax Smile VDS monitors. It serves as the interface between the monitor and the wall, providing the necessary electrical connections and physical support.
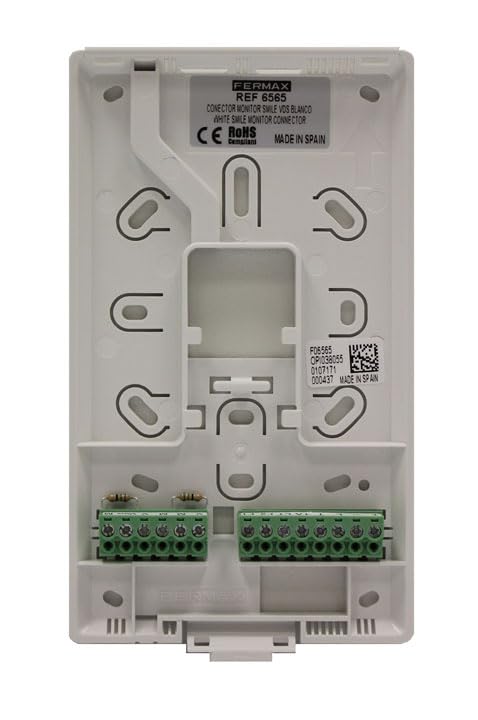
Figura 1: Davanti view of the Fermax 6565 Mounting Plate. This image displays the white plastic mounting plate with various screw holes for wall attachment and monitor securing. Two green terminal blocks are visible at the bottom, providing connection points for wiring. A label near the top indicates "FERMAX REF 6565 CONECTOR MONITOR SMILE VDS BLANCO WHITE SMILE MONITOR CONNECTOR CE RoHS MADE IN SPAIN". A QR code and additional serial numbers are also present on a label on the right side.
Caratteristiche principali:
- Designed for Fermax Smile VDS monitors.
- Provides secure mounting and electrical connection.
- Design compatto e durevole.
- Colore: bianco.
3. Configurazione e installazione
Installation of the Fermax 6565 Mounting Plate requires basic electrical and DIY skills. It is recommended to consult a qualified electrician if you are unsure about any steps.
Precauzioni di sicurezza:
- Scollegare sempre l'alimentazione to the intercom system before beginning any installation work.
- Assicurarsi che tutti i cablaggi siano conformi ai codici e alle normative elettriche locali.
- Non esporre il prodotto all'umidità o a temperature estreme.
Fasi di installazione:
- Preparare l'area di installazione: Choose a suitable location on the wall for the monitor, ensuring it is at an appropriate height and has access to the necessary wiring.
- Segnare i punti di foratura: Hold the mounting plate against the wall at the desired position. Use a pencil to mark the locations for the mounting screws through the designated holes on the plate.
- Fori di perforazione: Drill pilot holes at the marked points. Use appropriate drill bits and wall plugs (not included) suitable for your wall material (e.g., plasterboard, concrete).
- Montare la piastra: Secure the Fermax 6565 Mounting Plate to the wall using screws (not included) that are compatible with your wall plugs. Ensure the plate is level and firmly attached.
- Collegare il cablaggio: Route the intercom system's wiring through the opening in the mounting plate. Connect the wires to the green terminal blocks on the plate according to the wiring diagram provided with your Fermax Smile monitor. Pay close attention to polarity and correct terminal assignments (e.g., VDS bus, power, audio, video).
- Collegare il monitor: Once wiring is complete and secure, carefully align the Fermax Smile monitor with the mounting plate. Gently push the monitor onto the plate until it clicks into place, ensuring all connections are firm.
- Ripristina alimentazione: Reconnect power to the intercom system and test the functionality of the monitor.
4. Istruzioni per l'uso
The Fermax 6565 Mounting Plate is a passive component designed for physical mounting and electrical connection. It does not have any operational controls or functions itself. All operational aspects are managed through the connected Fermax Smile monitor and the overall intercom system.
5. Manutenzione
The Fermax 6565 Mounting Plate requires minimal maintenance. Periodically, you may:
- Pulizia: Wipe the surface of the plate with a soft, dry cloth to remove dust. Do not use abrasive cleaners or solvents.
- Verifica della connessione: If you experience issues with your intercom system, ensure the monitor is securely seated on the mounting plate and that all wiring connections are tight.
6. Risoluzione Dei Problemi
As a passive component, the mounting plate itself rarely causes issues. Most problems will stem from the monitor or the intercom system. However, consider the following if issues arise:
- Il monitor non si accende:
- Check if power to the intercom system is restored.
- Ensure all wires are correctly connected to the terminal blocks on the mounting plate and are securely fastened.
- Verify that the Fermax Smile monitor is properly seated on the mounting plate.
- Loose Monitor:
- Ensure the mounting plate is firmly secured to the wall. Tighten screws if necessary.
- Verify the monitor is correctly engaged with the plate's locking mechanisms.
For further troubleshooting, refer to the user manual of your Fermax Smile monitor or contact Fermax customer support.
7. Specifiche
| Attributo | Valore |
|---|---|
| Produttore | Fermata |
| Numero di modello | 8424299065656 |
| Dimensioni del prodotto (L x P x A) | Dimensioni: 13.9 x 2.3 x 17.3 cm |
| Peso dell'articolo | 23 grammi |
| Colore | Bianco |
| Numero di confezioni | 1 |
| Sistema di unità | Metrico |
| ASIN | B019P37A8W |
| Prima data disponibile | 1 dicembre 2016 |
8. Cosa c'è nella scatola
- 1 x FERMAX Mounting Plate for Fermax Smile Monitors -CONNECTOR
Note: Mounting screws and wall plugs are not included and must be purchased separately, suitable for your specific wall type.
9. Garanzia e supporto
For information regarding product warranty, please refer to the documentation provided with your purchase or visit the official FERMAX website. For technical support or inquiries, please contact FERMAX customer service through their official channels.
FERMAX Ufficiale Websito: www.fermax.com


