Introduzione
Grazie per l'acquistoasing the Insignia 10-inch Digital Photo Frame. This device allows you to display your favorite digital photos and videos in a high-quality format. This manual provides detailed instructions for setup, operation, maintenance, and troubleshooting to ensure you get the most out of your new digital photo frame.
Contenuto della confezione
Before you begin, please check that all items are present in the package:
- Insignia 10-inch Digital Photo Frame
- Adattatore di alimentazione
- Telecomando
- Manuale dell'utente (questo documento)
Impostare
1. Collegamento dell'alimentazione
Connect the included power adapter to the DC IN 9V port on the back of the digital photo frame. Plug the other end of the adapter into a standard wall outlet. The frame will typically power on automatically or can be turned on using the power switch.
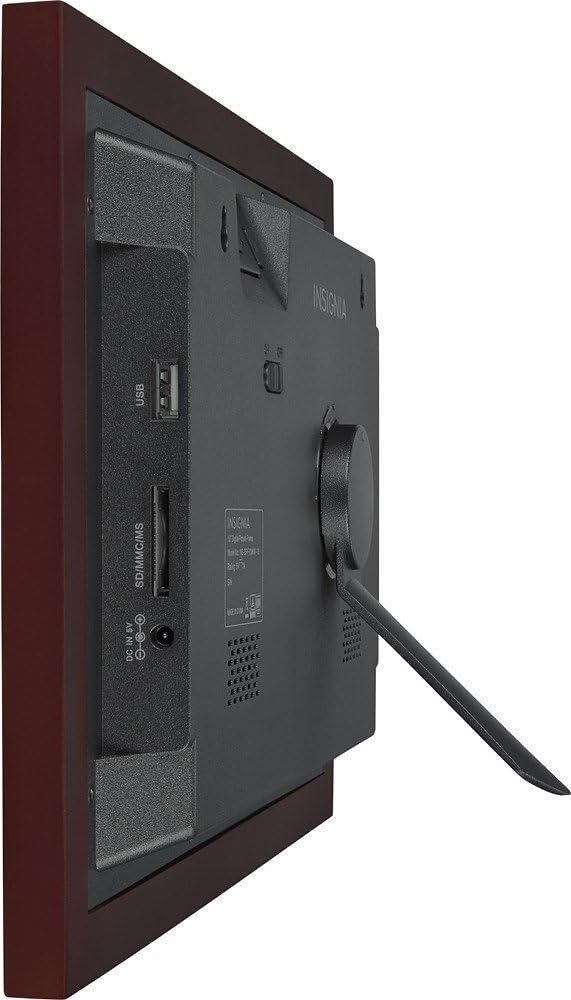
Immagine: Posteriore view of the digital photo frame, highlighting the USB port, SD/MMC/MS card slot, and DC IN 9V power input.
2. Inserimento di schede di memoria o unità USB
The frame supports SD, MMC, and MS memory cards, as well as USB flash drives. Insert your memory card into the appropriate slot or your USB drive into the USB port on the side/back of the frame. Ensure the card or drive is inserted correctly. The frame will automatically detect the storage device.
3. Impostazioni iniziali
Upon first power-on, you may be prompted to set the language, time, and date. Use the navigation buttons on the frame or the remote control to make your selections and confirm.
Operating the Digital Photo Frame
1. Controlliview
Your digital photo frame can be operated using the buttons on the back of the frame or the included remote control.
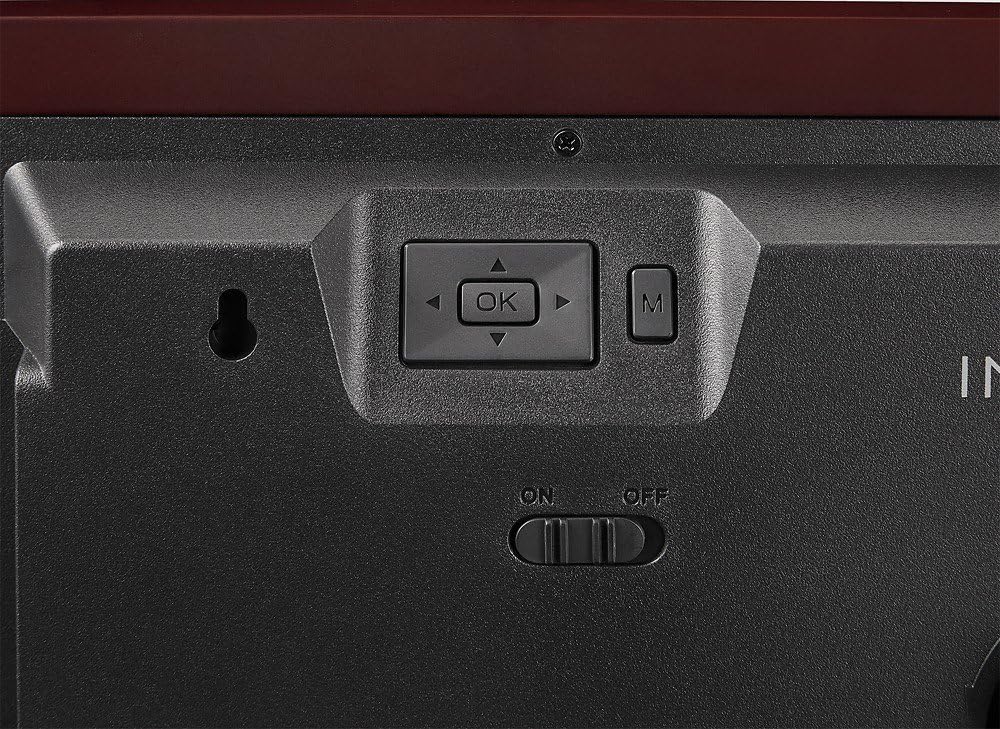
Image: Close-up of the control buttons located on the rear of the digital photo frame. These include directional arrows, an 'OK' button for selection, and an 'M' button for menu access, alongside the power switch.
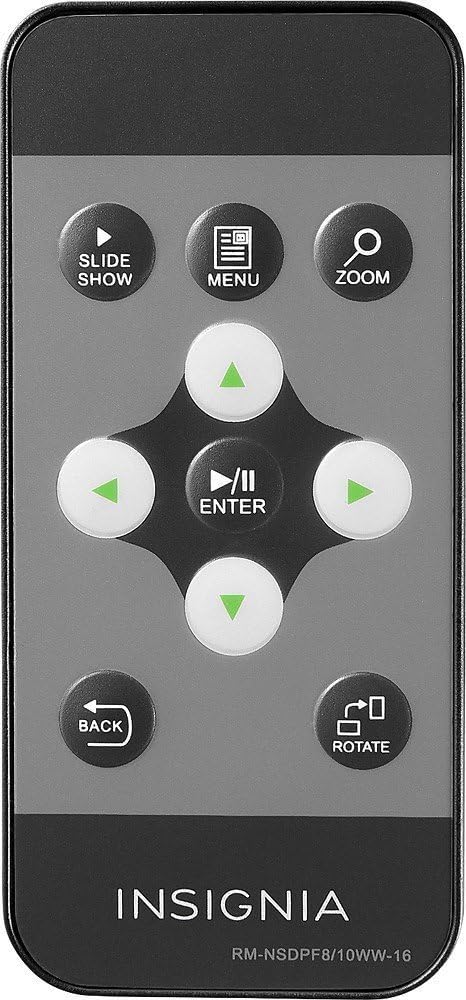
Image: The remote control for the digital photo frame, featuring dedicated buttons for slideshow, menu, zoom, directional navigation, enter, back, and image rotation functions.
2. Navigazione nei menu
Premere il tasto MENU pulsante sul telecomando o sul M button on the frame to access the main menu. Use the directional arrows (▲ ▼ ◀ ▶) to navigate through options and press ENTRARE or OK per confermare la tua selezione. premere INDIETRO per tornare alla schermata precedente o uscire dal menu.
3. Viewing Foto e video
Once a memory card or USB drive is inserted, the frame will typically start a slideshow automatically. You can manually browse files by selecting the "Photo" or "Video" option from the main menu. Use the navigation buttons to select a file e premere ENTRARE or OK A view Esso.
4. Slideshow Settings
From the main menu, navigate to "Settings" or "Slideshow Settings" to customize your slideshow. Options may include:
- Modalità di visualizzazione: Adjust how photos fit the screen (e.g., original, fit to screen, crop).
- Intervallo di tempo: Imposta la durata di visualizzazione di ogni foto.
- Effetto di transizione: Choose from various transition styles between photos.
- Modalità di ripetizione: Loop the slideshow continuously.
5. Clock and Calendar
Your frame may include a clock and calendar function. Access these features through the main menu. You can set the time and date in the settings menu.
Manutenzione
Pulizia del telaio
Per pulire lo schermo, strofinarlo delicatamente con un panno morbido e privo di lanugine. Per macchie ostinate, strofinare leggermenteampen the cloth with water or a non-abrasive screen cleaner. Avoid using harsh chemicals or abrasive materials, as these can damage the screen and frame finish. Ensure the frame is powered off and unplugged before cleaning.
Magazzinaggio
When not in use for extended periods, store the digital photo frame in a cool, dry place, away from direct sunlight and extreme temperatures. It is recommended to keep the original packaging for storage.
Risoluzione dei problemi
| Problema | Possibile soluzione |
|---|---|
| Il telaio non si accende. |
|
| No photos or videos display. |
|
| Il telecomando non funziona. |
|
| Images appear distorted or stretched. |
|
Specifiche
| Caratteristica | Dettaglio |
|---|---|
| Numero di modello | NS-DPF10WW-16 |
| Dimensioni dello schermo | 10 pollici |
| Risoluzione | WXGA |
| Dimensioni del prodotto | 12.6 x 1.5 x 9 pollici |
| Peso dell'articolo | 2 libbre |
| Tecnologia di connettività | USB |
| Schede di memoria supportate | SD, MMC, MS (Memory Stick) |
| Produttore | Insegne |
Garanzia e supporto
For warranty information, please refer to the warranty card included with your product or visit the official Insignia website. If you encounter issues not covered in this troubleshooting section, please contact Insignia customer support for assistance.
Supporto online: www.insigniaproducts.com/support