Introduzione
This manual provides detailed instructions for the installation, operation, and maintenance of your Memphis Audio SRX750D.1 Street Reference Series Mono Subwoofer Amplificatore. Leggere attentamente questo manuale prima di procedere all'installazione o all'utilizzo per garantire un utilizzo corretto ed evitare danni all'unità o al sistema audio del veicolo.
The SRX750D.1 amplifier is designed to deliver reliable performance and powerful bass output for your car audio system. It features a textured aluminum heatsink, high-level inputs, selectable bass boost, remote level control, and a variable crossover network.
Precauzioni di sicurezza
- Prima di iniziare qualsiasi installazione, scollegare sempre il terminale negativo della batteria del veicolo.
- Assicurarsi che tutti i cavi siano correttamente instradati e fissati per evitare danni o cortocircuiti.
- Use appropriate gauge wiring as recommended in the specifications section.
- Evitare di montare il amplificatore in aree esposte alla luce solare diretta, a calore eccessivo, umidità o polvere.
- Non azionare il amplifier se è danneggiato o malfunzionante. Consultare la sezione risoluzione dei problemi o contattare l'assistenza.
- Per ottenere prestazioni e sicurezza ottimali si consiglia l'installazione da parte di un professionista.
Contenuto della confezione
Verificare che tutti gli articoli siano presenti nel pacco:
- Memphis Audio SRX750D.1 Mono Subwoofer Amppiù vivace
- Manopola per bassi remoti
- Hardware di montaggio
- Manuale dell'utente (questo documento)
Installazione e configurazione
1. Scelta della posizione di montaggio
Select a location that provides adequate ventilation for the amplifier's heatsink. Avoid mounting directly on carpet or in enclosed spaces without airflow. Common locations include under seats, in the trunk, or on a custom ampcremagliera lificatore.

Figura 1: Angolato view of the SRX750D.1 amplifier, highlighting its heatsink design.
2. Cablaggio di alimentazione
- Scollegamento della batteria: Scollegare il terminale negativo (-) della batteria del veicolo.
- Cavo di alimentazione: Run a 4-gauge power cable (Recommended Amp Kit: 4GKIT) from the positive (+) terminal of the battery to the amplifier's power input. Install an inline fuse holder within 18 inches (45 cm) of the battery. The fuse rating should match the amplifier's requirements (refer to specifications).
- Cavo di terra: Collegare un cavo di terra di calibro 4 dal amplifier's ground terminal to a clean, unpainted metal surface on the vehicle's chassis. Ensure a solid, low-resistance connection. The ground cable should be as short as possible, ideally less than 3 feet (1 meter).
- Accensione remota: Connect a remote turn-on wire (typically 18-gauge) from your head unit's remote output to the ampterminale REM del lificatore. Questo filo segnala il amplifier per accendere e spegnere con l'unità principale.
3. Signal Input Wiring
The SRX750D.1 supports both low-level (RCA) and high-level inputs.
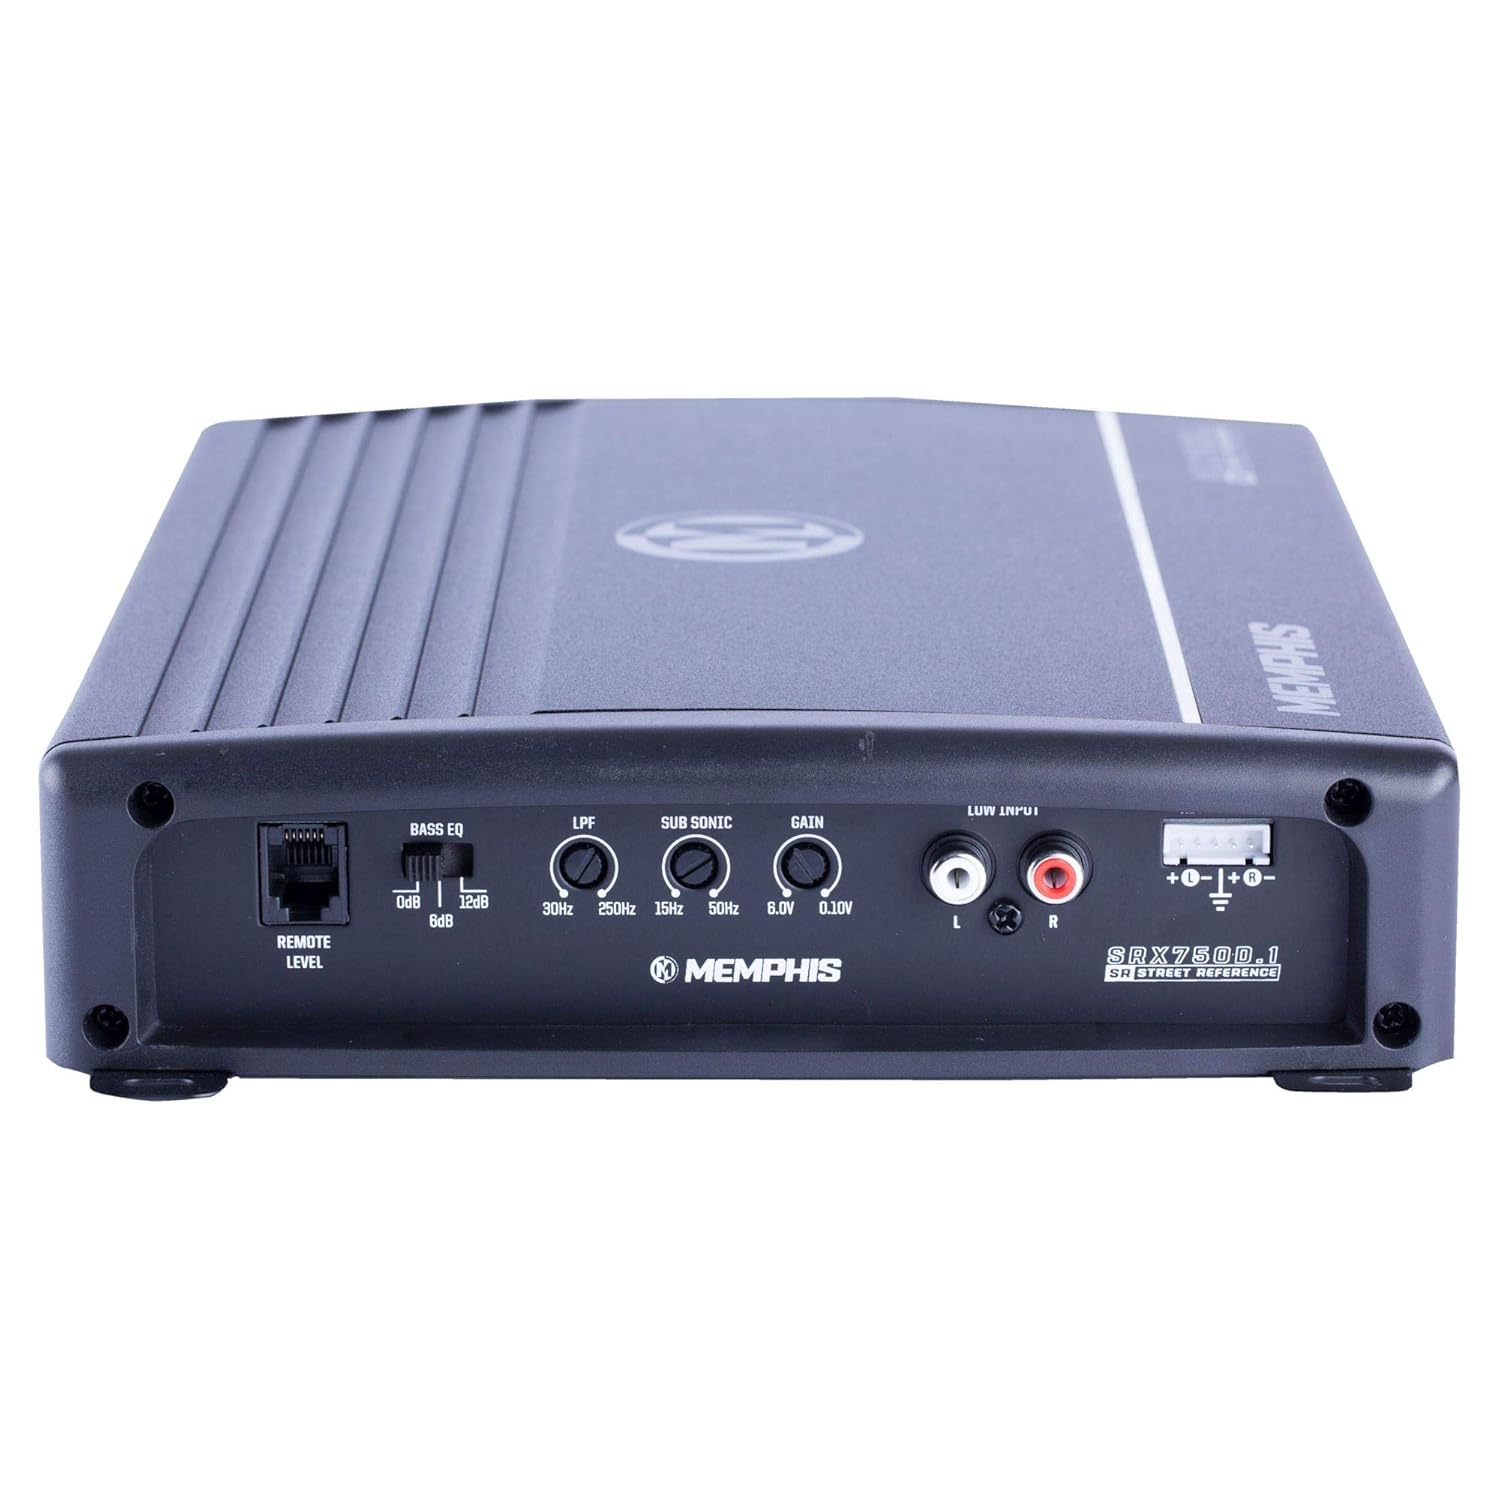
Figure 2: Rear panel of the SRX750D.1 amplifier with input and control connections.
- Ingresso a basso livello (RCA): Collegare i cavi RCA dal subwoofer dell'unità principale o dalle uscite pre-out full-range al amplifier's "LOW INPUT" RCA jacks.
- Input di alto livello: If your head unit does not have RCA outputs, use the high-level input. Connect the speaker wires from your head unit directly to the amplifier's high-level input terminal. Refer to your head unit's manual for speaker wire polarity.
4. Speaker Output Wiring
Collega il/i tuo/i subwoofer al/i amplifier's speaker output terminals. Ensure correct polarity (+ to + and - to -). The SRX750D.1 is a mono amplifier, designed for a single subwoofer or multiple subwoofers wired to a final impedance of 2 ohms or 4 ohms.
Important: Do not wire the amplifier below a 2-ohm load, as this can cause damage and void the warranty.
5. Installazione della manopola dei bassi remota
Connect the included remote bass knob to the "REMOTE LEVEL" port on the amplifier. Mount the knob in a convenient location for easy access while driving. This allows for real-time adjustment of the subwoofer output level.
Istruzioni per l'uso
1. Accensione iniziale
Dopo aver effettuato e verificato tutti i collegamenti, ricollegare il terminale negativo della batteria del veicolo. Accendere l'unità principale. amplifier should power on, indicated by an LED indicator (if present).
2. Regolazione del guadagno
The "GAIN" control matches the amplifier's input sensitivity to the output level of your head unit. This is not a volume control. To set the gain:
- Girare il amplifier's gain control to its minimum (counter-clockwise) setting.
- Imposta il volume dell'unità principale a circa il 75% del suo livello massimo.
- Play a dynamic piece of music with strong bass.
- Aumenta lentamente il amplifier's gain control (clockwise) until you hear distortion, then back it off slightly until the sound is clear.
3. Crossover Settings (LPF)
The "LPF" (Low Pass Filter) control allows only frequencies below the set point to pass through to the subwoofer. This is crucial for blending the subwoofer with your main speakers.
- Adjust the LPF control (30Hz - 250Hz) to a frequency typically between 80Hz and 120Hz, depending on your subwoofer and main speaker capabilities.
- Experiment with different settings to achieve the best sound integration.
4. Sub Sonic Filter
The "SUB SONIC" filter removes extremely low frequencies that your subwoofer cannot reproduce effectively, preventing wasted power and potential damage. Set this filter slightly below your LPF setting, typically around 20Hz-30Hz.
5. Bass EQ / Bass Boost
The "BASS EQ" or "BASS BOOST" control provides an adjustable boost at a specific low frequency (e.g., 0dB to +12dB). Use this sparingly to enhance bass impact. Excessive boost can lead to distortion and damage.
Manutenzione
- Pulizia: Pulire periodicamente il ampl'esterno del filtro con un panno morbido e asciutto. Non utilizzare prodotti chimici aggressivi o detergenti abrasivi.
- Ventilazione: Ensure the heatsink fins remain clear of obstructions to allow for proper cooling. Dust or debris buildup can impair cooling performance.
- Connessioni: Controllare di tanto in tanto tutti i collegamenti di alimentazione, di terra e di segnale per assicurarsi che siano saldi e privi di corrosione.
- Sostituzione fusibile: Se il amplifier's fuse blows, replace it only with a fuse of the exact same type and rating. Using an incorrect fuse can cause severe damage or fire.
Risoluzione dei problemi
| Problema | Possibile causa | Soluzione |
|---|---|---|
| Nessun potere / Amplifier non si accende |
|
|
| Nessuna uscita audio |
|
|
| Suono distorto |
|
|
| Amplifier si surriscalda |
|
|
Specifiche
| Caratteristica | Specificazione |
|---|---|
| Modello | SRX750D.1 |
| Potenza RMS @ 4Ω | 400 Watt x 1 |
| Potenza RMS @ 2Ω | 750 Watt x 1 |
| THD% a 4Ω | <1% |
| Risposta in frequenza | 30Hz - 250Hz |
| Intervallo di input | 120 mV - 6.1 V |
| Dimensioni (L x P x A) | 15 x 9.45 x 3.5 pollici |
| Voltage | 6.1 Volts (Input/Supply) |
| Materiale | Alluminio |
| Peso dell'articolo | 7 libbre |
| Numero di canali | 1 (Mono) |
| Raccomandato Amp Kit | 4GKIT (4-Gauge) |
| Caratteristiche | Textured aluminum heatsink, High level inputs, Selectable bass boost, Remote level control/bass knob, Variable crossover network |
Garanzia e supporto
Informazioni sulla garanzia
The Memphis Audio SRX750D.1 amplifier viene fornito con un Garanzia limitata di 1 anno dalla data di acquisto. La presente garanzia copre i difetti di materiali e di fabbricazione in condizioni di normale utilizzo. Non copre i danni causati da installazione impropria, incidenti, uso improprio, abuso, negligenza o modifiche non autorizzate.
Conservare la prova d'acquisto per eventuali richieste di garanzia.
Assistenza clienti
Per assistenza tecnica, assistenza in garanzia o ulteriori informazioni, contattare l'assistenza clienti di Memphis Audio. Fare riferimento al sito ufficiale di Memphis Audio. websito per le informazioni di contatto più aggiornate.
Risorse online: www.memphiscaraudio.com


