1. Introduzione
This manual provides detailed instructions for the installation, operation, and maintenance of your Focal FPX1.1000 Class D Mono Amplificatore. Leggere attentamente questo manuale prima di procedere all'installazione o all'utilizzo per garantirne il corretto funzionamento e la sicurezza. Conservare questo manuale per riferimento futuro.
2. Istruzioni di sicurezza
Observe the following safety precautions to prevent injury or damage to the amplificatore e veicolo:
- Installazione professionale consigliata: Installation of car audio equipment can be complex. It is highly recommended that a qualified professional install this amppiù vivace.
- Scollegare la batteria: Prima di iniziare qualsiasi intervento elettrico, scollegare sempre il terminale negativo della batteria del veicolo per evitare cortocircuiti.
- Cablaggio corretto: Use appropriate gauge wiring for power, ground, and speaker connections as specified in the installation section. Incorrect wiring can cause overheating, fire, or damage to components.
- Ventilazione: Assicurare il amplifier is mounted in a location with adequate ventilation to prevent overheating. Do not block cooling fins.
- Evitare l'umidità: Non esporre il amplificatore all'umidità o all'acqua.
- Montaggio sicuro: Montare il amplificatore in modo sicuro per evitare che si allenti durante il funzionamento del veicolo, causando lesioni o danni.
- Protezione del fusibile: Always use an external fuse on the main power wire, close to the battery, with the recommended ampera.
3. Prodotto finitoview
3.1 Caratteristiche principali
- CEA Power (4 Ohms): 1×420 Wrms
- Maximum Power (2 Ohms): 1×700 Wrms
- Maximum Power (1 Ohm): 1×1000 Wrms
- Bandwidth: 15Hz–250Hz
- Integrated Protections: Short Circuit, low impedance, reversal of polarity, DC, power drop, heat protection.
- Classe D Mono Amplifier design for high power and efficiency.
3.2 Cosa c'è nella scatola
- Focal FPX1.1000 Mono Amppiù vivace
- Manuale dell'utente (questo documento)
- Materiale di montaggio (viti, ecc.)
4. Installazione e configurazione
Proper installation is crucial for optimal performance and safety. Consult a professional installer if you are unsure about any steps.
4.1 Posizione di montaggio
Scegliere una posizione di montaggio che sia:
- Asciutto e privo di umidità.
- Ben ventilato per consentire la dissipazione del calore.
- Secure and protected from physical damage.
- Away from fuel lines, brake lines, and electrical wiring harnesses.
Le posizioni più comuni sono sotto un sedile, nel bagagliaio o dietro un pannello.
4.2 Collegamenti di cablaggio
Prima di effettuare qualsiasi collegamento, scollegare il terminale negativo della batteria del veicolo.
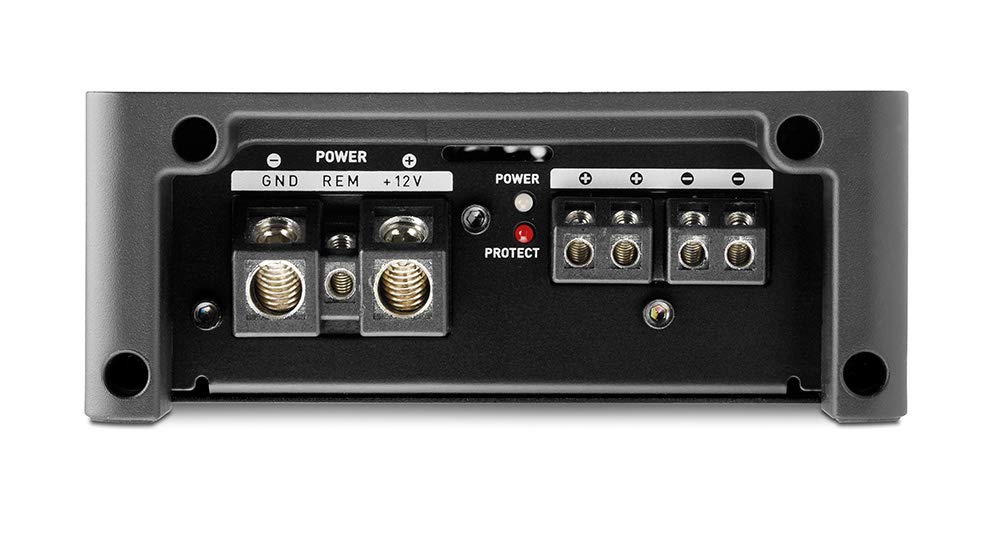
Image 1: Power and Speaker Terminal Connections. This image displays the rear panel of the amplifier, highlighting the power input terminals (GND, REM, +12V) and the speaker output terminals. A red 'PROTECT' indicator light is also visible.
- Cavo di alimentazione (+12 V): Run a heavy-gauge power wire (e.g., 4 AWG or larger, depending on total system power) directly from the positive terminal of the vehicle's battery to the +12V terminal on the amplifier. Install an inline fuse holder with the appropriate fuse (refer to specifications for recommended fuse size) within 18 inches (45 cm) of the battery.
- Cavo di terra (GND): Connect a heavy-gauge ground wire (same gauge as power wire) from the GND terminal on the amplifier to a clean, unpainted metal surface on the vehicle's chassis. Ensure a good electrical connection by scraping away any paint or rust. The ground wire should be as short as possible, ideally less than 3 feet (1 meter).
- Cavo di accensione remota (REM): Connect a smaller gauge wire (e.g., 18 AWG) from the REM terminal on the amplifier to the remote turn-on output of your head unit or other switched 12V source. This wire turns the amplifier acceso e spento con il tuo sistema audio.
- Uscita altoparlante: Collega il/i subwoofer ai terminali di uscita degli altoparlanti. Assicurati che la polarità sia corretta (+ con + e - con -). Questo è un mono. amplifier, designed for a single subwoofer or multiple subwoofers wired to present a 1-ohm or 2-ohm load. Refer to your subwoofer's specifications for impedance matching.
- Ingresso RCA: Connect RCA cables from the subwoofer output of your head unit to the INPUT CH1/CH2 RCA jacks on the amppiù vivace.

Image 2: Input and Control Panel. This image shows the front panel of the amplifier, featuring RCA input and output jacks, a remote port, and various control knobs for Gain, Subsonic filter, Bass Boost, Phase, and Low Pass Filter (LPF).
5. Istruzioni per l'uso
Una volta installato, regolare il ampimpostazioni del filtro per prestazioni audio ottimali.
5.1 Control Panel Adjustments
- GUADAGNO (sensibilità di ingresso): Questo controllo corrisponde al amplifier's input sensitivity to the output level of your head unit. Start with the gain at minimum (Min) and slowly increase it until you hear distortion, then back off slightly. Do not use the gain control as a volume knob.
- SUBSONICO: This filter removes extremely low frequencies that are inaudible and can waste amplifier power or damage subwoofers. Adjust it to a frequency below your subwoofer's resonant frequency or port tuning frequency (typically 15-30Hz).
- AUMENTO DEI BASSI: This control provides an increase in bass output at a specific frequency. Use sparingly to avoid distortion and potential damage to subwoofers.
- FASE: This control adjusts the phase of the subwoofer output relative to the main speakers (0° to 180°). Adjust for the best blend and impact with your front speakers.
- LPF (filtro passa basso): This filter allows only frequencies below the set point to pass through to the subwoofer. Adjust it to blend smoothly with your main speakers, typically between 50Hz and 80Hz.
5.2 Power and Protection Indicators
- Indicatore di alimentazione: Si illumina quando il amplifier is receiving power and operating normally.
- Protect Indicator: Si illumina quando il amplifier detects a fault (e.g., short circuit, overheating, low impedance). If this light comes on, turn off your audio system immediately and troubleshoot the issue.
6. Manutenzione
The Focal FPX1.1000 ampIl filtro richiede una manutenzione minima. Seguire queste linee guida per garantirne la longevità:
- Pulizia: Pulire periodicamente il ampl'esterno del filtro con un panno morbido e asciutto. Non utilizzare prodotti chimici aggressivi o detergenti abrasivi.
- Ventilazione: Ensure that the cooling fins remain free of dust and debris. Use compressed air to gently clear any blockages if necessary.
- Connessioni: Controllare di tanto in tanto tutti i collegamenti elettrici per accertarsi che siano saldi e privi di corrosione.
7. Risoluzione Dei Problemi
Se riscontri problemi con il tuo amplifier, consultare la seguente tabella prima di richiedere assistenza professionale:
| Problema | Possibile causa | Soluzione |
|---|---|---|
| Nessun potere / Amplifier non si accende |
|
|
| Protect light is on |
|
|
| Nessun suono |
|
|
| Suono distorto |
|
|
8. Specifiche
| Caratteristica | Dettaglio |
|---|---|
| Numero di modello | FPX1.1000 |
| Marca | Focale |
| Potenza CEA (4 Ohm) | 1×420 Wrms |
| Maximum Power (2 Ohms) | 1×700 Wrms |
| Maximum Power (1 Ohm) | 1×1000 Wrms |
| Larghezza di banda | 15Hz – 250Hz |
| Protezioni | Short Circuit, low impedance, reversal of polarity, DC, power drop, heat protection |
| Dimensioni del prodotto | 11.81 x 11.81 x 11.81 pollici; 6 libbre |
| Tipo di montaggio | Montaggio in superficie |
| Voltage | 10 Volts, 14.4 Volts, 5 Volts (Operating Voltage Gamma) |
9. Garanzia e supporto
Focal products are designed and manufactured to high quality standards. This product is covered by a limited warranty against defects in materials and workmanship. The specific terms and duration of the warranty may vary by region and retailer. Please retain your proof of purchase for warranty claims.
For technical support, warranty service, or further assistance, please contact your authorized Focal dealer or visit the official Focal websito per le informazioni di contatto.


