Introduzione
This manual provides detailed instructions for the proper setup, operation, and maintenance of your FEELWORLD FW760 7-inch On-Camera Monitor. Please read this manual thoroughly before using the product to ensure optimal performance and to prevent damage.
Prodotto finitoview
The FEELWORLD FW760 is a 7-inch Full HD on-camera monitor designed for professional videography and photography. It features a 1920x1200 resolution IPS panel, 4K HDMI input, and a lightweight, ultra-thin design. Key features include a built-in sunshade and an HDMI lock for secure connections.
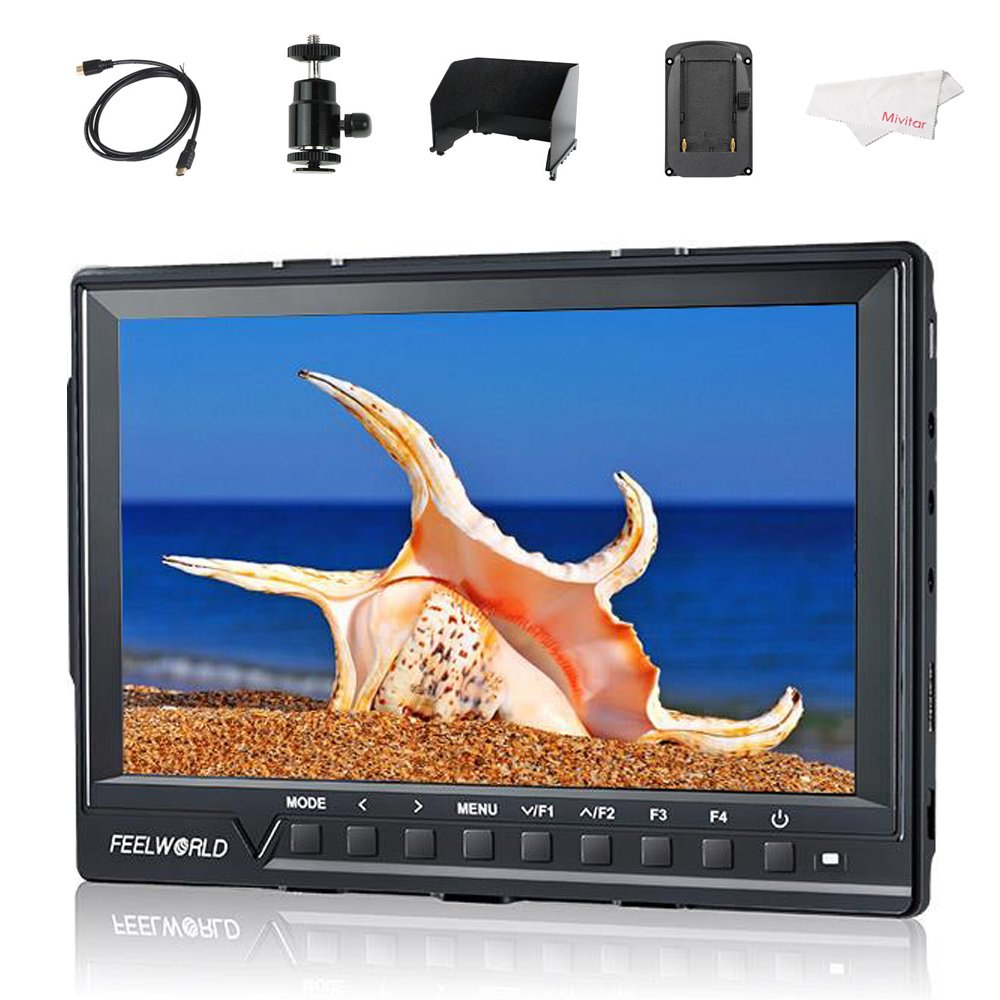
Image: The FEELWORLD FW760 monitor displaying an image, with callouts for Full HD 1920x1200 Resolution, 4K HDMI Input, and 1200:1 Contrast Ratio.
Contenuto della confezione
Verifica che tutti gli articoli elencati di seguito siano inclusi nella confezione. Se alcuni articoli risultano mancanti o danneggiati, contatta il rivenditore.
- 1 × Monitor FEELWORLD FW760
- 1 × Cavo Mini HDMI
- 1 × Parasole
- 1 × attacco per slitta a contatto caldo
- 1 × F970 Battery Plate (pre-installed or separate)
- 1 × Blocco spina HDMI
- 1 × Operation Manual (this document)

Image: A visual representation of the standard accessories: Mini HDMI Cable, Sun Shade, Hot Shoe Mount, HDMI Plug Lock, Operation Manual, and F970 Battery Plate.
Istruzioni di installazione
1. Attaching the HDMI Plug Lock
The HDMI plug lock secures the HDMI cable to prevent accidental disconnection during operation.
- Locate the HDMI port on the side of the monitor.
- Align the HDMI plug lock with the screw hole next to the HDMI port.
- Insert the HDMI cable into the port.
- Secure the HDMI plug lock by tightening the screw.

Immagine: La parte posteriore view of the monitor, highlighting the HDMI port with the HDMI lock mechanism and the F970 battery plate.

Image: A step-by-step visual guide demonstrating the attachment of the HDMI plug lock to the monitor's HDMI port.
2. Attaching the Sunshade
The sunshade reduces glare and improves screen visibility in bright conditions.
- Align the sunshade with the grooves around the monitor's screen.
- Gently slide the sunshade into place until it is securely attached.

Image: The FEELWORLD FW760 monitor with its sunshade fully assembled and attached, providing shade to the screen.

Image: A sequence of images illustrating how to correctly attach the sunshade to the monitor, showing the monitor both with and without the sunshade.
3. Fissaggio del supporto slitta
The hot shoe mount allows you to attach the monitor to your camera's hot shoe or other compatible mounting points.
- Screw the hot shoe mount onto the 1/4-inch screw hole at the bottom or side of the monitor.
- Tighten the locking ring on the hot shoe mount to secure it.
- Attach the hot shoe mount to your camera's hot shoe and tighten its locking mechanism.

Immagine: Un primo piano laterale view of the monitor, detailing the various input/output ports and the threaded mounting point.
4. Accensione del monitor
The monitor can be powered via a DC 12V adapter or an F970 series battery (not included).
- Potenza CC: Connect a 12V DC power adapter to the DC 12V input port on the monitor.
- Potenza della batteria: Ensure an F970 battery is securely attached to the F970 battery plate on the back of the monitor.

Image: The back panel of the monitor, showing the DC 12V power input and the F970 battery plate for portable power.
5. Connecting to a Camera (HDMI)
Use the provided Mini HDMI cable to connect your camera to the monitor.
- Connect one end of the Mini HDMI cable to your camera's HDMI output.
- Connect the other end to the HDMI input port on the FEELWORLD FW760 monitor.
- If installed, ensure the HDMI plug lock is secured.

Image: A close-up of the monitor's input ports, specifically highlighting the 4K HDMI input and listing supported resolutions such as 4K UHD 3840x2160P and 4096x2160P.
Guida video all'installazione
Video: A visual guide demonstrating the unboxing, assembly of the HDMI lock, sunshade, and hot shoe mount for the FEELWORLD FW760 monitor.
Istruzioni per l'uso
Funzionamento di base
- Accensione/spegnimento: Press and hold the power button (usually located on the front panel) to turn the monitor on or off.
- Navigazione nel menu: Use the 'MENU' button to access the main menu. Use the arrow buttons (<, >) to navigate through options and 'V/F1' or 'F2' to confirm selections.
- Pulsanti funzione (F1-F4): These customizable buttons can be assigned to frequently used functions like False Color, Peaking, Zoom, etc. Refer to the menu settings to configure them.
Funzionalità avanzate
Falso colore
The False Color feature assists in setting exposure by displaying different luminance values as distinct colors. This helps identify overexposed or underexposed areas quickly.

Image: A side-by-side comparison showing a normal image and the same image with the False Color function activated, displaying different exposure levels in various colors.
Zebras Exposure
Zebras indicate areas of the image that are overexposed, helping to prevent blown-out highlights. The zebra pattern appears on parts of the image exceeding a set luminance threshold.

Image: A comparison showing a normal image of a horse and the same image with Zebras Exposure activated, indicating overexposed areas with diagonal stripes.
Funzione di zoom
The zoom function allows you to magnify a portion of the image for critical focus assessment. Multiple zoom levels are available.

Image: Four screen captures illustrating different zoom modes: Normal Mode, 1.3X zoom, 2.0X zoom, and 2.0X magnified view.
Image Flip
This feature allows you to flip the image horizontally, vertically, or both, which is useful when the monitor is mounted in unconventional positions.

Image: Four images demonstrating the Image Flip function: Normal image, Horizontal flip, Vertical flip, and Horizontal & Vertical flip.
Nove griglie
The Nine Grid function overlays a 3x3 grid on the screen, assisting with composition using the rule of thirds.

Image: A split image showing the Nine Grid overlay for composition on one side and a zoomed-in portion of an image on the other.
Pixel to Pixel
This mode displays the image at its native resolution without scaling, allowing for precise focus checking.

Image: A comparison showing an image in normal display mode versus Pixel to Pixel mode, highlighting the unscaled, native resolution view.
Specifiche
| Caratteristica | Dettaglio |
|---|---|
| Dimensioni dello schermo | 7 pollici |
| Risoluzione | 1920x1200 (Full HD) |
| Tipo di pannello | Informazione pubblica |
| Viewangolo di ing | 160° Largo |
| Rapporto di contrasto | 1200:1 |
| Luminosità | 450 cd/m² |
| Ingresso HDMI | 4K HDMI (Supports 4K UHD 3840x2160P, 4096x2160P) |
| Spessore | 17mm |
| Peso | 270 g (0.6 libbre) |
| Peso dell'articolo (confezionato) | 1.9 libbre |
| Potenza in ingresso | DC 12V, F970 Battery Plate |
| Caratteristiche speciali | HDMI Lock, Built-in Sunshade, Histogram, False Color, Zebras, Zoom, Image Flip, Nine Grid, Pixel to Pixel |

Image: A visual representation of the monitor's 160° wide viewing angles, showing consistent image quality from various perspectives.

Immagine: Lato A view of the monitor emphasizing its ultra-thin profile, measuring 17mm in thickness.
Risoluzione dei problemi
- Nessun potere: Ensure the DC power adapter is correctly connected or the F970 battery is fully charged and properly seated.
- Nessun segnale: Verify that the HDMI cable is securely connected to both the camera and the monitor. Check camera output settings. Ensure the HDMI lock is engaged.
- Problemi di immagine: If the image is distorted or incorrect, check the input resolution settings on both the camera and the monitor. Reset monitor settings to default if necessary.
- Pulsanti che non rispondono: Power cycle the monitor. If the issue persists, contact customer support.
Manutenzione
- Pulizia: Utilizzare un panno morbido e asciutto per pulire lo schermo e il corpo del monitor. Per le macchie ostinate, utilizzare un panno leggermenteamp cloth with a mild, non-abrasive cleaner suitable for electronics can be used. Avoid harsh chemicals.
- Magazzinaggio: Store the monitor in a cool, dry place away from direct sunlight and extreme temperatures. Use the sunshade or a protective case during transport.
- Cura della batteria: If using battery power, follow the manufacturer's guidelines for battery charging and storage to prolong battery life.
Garanzia e supporto
For warranty information, technical support, or service inquiries, please refer to the warranty card included with your product or visit the official FEELWORLD websito. Conservare la ricevuta d'acquisto come prova d'acquisto per eventuali reclami in garanzia.
Official FEELWORLD Store: Visit the FEELWORLD Store on Amazon


