1. Introduzione
The UNIC UC30 LED Mini Projector is a compact and versatile multimedia device designed for home theater projection. It supports a wide range of input sources and file formats, making it suitable for various entertainment and presentation needs.
Le caratteristiche principali includono:
- Multiple Input Interfaces: AV, VGA, HDMI, USB, SD, and TV input.
- Esteso File Format Support: Compatible with various video, audio, image, and e-book formats.
- Keystone Correction: Adjusts image distortion for optimal viewing.
- Integrated Speaker: Built-in 2.0W *2 stereo speakers for audio output.
- Flexible Projection: Supports front and rear projection models.

Figura 1: Fronte view of the UNIC UC30 LED Mini Projector, showcasingrazie al suo design compatto e alla lente.
2. Impostazione
2.1 Disimballaggio e posizionamento
Carefully remove the projector and all accessories from the packaging. Place the projector on a stable, flat surface. Ensure adequate ventilation around the unit to prevent overheating.
2.2 Collegamento di alimentazione
- Collegare l'adattatore di alimentazione alla porta di ingresso dell'alimentazione del proiettore.
- Collegare l'alimentatore a una presa elettrica adeguata.
2.3 Collegamento dei dispositivi di input
The UC30 projector offers multiple input options. Connect your desired source device (e.g., laptop, DVD player, game console, USB drive) to the corresponding port on the projector.

Figura 2: Posteriore view of the white UNIC UC30 projector, showing various input ports including AV, VGA, HDMI, and USB.
- HDMI: Per video e audio digitali ad alta definizione.
- VGA: Per collegare computer o laptop.
- AV: For standard definition video and stereo audio (using the included 3-in-1 AV cable).
- USB: Per la riproduzione di contenuti multimediali fileÈ direttamente da un'unità flash USB.
- Scheda SD: Per la riproduzione di contenuti multimediali files directly from an SD memory card.
- TV: For connecting to a TV signal source (if applicable to your region/model).
2.4 Correzione della messa a fuoco e della distorsione trapezoidale
After powering on the projector, adjust the focus ring around the lens until the projected image is clear. Use the keystone correction feature (usually a dial or button on the projector) to correct any trapezoidal distortion in the image, ensuring a rectangular projection.
3. Istruzioni per l'uso
3.1 Accensione/spegnimento
Premere il pulsante di accensione sul proiettore o sul telecomando per accendere o spegnere l'unità. Attendere alcuni secondi affinché il proiettore si riscaldi o si raffreddi.
3.2 Selezione della sorgente di input
Use the "Source" button on the projector or remote control to cycle through the available input options (HDMI, VGA, AV, USB, SD, TV) until your desired source is displayed.
3.3 Riproduzione multimediale (USB/SD)
When a USB drive or SD card is inserted, the projector's media player interface will typically appear. Navigate through the menus using the directional buttons on the projector or remote to select and play your desired files.
- Formati video supportati: AVI, MOV, VOB, DAT, MPEG, MPG, RM, RMVB (encoding: MPEG1/MPEG2/MPEG4/DivX/Xvid).
- Formati audio supportati: MP3, WMA, WAV.
- Formati immagine supportati: JPEG, BMP, GIF, PNG.
- Supported E-book Format: TXT.

Figure 3: The UNIC UC30 projector displaying a video of a man in a soccer jersey, demonstrating its video playback capability.
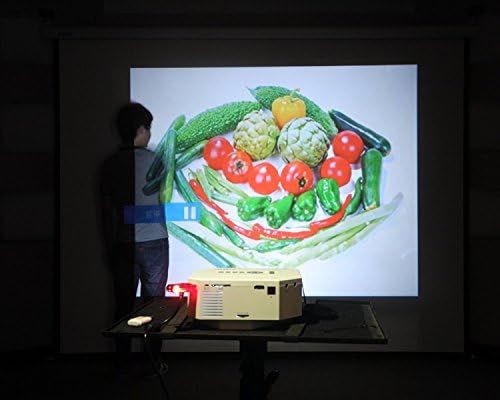
Figure 4: The UNIC UC30 projector displaying a vibrant image of vegetables, showcasing its image display quality.
3.4 Uscita audio
The projector has built-in stereo speakers. For private listening or connecting to external audio systems, use the stereo earphone output terminal.
3.5 Projection Model
The projector supports both front and rear projection. This setting can typically be adjusted in the projector's menu to suit your setup (e.g., projecting from behind a translucent screen).
4. Manutenzione
4.1 Pulizia della lente
Utilizzare un panno morbido e privo di lanugine, specificamente progettato per lenti ottiche, per pulire delicatamente la lente del proiettore. Evitare l'uso di detergenti abrasivi o di esercitare una forza eccessiva, che potrebbero graffiare la lente.
4.2 Pulizia del corpo del proiettore
Pulire l'esterno del proiettore con un panno morbido e asciutto. Per macchie ostinate, utilizzare un panno leggermenteamp cloth can be used, but ensure no liquid enters the ventilation openings.
4.3 Ventilazione
Ensure the projector's ventilation ports are clear of dust and obstructions. Proper airflow is crucial for maintaining optimal operating temperature and extending the lifespan of the LED lamp.
5. Risoluzione Dei Problemi
5.1 No Image or "No Signal" Message
- Check if the projector is powered on and the power indicator light is active.
- Verify that the input cable (HDMI, VGA, AV) is securely connected to both the projector and the source device.
- Ensure the correct input source is selected on the projector (use the "Source" button).
- If using a computer, ensure its display output is enabled (e.g., press Fn + F8 or similar key combination).
5.2 Immagine sfocata
- Regolare l'anello di messa a fuoco attorno all'obiettivo del proiettore finché l'immagine non risulta nitida.
- Assicurarsi che la distanza di proiezione sia compresa nell'intervallo consigliato (1-3.5 metri).
- Pulire la lente del proiettore se appare sporca.
5.3 Nessun suono
- Controllare il livello del volume sia sul proiettore che sul dispositivo sorgente.
- Se si utilizza HDMI, assicurarsi che il dispositivo sorgente invii l'audio tramite HDMI.
- If using AV, ensure the red and white audio cables are correctly connected.
- If external speakers are connected, ensure they are powered on and functioning correctly.
5.4 Image Distortion (Trapezoid Shape)
- Adjust the keystone correction feature on the projector to square the image.
- Ensure the projector is placed on a level surface and is as perpendicular to the screen as possible.
6. Specifiche
Below are the detailed technical specifications for the UNIC UC30 LED Mini Projector:
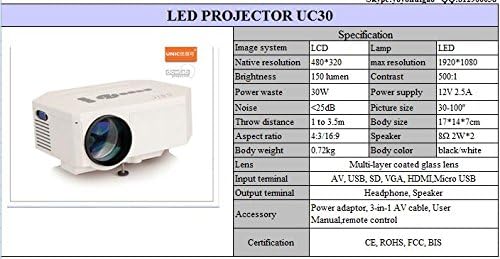
Figure 5: Official specification table for the UNIC UC30 LED Mini Projector, detailing its technical characteristics.
| Caratteristica | Dettaglio |
|---|---|
| Sistema di immagine | LCD |
| Risoluzione nativa | 480 x 320 pixel |
| Supporto per la risoluzione massima | 1920 x 1080 (Full HD) |
| Luminosità | 150 LUX (150 lumen) |
| Rapporto di contrasto | 500:1 |
| Consumo energetico | 30W |
| Alimentazione elettrica | 12V 2.5A |
| Livello di rumore | <25dB |
| Distanza di lancio | Da 1 a 3.5 metri |
| Dimensioni dell'immagine | 30-120 pollici |
| Proporzioni | 4:3 / 16:9 |
| Peso corporeo | 0.72 kg |
| Dimensioni del corpo | Dimensioni: 17 x 14 x 7 cm |
| Oratore | 2.0W *2 Stereo |
| Lente | Multi-layer coated glass lens |
| Terminali di ingresso | AV, USB, SD, VGA, HDMI, Micro USB |
| Terminali di uscita | Stereo Earphone, Speaker |
| Accessori inclusi | Power adapter, 3-in-1 AV cable, User Manual, Remote control |
| Certificazioni | CE, ROHS, FCC, BIS |
7. Garanzia e supporto
For information regarding warranty coverage, technical support, or service, please refer to the warranty card included with your product or contact the retailer or manufacturer directly. Keep your purchase receipt as proof of purchase.


