1. Introduzione
The Infinity REF-551A Reference Mono Amplifier is designed to deliver pure power in a compact chassis, suitable for various vehicle installations. This amplifier incorporates advanced topology, variable electronic crossovers, and bass boost control for precise audio system tuning. It features high- and low-level inputs for compatibility with both aftermarket and factory car stereo systems. The REF-551A is also compatible with certain advanced driver assistance systems (ADAS) and Harman HALOsonic technologies, which can enhance the in-car audio experience by reducing noise and simulating engine sounds.
Cosa c'è nella scatola
- 1 x Infinity REF-551A Amppiù vivace
- 1 x High-level input wiring harness
- 2 x Spare fuses
- 2 x 2-color brand stickers
- 1 x Guida rapida

Figura 1: in alto view of the Infinity REF-551A Reference Mono Amplificatore, showcasing its compact design and Infinity branding.
2. Informazioni sulla sicurezza
Si prega di leggere attentamente tutte le istruzioni prima di installare e utilizzare il vostro amplifier. Failure to follow these instructions may result in serious injury or damage to the product or vehicle. Keep this manual for future reference.
- Fonte di energia: Collegare il amplificatore solo a un sistema elettrico a terra negativa da 12 V CC.
- Cablaggio: Ensure all wiring is correctly routed and secured to prevent pinching or damage. Use appropriate gauge wire for power and ground connections.
- Fusibili: Always replace fuses with the same type and rating as specified. Do not bypass fuses.
- Ventilazione: Installare il amplificatore in un luogo che consenta un'adeguata circolazione dell'aria per evitare il surriscaldamento. Non coprire il amplificatore con tappeti o altri materiali.
- Installazione professionale: In caso di dubbi su qualsiasi fase del processo di installazione, rivolgersi a un installatore professionista qualificato.
- Protezione dell'udito: Prolonged exposure to high volume levels can cause permanent hearing loss. Use caution when adjusting volume.
3. Configurazione e installazione
Proper installation is crucial for optimal performance and safety. Choose a mounting location that is dry, well-ventilated, and secure. Avoid mounting the amplifier where it will be exposed to direct sunlight, excessive heat, or moisture.
Montaggio del Amppiù vivace
Mettere in sicurezza il amplifier firmly to a solid surface using appropriate screws. Ensure there is enough space around the amplificatore per la circolazione dell'aria.
Collegamenti elettrici
Prima di effettuare qualsiasi collegamento, scollegare il terminale negativo della batteria del veicolo per evitare cortocircuiti.
Connessioni di alimentazione e di terra
- +12V (Alimentazione): Connect a heavy-gauge power cable directly from the vehicle's positive battery terminal to the +12V terminal on the amplifier. Install an appropriate fuse holder (not supplied) within 18 inches (45 cm) of the battery.
- GND (Terra): Collegare un cavo di terra di grosso calibro dal terminale GND sul amplificatore su una superficie metallica pulita e non verniciata del telaio del veicolo. Assicurarsi che il collegamento elettrico sia corretto.
- REM (telecomando): Collegare un cavo di accensione remota dall'uscita remota dell'unità principale al terminale REM sul amplifier. Se l'unità principale non ha un'uscita remota, il amplifier features auto signal detection, which can turn it on/off by sensing an audio signal.
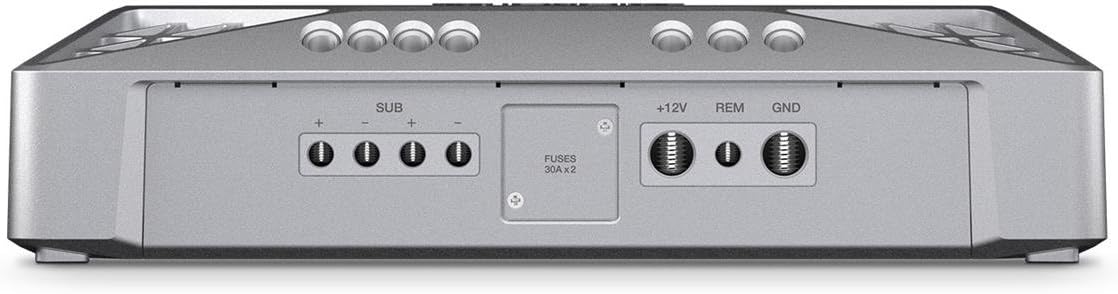
Figura 2: Posteriore view del amplifier, detailing the power, ground, remote, and subwoofer output terminals. Note the fuse compartment.
Connessioni di ingresso audio
- Ingresso a basso livello (RCA): Per le unità principali con uscite pre-out RCA, collegare i cavi RCA dall'unità principale al amplifier's INPUT (LO) terminals.
- Input di alto livello: For head units without RCA pre-outs, use the supplied high-level input wiring harness. Connect the speaker wires from your head unit to the harness, then plug the harness into the amplifier's high-level input.
Collegamenti di uscita degli altoparlanti Speaker
Connect your subwoofer(s) to the SUB terminals on the amplifier. Ensure correct polarity (+ to + and - to -) for optimal performance. This is a mono amplifier, designed for a single subwoofer or multiple subwoofers wired to a mono load.

Figura 3: Fronte view del amplifier, displaying the RCA input, input level switch, gain, bass boost, and phase controls.
4. Funzionamento del Amppiù vivace
Una volta installato, è possibile regolare il amplifier's settings to optimize sound performance for your vehicle and subwoofer setup.
Controlli e regolazioni
- INPUT LEVEL (LO/HI1/HI2): This switch adjusts the input sensitivity to match the output voltage of your head unit. Set to 'LO' for low-level (RCA) inputs. For high-level inputs, select 'HI1' or 'HI2' based on your head unit's output.
- GUADAGNO (MIN/MAX): Il controllo del guadagno corrisponde al amplifier's input sensitivity to your head unit's output. Start with the gain at minimum, then slowly increase it until you hear distortion, then back off slightly.
- FREQ (Crossover Frequency): This knob adjusts the low-pass filter frequency. It allows only frequencies below the set point to pass to the subwoofer. Adjust this to blend the subwoofer output smoothly with your main speakers.
- BASS BOOST (0dB/+9dB): This control provides a boost at 45Hz to enhance bass impact. Use sparingly to avoid distortion.
- FASE (0°/180°): This switch adjusts the phase of the subwoofer output relative to the main speakers. Experiment with both settings to find the one that provides the most impactful and cohesive bass response.
5. Manutenzione
The Infinity REF-551A ampIl filtro richiede una manutenzione minima. Seguire queste linee guida per garantirne la longevità:
- Pulizia: Pulire periodicamente il ampl'esterno del filtro con un panno morbido e asciutto. Non utilizzare prodotti chimici aggressivi o detergenti abrasivi.
- Ventilazione: Assicurarsi che il amplifier's cooling fins and ventilation openings remain clear of dust and debris.
- Connessioni: Controllare di tanto in tanto tutti i collegamenti elettrici per accertarsi che siano saldi e privi di corrosione.
6. Risoluzione Dei Problemi
Se riscontri problemi con il tuo amplifier, consult this section for potential solutions before contacting support.
Nessun potere / Amplifier non si accende
- Check the main fuse near the battery and the fuses on the amplifier. Replace if blown.
- Verify that the +12V power wire is connected securely to the battery and the amppiù vivace.
- Ensure the ground wire is securely connected to a clean metal chassis point.
- Check the remote turn-on wire connection. If using auto signal detection, ensure the head unit is on and producing an audio signal.
Nessuna uscita audio
- Confirm that the head unit is on and playing audio.
- Check all audio input connections (RCA or high-level harness) for proper seating and continuity.
- Verify speaker wire connections at both the amplifier and the subwoofer. Ensure correct polarity.
- Regolare il amplifier's GAIN control. It might be set too low.
Suono distorto
- Reduce the GAIN setting on the amppiù vivace.
- Check for proper impedance matching between the amplifier and the subwoofer(s).
- Ensure the subwoofer is not overdriven. Reduce the head unit's volume or bass boost.
- Controllare che non vi siano cavi degli altoparlanti allentati o cortocircuiti.
AmpSurriscaldamento del lifier
- Assicurare una ventilazione adeguata attorno all' amplificatore. Rimuovere eventuali ostruzioni.
- Check the speaker impedance. Running the amplifier below its minimum recommended impedance can cause overheating.
- Reduce the GAIN setting or BASS BOOST.
7. Specifiche
| Caratteristica | Specificazione |
|---|---|
| Modello | REF-551A |
| Potenza di uscita (2Ω) | 550W RMS x 1, <1.0% THD+N |
| Potenza di uscita (4Ω) | 370W RMS x 1, <1.0% THD+N |
| Potenza massima | Picco da 1300 W |
| Signal-to-Noise Ratio | >80dB (ref 1W output @ 4Ω) |
| Numero di canali | 1 (Mono) |
| Dimensioni articolo (L x P x A) | 11.5 x 9.25 x 4.25 pollici |
| Peso dell'articolo | 7.28 libbre |
| Materiale | Metallo |
| Tipo di montaggio | Montaggio in superficie |
8. Garanzia e supporto
Informazioni sulla garanzia
The Infinity REF-551A Reference Mono Amplifier viene fornito con un Garanzia del produttore di 1 anno. This warranty covers defects in materials and workmanship under normal use. Please retain your proof of purchase for warranty claims. The warranty does not cover damage caused by improper installation, accident, abuse, neglect, or unauthorized modification.
Assistenza clienti
For technical assistance, troubleshooting beyond this manual, or warranty service, please contact Infinity customer support. Refer to the contact information provided in your quick start guide or visit the official Infinity websito per i dettagli di supporto più aggiornati.


