1. Introduzione
This manual provides essential information for the proper installation, operation, and maintenance of the Trane Liquid Level/Bottom Sensor, model SEN02128. This sensor is a genuine Trane component designed for use in various Trane chiller systems and other compatible applications. Adherence to these instructions is crucial for optimal performance and safety.
2. Informazioni sulla sicurezza
WARNING: Risk of electric shock and equipment damage.
- Installation and service must be performed by qualified, trained, and authorized personnel only.
- Always disconnect all power to the equipment before installing, servicing, or removing the sensor.
- Follow all local and national electrical codes and safety regulations.
- Assicurare la corretta messa a terra di tutte le apparecchiature.
- Il mancato rispetto di queste istruzioni potrebbe causare lesioni personali, morte o danni alla proprietà.
3. Prodotto finitoview
The Trane Liquid Level/Bottom Sensor (SEN02128) is a critical component designed to detect the presence or level of liquid at the bottom of a vessel or system. It is constructed primarily from copper and features a flange mount for secure installation. This sensor is supplied with a GKT04098 gasket for proper sealing.
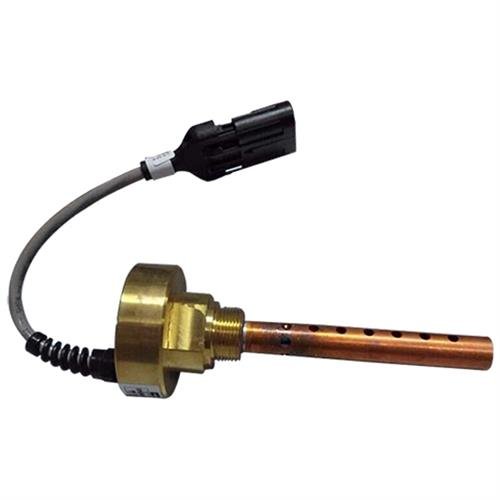
Figure 1: Trane Liquid Level/Bottom Sensor SEN02128. This image displays the sensor unit, featuring a brass-colored flange, a copper probe with perforations, and an attached electrical cable with a connector.
4. Installazione e configurazione
The SEN02128 sensor is designed for flange mounting. Proper installation is essential for accurate operation and system integrity.
- Preparazione: Ensure all power to the system is disconnected and locked out. Relieve any system pressure before beginning installation.
- Posizione di montaggio: Identify the designated flange mount location on the chiller or system where the sensor is to be installed.
- Posizionamento della guarnizione: Place the provided GKT04098 gasket onto the sensor's flange or the system's mounting surface to ensure a leak-proof seal.
- Installazione del sensore: Carefully insert the sensor into the mounting flange. Secure it using appropriate fasteners (not included) and torque to the manufacturer's specifications for the system.
- Collegamento elettrico: Connect the sensor's electrical cable to the corresponding system wiring. Ensure connections are secure and correctly polarized according to the system's wiring diagram.
- First-Time Replacement: For first-time replacements, an ADP01123 adapter may be required (not included). Consult your system's documentation or a Trane service technician for verification.
- Riavvio del sistema: After installation, carefully restore power and monitor the system for proper operation and leak detection.
5. Principi operativi
The Trane Liquid Level/Bottom Sensor SEN02128 functions by detecting the presence or absence of liquid at a specific point, typically the bottom of a component or system. When liquid reaches the sensor's probe, it triggers a signal that is transmitted to the system's control unit. This signal allows the system to monitor liquid levels, prevent dry-run conditions, or initiate specific operational sequences based on the detected liquid status. The sensor provides reliable feedback for maintaining optimal system performance and preventing potential damage.
6. Manutenzione
Regular maintenance helps ensure the longevity and accuracy of the sensor. All maintenance procedures should be performed by qualified personnel.
- Ispezione visiva: Periodically inspect the sensor and its connections for any signs of physical damage, corrosion, or loose wiring.
- Pulizia: Ensure the sensor probe is free from excessive buildup of debris, scale, or contaminants that could impede its function. Clean gently if necessary, following Trane's recommended cleaning procedures for the specific system.
- Integrità della guarnizione: Check the gasket for signs of wear or degradation. Replace if necessary to prevent leaks.
- Controlli del sistema: Refer to your Trane chiller's maintenance schedule for specific sensor testing and calibration requirements.
7. Risoluzione Dei Problemi
If the system indicates a sensor fault or abnormal liquid level readings, consider the following troubleshooting steps. Always ensure safety precautions are followed before attempting any troubleshooting.
- Controllare le connessioni: Verify that the sensor's electrical connections are secure and free from corrosion.
- Alimentazione elettrica: Confirm that the sensor is receiving the correct power supply as specified by the system's wiring diagram.
- Ostruzione fisica: Inspect the sensor probe for any physical obstructions or excessive buildup that might be interfering with its operation.
- Diagnostica di sistema: Consult the diagnostic codes or messages displayed by the Trane chiller's control panel. Refer to the chiller's specific service manual for interpretation.
- Assistenza professionale: If the issue persists after basic checks, contact a qualified Trane service technician for further diagnosis and repair.
8. Specifiche
| Specificazione | Dettaglio |
|---|---|
| Numero di modello | SEN02128 |
| Marca | Trane |
| Materiale | Rame |
| Tipo di montaggio | Montaggio a flangia |
| Peso dell'articolo | 0.01 once |
| Supersedes Part Numbers | SEN-2128, SEN2128, SEN01392, SEN-1392, SEN1392 |
| Accessori inclusi | GKT04098 Gasket |
| Potential First-Time Replacement Requirement | ADP01123 (Not Included) |
9. Garanzia e supporto
The Trane Liquid Level/Bottom Sensor SEN02128 is a genuine OEM component and comes with a factory warranty. For specific warranty terms and conditions, please refer to the documentation provided with your Trane equipment or contact Trane directly.
For technical support, service, or to order replacement parts, please contact your authorized Trane service provider or visit the official Trane website. Always provide the model number (SEN02128) and the serial number of your Trane equipment when seeking support.

Figura 2: Componenti OEM ufficiali Trane StampQuesta immagine mostra una st circolareamp with the text 'TRANE OEM COMPONENT' and stars, indicating the authenticity and quality of the part.


