Introduzione
This manual provides comprehensive instructions for the installation, operation, and maintenance of your Kingston Brass American Classic Widespread Bathroom Faucet, Model FSC1975ACL. Please read these instructions thoroughly before beginning installation to ensure proper function and longevity of your product. Retain this manual for future reference.

Image: The Kingston Brass American Classic Widespread Bathroom Faucet, Model FSC1975ACL, featuring an oil-rubbed bronze finish and a three-piece design with two handles and a central spout.
Informazioni sulla sicurezza
Observe all local plumbing and building codes. Professional installation is recommended. Always turn off the main water supply before installing or servicing the faucet. Wear safety glasses during installation. Avoid using harsh chemicals or abrasive cleaners on the faucet finish.
Contenuto della confezione
Verificare che tutti i componenti siano presenti prima di iniziare l'installazione:
- Widespread Bathroom Faucet Assembly (Spout and two handles)
- Hardware di montaggio
- Gruppo di scarico a scomparsa
- Hot and Cold Water Supply Lines (typically 1/2" IPS connection)
Strumenti necessari (non inclusi)
Per l'installazione sono solitamente necessari i seguenti strumenti:
- Chiave regolabile
- Cacciavite con testa Phillips
- Cacciavite a testa piatta
- Mastice idraulico o sigillante siliconico
- Thread Seal Tape (Teflon Tape)
- Basin Chiave inglese (facoltativa, per spazi ristretti)
- Occhiali di sicurezza
- Torcia elettrica
Specifiche
| Marca | Ottone Kingston |
| Nome del modello | American Classic |
| Numero di modello | FSC1975ACL |
| Materiale | Costruzione in ottone massiccio |
| Tipo di finitura | Bronzo strofinato ad olio |
| Tipo di montaggio | Deck Mount, Widespread |
| Conteggio dei fori | 3-Hole Installation |
| Numero di maniglie | 2 |
| Portata massima | 1.2 Gallons Per Minute (4.5 LPM) at 60 PSI |
| Altezza del becco | 6 pollici |
| Portata del becco | 5.19 pollici |
| Tipo di connessione | Standard 1/2" IPS Connection |
| Tipo di cartuccia | Drip-free Ceramic Disc Cartridge |

Immagine: Oltreview of faucet features, highlighting 3-hole installation, 1.2 GPM flow rate, and a rotating swivel spout.
Configurazione e installazione
Follow these steps for proper installation of your widespread bathroom faucet:
Step 1: Prepare the Sink and Water Supply
- Chiudere l'alimentazione idrica principale del bagno.
- Liberare l'area sotto il lavandino per accedervi.
- Se si sostituisce un vecchio rubinetto, rimuoverlo e pulire accuratamente la superficie del lavandino.
Step 2: Install the Faucet Handles
- Insert the hot and cold valve bodies through the outer holes of the sink deck.
- From underneath the sink, secure each valve body with its respective washer and mounting nut. Hand-tighten, then use a basin wrench or adjustable wrench to tighten securely. Ensure the handles are properly oriented.

Immagine: Un dettaglio view of one of the faucet handles, showcasing its design and oil-rubbed bronze finish.
Step 3: Install the Faucet Spout
- Apply a thin bead of plumber's putty or silicone sealant around the base of the faucet spout.
- Insert the spout body through the center hole of the sink deck.
- From underneath, secure the spout with its washer and mounting nut. Tighten securely.

Image: A close-up of the faucet spout, highlighting the aerator and the smooth curve of the design.
Step 4: Connect Water Supply Lines and Cross-Connectors
- Connect the hot and cold water supply lines to the corresponding valve bodies. Use thread seal tape on the threads and tighten with an adjustable wrench.
- Connect the flexible cross-connectors between the valve bodies and the spout assembly. Ensure all connections are tight to prevent leaks.
- Connect the main water supply lines from the wall to the bottom of the faucet valve bodies.
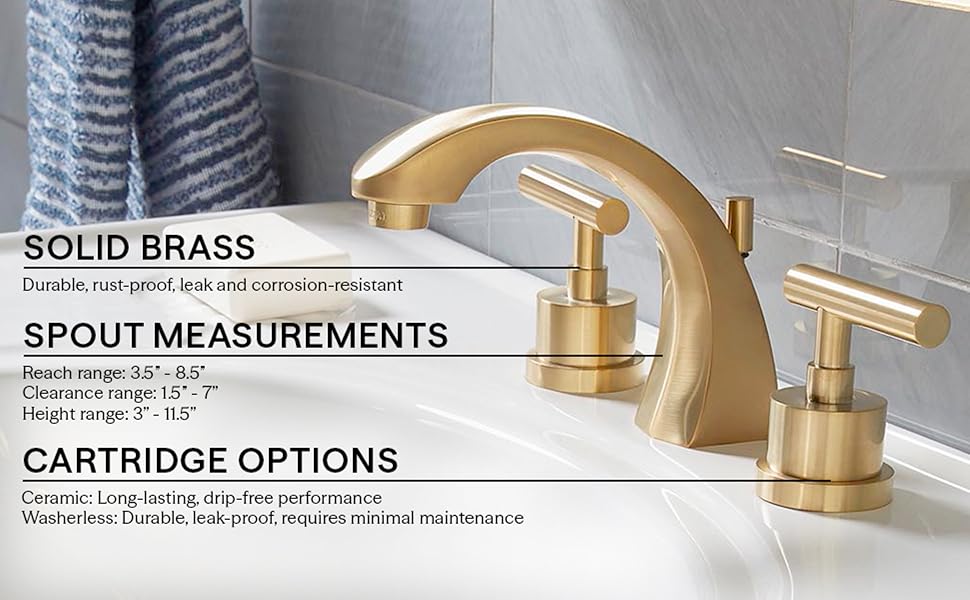
Image: Diagram illustrating the solid brass construction, key spout measurements (reach, clearance, height), and available cartridge options (ceramic for drip-free performance).
Step 5: Install the Pop-Up Drain Assembly
- Disassemble the pop-up drain. Apply plumber's putty or silicone sealant under the flange of the drain body and insert it into the sink drain hole.
- From underneath, secure the drain body with the rubber washer, friction washer, and mounting nut. Tighten securely.
- Connect the pivot rod to the pop-up stopper and the lift rod. Adjust the height of the stopper as needed.

Image: Detailed diagram of the drain assembly with overflow, showing the plunger, clevis screw, spring clip, and clevis strap for proper installation and function.
Fase 6: verificare la presenza di perdite
- Aprire lentamente la rete idrica principale.
- Check all connections for leaks. If leaks occur, tighten the connections further.
- Remove the aerator from the spout and turn on both hot and cold water to flush out any debris. Replace the aerator.

Image: Technical diagram providing detailed dimensions and assembly views for the widespread lavatory faucet, essential for accurate installation.
Istruzioni per l'uso
Your Kingston Brass American Classic Widespread Bathroom Faucet is designed for ease of use.
- Flusso d'acqua: Ruotare le maniglie in senso orario per diminuire il flusso dell'acqua e in senso antiorario per aumentarlo.
- Controllo della temperatura: La manopola sinistra controlla l'acqua calda, mentre quella destra controlla l'acqua fredda. Regola entrambe le manopole per ottenere la temperatura dell'acqua desiderata.
- Beccuccio girevole: The faucet spout is designed to swivel 360 degrees, allowing for flexible positioning and ease of use within the sink basin.
- Piletta di scarico a scomparsa: Use the lift rod located behind the spout to open and close the drain stopper.

Image: Diagram highlighting the 360-degree swivel capability of the faucet spout, providing enhanced flexibility.
Manutenzione e cura
Proper care will ensure the lasting beauty and performance of your faucet.
- Pulizia: Clean the faucet regularly with a soft cloth and warm, soapy water. Rinse thoroughly and dry with a soft cloth to prevent water spots.
- Evitare detergenti aggressivi: Do not use abrasive cleaners, harsh chemicals, ammonia-based products, or polishes containing alcohol. These can damage the oil-rubbed bronze finish.
- Manutenzione dell'aeratore: If water flow decreases, the aerator may be clogged. Unscrew the aerator from the spout, clean any debris, and rinse before reattaching.
- Cartuccia a dischi ceramici: The faucet features a drip-free ceramic disc cartridge, which typically requires no maintenance. If a leak occurs from the handles, contact customer support.
Risoluzione dei problemi
| Problema | Possibile causa | Soluzione |
|---|---|---|
| Basso flusso d'acqua | Aeratore intasato; valvole di intercettazione parzialmente chiuse; detriti nelle linee di alimentazione. | Pulire l'aeratore; assicurarsi che le valvole di intercettazione siano completamente aperte; lavare le linee di alimentazione. |
| Leaks from Spout | Loose connections; damaged O-rings or cartridge. | Check and tighten all connections; if problem persists, contact customer support for replacement parts. |
| Leaks from Handles | Loose packing nut; worn cartridge. | Tighten packing nut (if applicable); replace ceramic disc cartridge if necessary (contact customer support). |
| Problemi di temperatura dell'acqua | Collegamento errato della linea di alimentazione caldo/freddo; problemi allo scaldabagno. | Verify hot and cold lines are connected correctly; check water heater settings. |
Garanzia e supporto
Kingston Brass products are manufactured under strict quality standards. For specific warranty details, please refer to the warranty card included with your purchase or visit the official Kingston Brass website. For technical assistance, replacement parts, or any other inquiries, please contact Kingston Brass customer support directly.
Produttore: Ottone Kingston
Websito: www.kingstonbrass.com


