1. Introduzione
This manual provides essential information for the safe and efficient operation of your KING KB ECO2S Garage Heater. The KB ECO2S series offers advanced heating solutions with an integrated electronic thermostat and remote control, designed for energy-efficient 2-stage heating. It features an Eco mode, fan-only operation, and timer functions, making it suitable for primary or supplemental heating in garages, workshops, and similar large spaces.
Si prega di leggere attentamente il presente manuale prima dell'installazione e dell'uso e di conservarlo per riferimento futuro.

Image 1: KING KB ECO2S Garage Heater, showing the main unit, remote control, and mounting bracket.
2. Informazioni importanti sulla sicurezza
AVVERTENZA: rischio di incendio, scossa elettrica o lesioni personali.
- Leggere tutte le istruzioni prima di utilizzare questo riscaldatore.
- Questa stufa è calda quando è in uso. Per evitare ustioni, evitare il contatto della pelle nuda con superfici calde. Tenere materiali combustibili, come mobili, cuscini, biancheria da letto, carta, vestiti e tende, ad almeno 90 cm dalla parte anteriore della stufa e tenerli lontani dai lati e dal retro.
- È necessaria la massima cautela quando un riscaldatore viene utilizzato da bambini o invalidi o nelle loro vicinanze e quando il riscaldatore viene lasciato in funzione e incustodito.
- Non utilizzare alcun riscaldatore con un cavo o una spina danneggiati o dopo che il riscaldatore non funziona correttamente, è caduto o è stato danneggiato in qualsiasi modo. Smaltire il riscaldatore o restituirlo a un centro di assistenza autorizzato per l'esame e/o la riparazione.
- Non utilizzare all'aperto.
- Questo riscaldatore non è destinato all'uso in bagni, aree lavanderia e simili luoghi interni. Non posizionare mai il riscaldatore dove potrebbe cadere in una vasca da bagno o in un altro contenitore d'acqua.
- Non far passare il cavo sotto la moquette. Non coprire il cavo con tappeti, passatoie o rivestimenti simili. Disporre il cavo lontano dall'area di passaggio e dove non ci si possa inciampare.
- Per scollegare il riscaldatore, spegnere i comandi, quindi staccare la spina dalla presa.
- Non inserire o consentire l'ingresso di oggetti estranei nelle aperture di ventilazione o di scarico poiché ciò potrebbe causare scosse elettriche o incendi oppure danneggiare il riscaldatore.
- Per prevenire un possibile incendio, non bloccare in alcun modo le prese d'aria o gli scarichi. Non utilizzare su superfici morbide, come un letto, dove le aperture potrebbero bloccarsi.
- Un riscaldatore ha parti calde e che generano archi elettrici o scintille al suo interno. Non utilizzarlo in aree in cui vengono utilizzati o conservati benzina, vernice o vapori o liquidi infiammabili.
- Utilizzare questo riscaldatore solo come descritto nel presente manuale. Qualsiasi altro utilizzo non raccomandato dal produttore può causare incendi, scosse elettriche o lesioni alle persone.
- This heater must be hardwired by a qualified electrician. Do not attempt to install or service this unit yourself if you are not qualified.
3. Contenuto della confezione
Prima di procedere con l'installazione, verificare che tutti i componenti siano presenti e integri.
- KING KB ECO2S Garage Heater Unit
- Staffa di montaggio universale a parete/soffitto
- Telecomando
- Manuale di istruzioni (questo documento)

Image 2: The heater unit, mounting bracket, and remote control as included in the package.
4. Installazione
IMPORTANT: This heater requires hardwiring to a 240V electrical supply. Installation must be performed by a qualified, licensed electrician in accordance with all local and national electrical codes.
4.1 Montaggio del riscaldatore
The heater comes with a universal bracket for wall or ceiling mounting. Ensure the mounting surface is structurally sound and capable of supporting the heater's weight (approximately 37.5 lbs).
- Select a mounting location that allows for proper air circulation and is at least 3 feet (0.9 m) away from combustible materials.
- Securely attach the universal bracket to the chosen wall or ceiling studs/joists using appropriate hardware (not included).
- Mount the heater unit onto the bracket. The bracket allows for adjustable positioning to direct heat flow.
4.2 Collegamento elettrico
WARNING: Ensure power is disconnected at the main circuit breaker before attempting any electrical wiring.
- A dedicated 240V circuit with appropriate ampetà (45 Amps for the 10000W model) is required.
- Access the internal wiring compartment of the heater. This typically involves removing a panel on the unit.
- Connect the supply wires to the heater's terminals as indicated in the wiring diagram located inside the heater's wiring compartment and in the full installation guide. Ensure proper grounding.
- Securely close the wiring compartment.
- Una volta completata l'installazione, ripristinare l'alimentazione tramite l'interruttore automatico.

Immagine 3: posteriore view of the heater, illustrating the fan and the typical location for electrical wiring access.
5. Istruzioni per l'uso
The KB ECO2S heater can be operated using the integrated control panel or the included remote control.
5.1 Pannello di controllo Sopraview
The front panel features a digital display and control buttons for power, mode selection, and temperature adjustment.
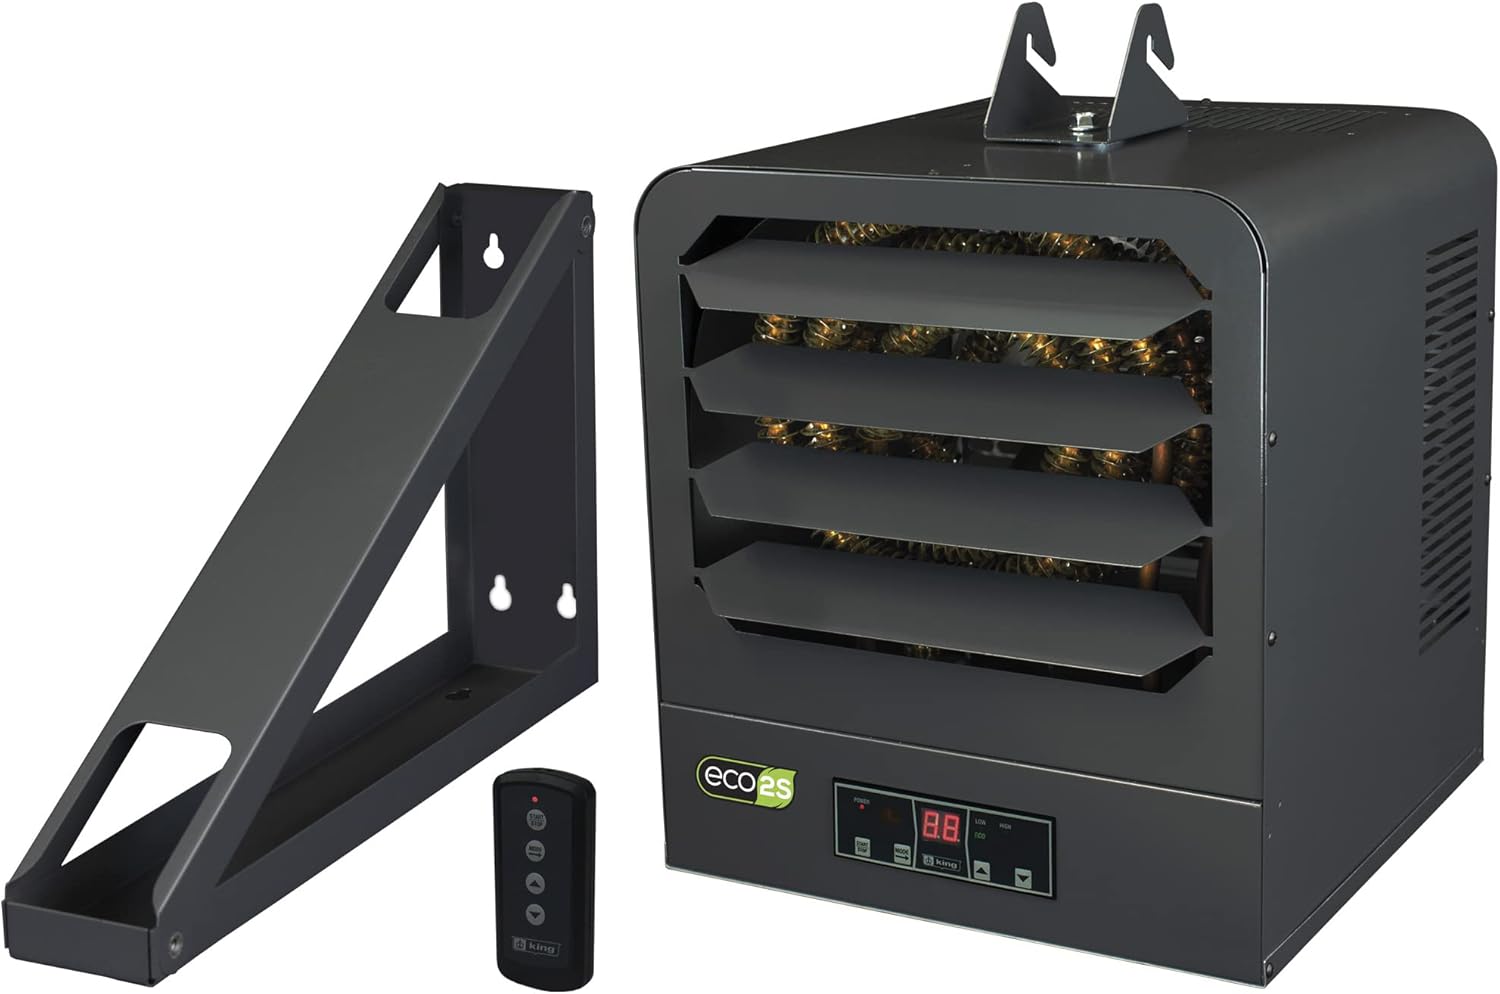
Immagine 4: Dettagliata view of the heater's control panel with digital display and buttons.
5.2 Funzioni del telecomando
The remote control provides convenient access to all heater functions from a distance.
- Accensione/spegnimento: Premere il pulsante di accensione per accendere o spegnere il riscaldatore.
- Regolazione della temperatura: Use the up/down arrows to set the desired temperature. The digital display will show the set temperature.
- Selezione della modalità: Cycle through available modes (Heat, Eco, Fan Only, Timer) using the mode button.
- Modalità ecologica: Automatically adjusts wattage to maintain the set temperature efficiently.
- Modalità solo ventola: Operates the fan without engaging the heating elements, useful for air circulation.
- Funzione timer: Set a timer for automatic shut-off. Refer to the full manual for detailed timer programming.
5.3 Operazione iniziale
Upon first use, the heater may emit a slight odor as manufacturing oils burn off. This is normal and will dissipate quickly.
Set the desired temperature. The heater will operate in 2-stage heating, using the lowest wattage necessary to reach and maintain the set temperature, optimizing energy consumption.
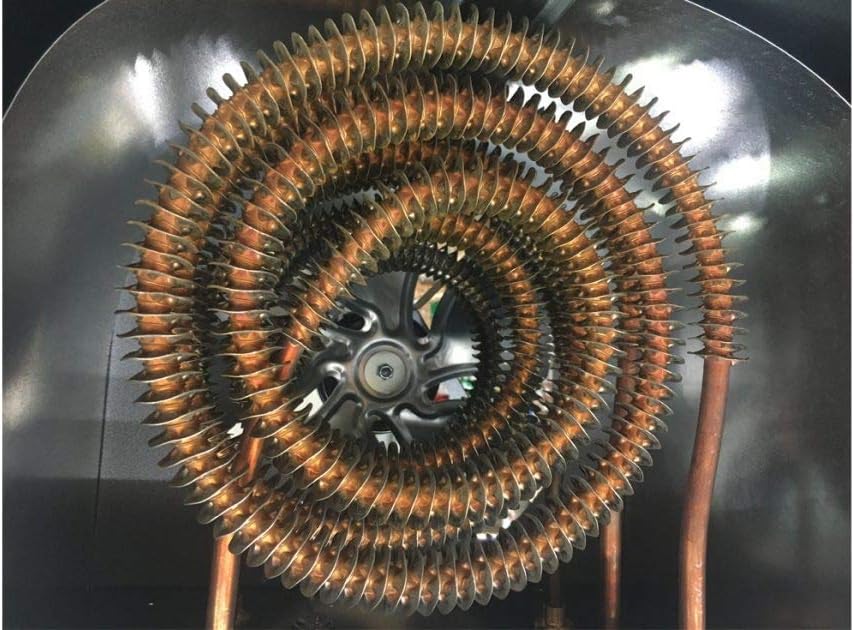
Immagine 5: View of the spiral steel heating elements and fan, designed for efficient heat distribution.
6. Manutenzione
WARNING: Disconnect power at the main circuit breaker before performing any maintenance.
- Pulizia: Pulire periodicamente l'esterno del riscaldatore con un panno morbido eamp panno. Non usare detergenti abrasivi o solventi.
- Aspirazione/scarico aria: Ensure that the air intake and exhaust grilles are free from dust, debris, and obstructions. Use a vacuum cleaner with a brush attachment to gently clean these areas.
- Ispezione interna: For internal cleaning or inspection, it is recommended to contact a qualified service technician.
- Magazzinaggio: Se si conserva la stufa per un periodo prolungato, assicurarsi che sia pulita e asciutta. Conservare in un luogo fresco e asciutto.
7. Risoluzione Dei Problemi
Prima di contattare l'assistenza clienti, riview i seguenti problemi comuni e le relative soluzioni:
| Problema | Possibile causa | Soluzione |
|---|---|---|
| Il riscaldatore non si accende. | No power supply; circuit breaker tripped; wiring issue. | Check circuit breaker. Ensure proper electrical connection (consult electrician if unsure). |
| Il riscaldatore produce calore insufficiente. | Incorrect temperature setting; room size exceeds heating capacity; poor insulation. | Increase set temperature. Verify heater wattage is appropriate for the space (refer to specifications). Improve room insulation. |
| Heater cycles on/off frequently (clicking sound). | Thermostat sensitivity; rapid temperature changes. | This can be normal operation as the thermostat maintains temperature. If excessive, ensure proper air circulation around the unit and that the thermostat is not exposed to drafts. If the issue persists, contact customer support. |
| Telecomando non funzionante. | Dead batteries; obstruction; out of range. | Replace remote control batteries. Ensure no obstructions between remote and heater. Operate within recommended range. |
8. Specifiche
| Caratteristica | Dettaglio |
|---|---|
| Modello | KB2410-1-B2-ECO |
| Marca | RE |
| Voltage | 240 Volt |
| Amprabbia | 45 Amps |
| Cosatage | 10000 Watt |
| Copertura del riscaldamento | Up to 900 sq ft (based on 8-ft ceiling height and FHA standard insulation values) |
| Dimensioni del prodotto (P x L x A) | 13.5" x 15" x 16.5" |
| Peso dell'articolo | 37.5 libbre |
| Caratteristiche speciali | Remote Control, Electronic Thermostat, 2-Stage Heating, Eco Mode, Fan Only Mode, Timer |
| Numero di velocità | 2 |
| Tipo di carburante | Elettrico |
| Tipo di montaggio | Universal Wall/Ceiling Bracket (included) |

Image 6: Heating coverage chart for various wattage models, including the 10000W model covering up to 900 sq ft.
9. Garanzia e supporto
For warranty information, technical support, or service inquiries, please refer to the official KING Electric webo contattare direttamente il servizio clienti. Conservare la ricevuta d'acquisto come prova d'acquisto per eventuali reclami in garanzia.
Produttore: King Electric
Websito: www.king-electric.com
10. Video di prodotto
KING Electric - Smart Heating Solutions
Video 1: Un overview of KING Electric's commitment to smart heating solutions and manufacturing quality.


