1. Introduzione e oltreview
This manual provides detailed instructions for the installation, operation, and maintenance of your maXpeedingrods 2 Barrel Carburetor. Designed for specific Toyota Corolla and Suzuki Samurai models, this carburetor is engineered for reliable performance and efficient fuel delivery. Please read this manual thoroughly before installation and use to ensure proper function and safety.


2. Caratteristiche del prodotto
- Sistema di arresto manuale: Equipped with a manual choke for precise cold-start control.
- Costruzione durevole: Manufactured from heavy-duty zinc alloy for longevity and resistance to wear.
- Prestazioni ottimizzate: Designed to provide low fuel consumption, stable idle speed, and quick engine response.
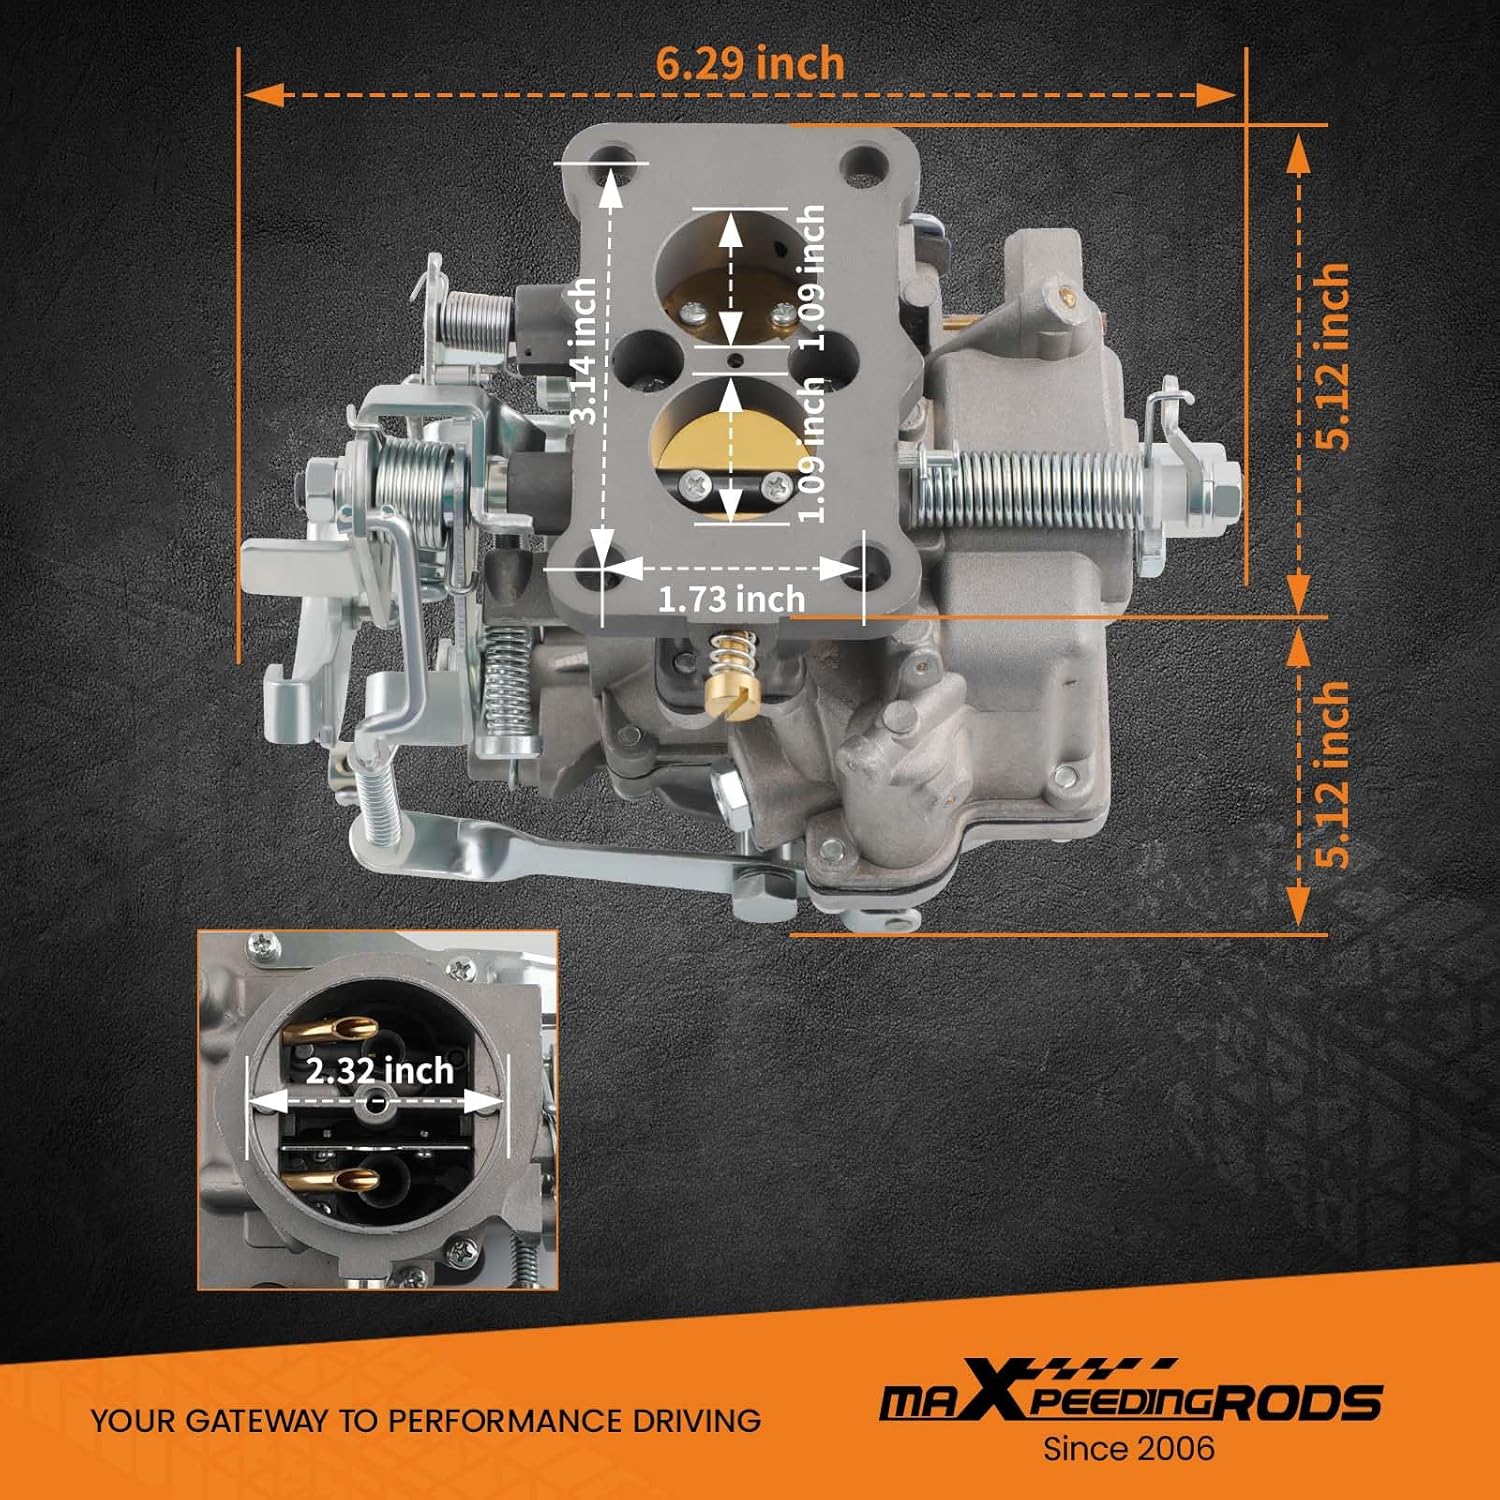
- Ingegneria di precisione: Features a venturi diameter of 21/25mm, intake side inner diameter of 28mm/28mm, and same bore size of 27.8/27.8mm.
- Air Filter Mount: Air filter mount inner diameter (ID) is 59mm, outer diameter (OD) is 63mm.


3. Montaggio del veicolo
This maXpeedingrods 2 Barrel Carburetor is compatible with the following vehicle models:
- Toyota Corolla 3K 4K: 1968-1978
- Toyota Corolla: 1974-1981
- Toyota Starlet: 1974-1978
- Toyota Trueno: 1974-1981
- Suzuki Samurai: 1986-1988 (Note: Engine mounting holes may require modification for Suzuki Samurai models.)
Numeri di parte: 21100-24034, 21100-24035, 21100-24045, 2110024034, 2110024035, 211002404, 21100 24034, 21100 24035, 21100 24045, TOY-250.

4. Specifiche
| Specificazione | Valore |
|---|---|
| Marca | maXpeedingrods |
| Numero di modello | CB-21100-24034-AMUS |
| Numeri di parte OEM | 21100-24034, 21100-24035, 21100-24045 |
| Tipo di servizio del veicolo | Auto |
| Tipo di flangia | Bullone su |
| Tipo di carburante | Benzina |
| Choke Type | Choke manuale |
| Distanza tra i fori di montaggio | 44x80mm |
| Diametro Venturi | 21/25mm |
| Intake Side Inner Diameter | 28mm/28mm |
| Same Bore Size | 27.8/27.8mm |
| Air Filter Mount ID/OD | 59mm/63mm |
| Dimensioni del prodotto | 6.3"P x 7.09"L x 6.1"A |
| Peso dell'articolo | 3.79 libbre |
5. Configurazione e installazione
Carburetor installation requires mechanical knowledge and specialized tools. It is highly recommended that installation be performed by a qualified professional. If you choose to perform the installation yourself, proceed with caution and consult a service manual specific to your vehicle for detailed steps.
Passaggi generali di installazione:
- Disconnect the battery cables to prevent electrical hazards.
- Remove the air cleaner and any associated air intake ductwork.
- Identify and remove all vacuum hoses and other connections attached to the old carburetor. Label them for correct reinstallation.
- Remove any linkages connected to the carburetor (e.g., throttle cable, choke cable).
- Disconnect the fuel supply line, being mindful of residual fuel pressure.
- Carefully remove the old carburetor from the intake manifold.
- Prepare to install the replacement carburetor. Ensure the mounting surface is clean and flat. Use a new gasket (not included) for a proper seal.
- Install the new maXpeedingrods carburetor, securing it with appropriate fasteners.
- Reconnect all linkages, vacuum hoses, and the fuel supply line.
- Check the carburetor for any leaks after initial fuel priming.
- Complete the installation by reconnecting the battery and performing initial adjustments.
Note: For Suzuki Samurai models, modifications to the engine mounting holes may be necessary.


6. Operating Instructions (Manual Choke)
This carburetor features a manual choke, which requires user input for cold starts.
- Partenza a freddo: Pull the choke knob fully out before starting a cold engine. This enriches the fuel mixture for easier starting.
- Riscaldamento del motore: Once the engine starts, gradually push the choke knob in as the engine warms up. The goal is to find the position where the engine runs smoothly without stalling or running too rich (indicated by black smoke or rough idling).
- Warm Engine: For a fully warm engine, the choke should be completely disengaged (pushed all the way in).
- Regolazioni: Fine-tune the choke position based on ambient temperature and engine response.
7. Manutenzione
Regular maintenance is crucial for the longevity and optimal performance of your carburetor.
- Pulizia del sistema di alimentazione: Assicuratevi che il serbatoio e i tubi del carburante siano privi di contaminanti. Utilizzate un filtro del carburante di alta qualità e sostituitelo regolarmente.
- Ispezione del filtro dell'aria: Regularly inspect and replace the air filter to prevent dirt and debris from entering the carburetor.
- Lubrificazione del collegamento: Lubricate all moving linkages (throttle, choke) with appropriate grease or oil to ensure smooth operation.
- Idle Mixture Adjustment: Periodically check and adjust the idle mixture screw for optimal fuel-air ratio, especially after significant temperature changes or if performance issues arise.
- Integrità della guarnizione: Inspect carburetor gaskets for signs of wear or leaks. Replace as necessary to maintain a proper seal.
8. Risoluzione Dei Problemi
If you experience issues with your carburetor, consider the following common problems and potential solutions:
- Prestazioni del motore ridotte: Check for clogged fuel filters, vacuum leaks, or incorrect idle mixture settings.
- Fumo nero dallo scarico: This often indicates a rich fuel mixture. Inspect the choke operation (ensure it's fully open when warm) and idle mixture screw adjustment.
- Backfiring or Overheating: Could be caused by a lean fuel mixture, ignition timing issues, or vacuum leaks.
- Difficoltà di avviamento: Verify choke operation, fuel delivery, and spark plug condition.
- Oil Leaking: Inspect carburetor gaskets and seals for damage.
- Minimo irregolare: Check for vacuum leaks, proper idle speed adjustment, and clean fuel/air filters.

9. Qualità e produzione
maXpeedingrods is committed to providing high-quality automotive parts. Our products are developed and tested by over 200 dedicated engineers and mechanics in a state-of-the-art 861,000 sq ft factory with 15 high-tech production lines. We continuously strive to improve and test our parts to ensure they meet rigorous performance standards.
10. Garanzia e supporto
For warranty information, technical support, or any questions regarding your maXpeedingrods carburetor, please contact our customer service. Each item includes a unique code for verification before shipping, ensuring product authenticity.
Contact information can typically be found on the product packaging or the official maXpeedingrods websito.


