1. Introduzione
The FLIR ONE Thermal Imaging Camera (Gen 3) for Android USB-C transforms your compatible Android phone or tablet into a powerful thermal imager. This device allows you to visualize temperature differences, enabling you to detect issues such as invisible energy leaks, moisture problems, electrical hot spots, and more. It operates by capturing infrared radiation, providing a visual representation of heat energy that is otherwise undetectable to the human eye. The FLIR ONE is designed for ease of use, integrating seamlessly with your mobile device to offer advanced thermal imaging capabilities for various applications around the home or workplace.

Figure 1: FLIR ONE Thermal Imaging Camera connected to an Android smartphone.
2. Cosa c'è nella scatola
Verificare che tutti gli articoli siano presenti nella confezione:
- FLIR ONE Thermal Imager for Android devices
- Custodia protettiva
- Cavo di ricarica da USB-C a USB-A
- Guida rapida

Figure 2: Included components: FLIR ONE camera, protective case, and charging cable.
3. Impostazione
- Charge the FLIR ONE: Before initial use, fully charge your FLIR ONE device using the provided USB-C to USB-A cable. Connect the USB-C end to the FLIR ONE and the USB-A end to a standard USB power adapter (not included) or a computer USB port. The charging indicator light will show the charging status.
- Download the FLIR ONE App: Cercare and download the official "FLIR ONE" application from the Google Play Store on your Android device.
- Installa l'app: Follow the on-screen instructions to install the FLIR ONE app. An initial internet connection may be required for app registration and updates.
- Connect the FLIR ONE: Carefully plug the FLIR ONE camera into the USB-C port of your Android smartphone or tablet. Ensure a secure connection. The adjustable OneFit connector allows for compatibility with various phone cases.
- Avvia l'app: Open the FLIR ONE app. The app should automatically detect the connected camera and display the thermal feed.
Video 1: Official FLIR ONE product overview, dimostrandone vari usi e caratteristiche.
4. Istruzioni per l'uso
4.1 Funzionamento di base
- Once connected and the app is open, the thermal image will appear on your device's screen.
- Point the FLIR ONE at the area you wish to inspect.
- Use the app's interface to capture thermal images or videos.
4.2 MSX Technology
The FLIR ONE utilizes exclusive MSX (Multi-Spectral Dynamic Imaging) technology. This feature blends the thermal image with visual details from your phone's camera, enhancing clarity and making it easier to identify the context of thermal patterns. This results in sharper, more detailed thermal images.
4.3 Applicazioni
The FLIR ONE can be used for a variety of tasks:
- Ispezione della casa: Identify insulation gaps, drafts around windows and doors, and potential moisture intrusion.
- Risoluzione dei problemi elettrici: Detect overheating circuits, loose connections, or overloaded components in electrical panels.
- Idraulica: Locate hidden leaks or clogs by observing temperature differences in pipes.
- Riscaldamento, ventilazione e condizionamento (HVAC): Check for proper airflow, duct leaks, and efficiency of heating and cooling systems.
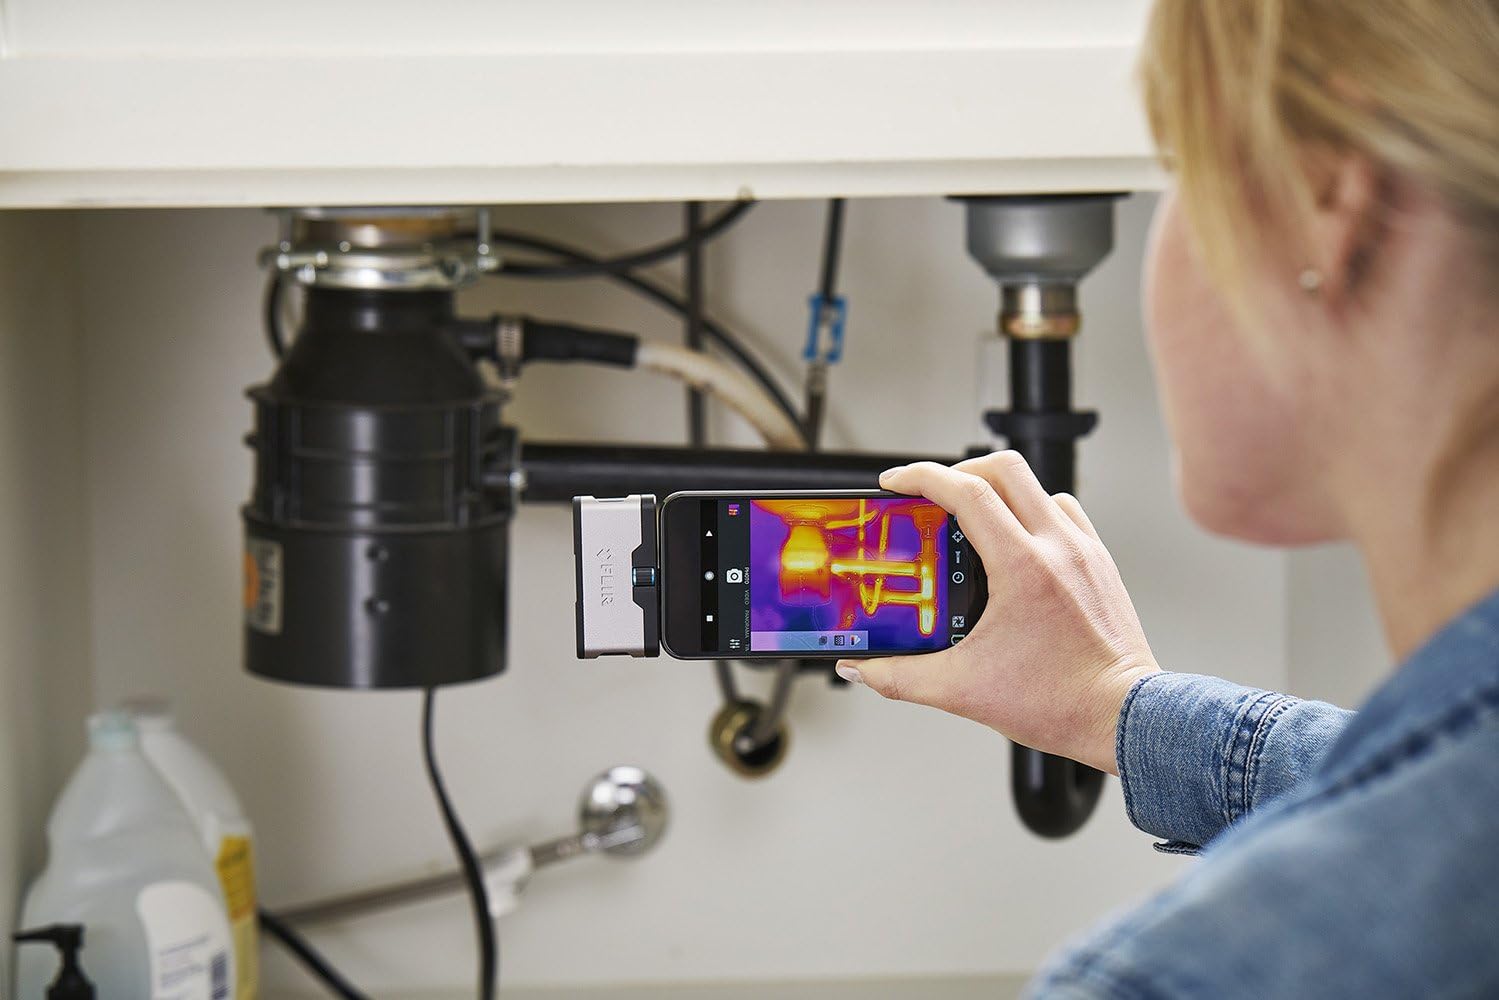
Figure 3: Inspecting plumbing under a sink with the FLIR ONE.
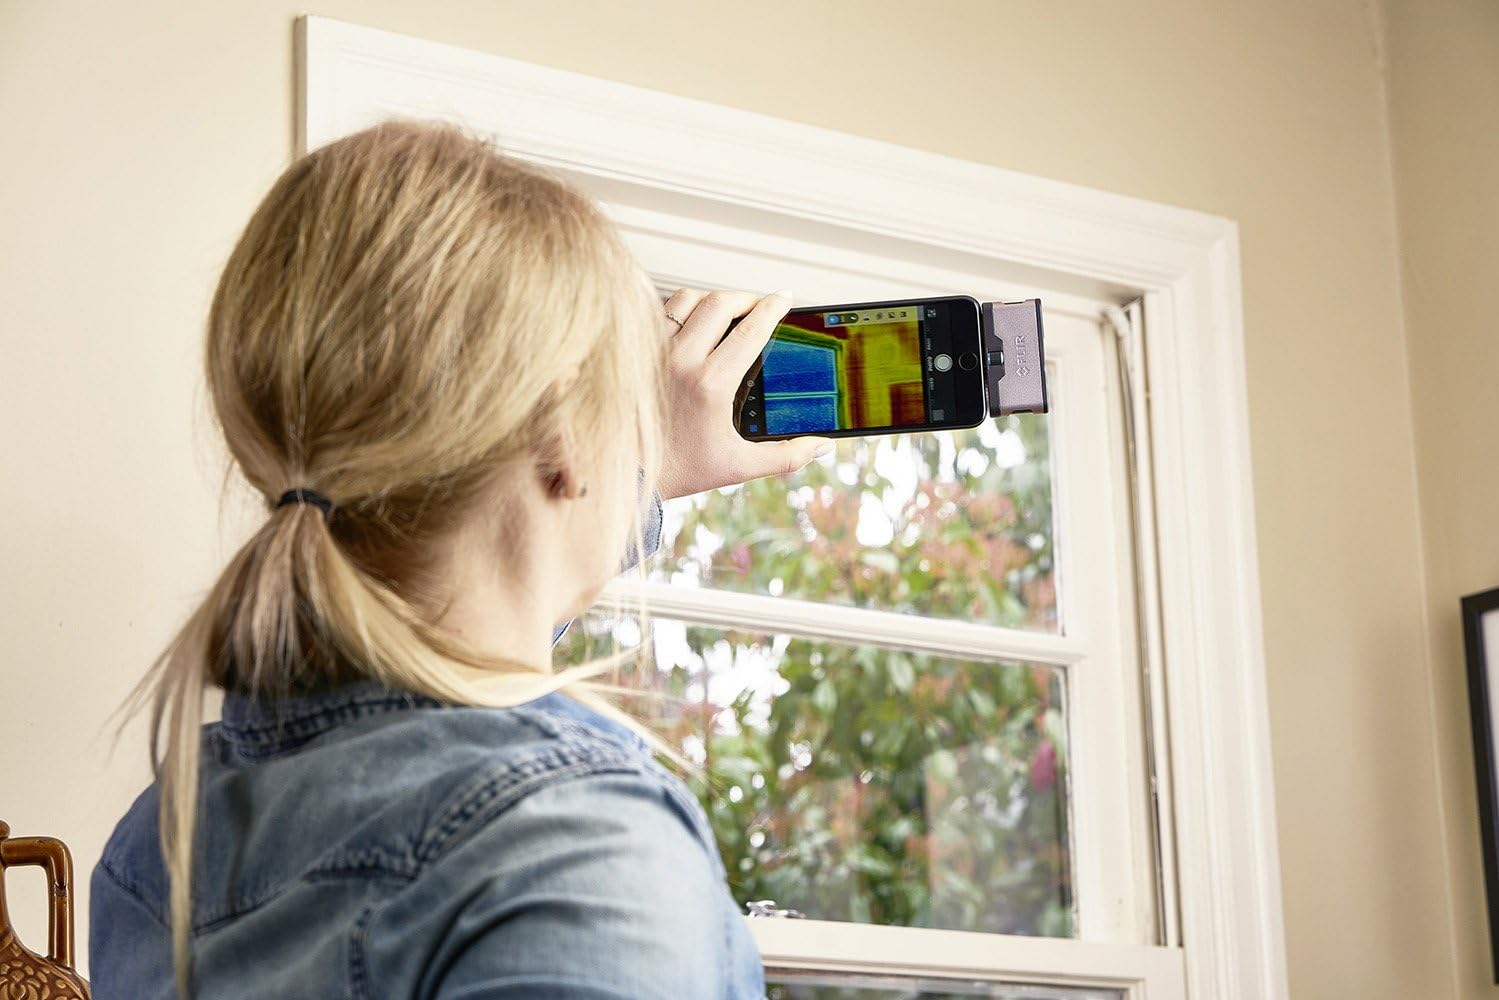
Figure 4: Checking a window for heat loss using the FLIR ONE.

Figure 5: Observing thermal signatures with the FLIR ONE.
5. Manutenzione
- Pulizia: Gently wipe the camera lenses with a soft, lint-free cloth. Avoid abrasive materials or harsh chemicals that could damage the optics.
- Magazzinaggio: Store the FLIR ONE in its protective case when not in use to prevent scratches and damage. Keep it in a cool, dry place away from extreme temperatures.
- Cura della batteria: Per una durata ottimale della batteria, evitare di scaricare completamente il dispositivo frequentemente. Caricarlo regolarmente, anche se non lo si utilizza costantemente.
6. Risoluzione Dei Problemi
6.1 Device Not Detected by App
- Ensure the FLIR ONE is fully charged.
- Verify that the FLIR ONE is securely connected to your Android device's USB-C port.
- Restart the FLIR ONE app and/or your Android device.
- Controlla gli aggiornamenti delle app nel Google Play Store.
- Confirm your Android device supports USB On-The-Go (OTG) functionality.
6.2 Scarsa qualità dell'immagine
- Clean both the thermal and visible light lenses on the FLIR ONE.
- Assicurarsi che non vi siano ostacoli tra la telecamera e il bersaglio.
- Allow the camera a few moments to calibrate after connecting.
6.3 La batteria si scarica rapidamente
- The FLIR ONE has its own internal battery. Ensure it is fully charged before use.
- Prolonged use of thermal imaging can consume power. Close the app when not actively using the camera.
7. Specifiche
| Numero di modello | Numero di telefono: 435-0005-02 |
| Dimensioni del prodotto | 2.7 x 0.6 x 1.4 pollici |
| Peso dell'articolo | 1.28 once |
| Batterie | 1 batteria agli ioni di litio (inclusa) |
| Tecnologia del sensore fotografico | Sensore termico |
| Risoluzione di acquisizione video | Formato: 1080p |
| Apertura massima | 2 anni |
| Tipo di memoria flash | Micro SD (via phone) |
| Tecnologia di connettività | USB-C |
| Colore | Argento |
8. Garanzia e supporto
FLIR products are designed for reliability and performance. For detailed warranty information, please refer to the warranty card included with your product or visit the official FLIR website. For technical support, product registration, or service inquiries, please contact FLIR customer service through their official channels. Keep your purchase receipt and product serial number handy when contacting support.


