Prodotto finitoview
This manual provides detailed instructions for the installation, operation, and maintenance of your KUS Tachometer RPM Gauge with Hour Meter. This gauge is designed to display engine rotation speed and track operating hours, suitable for various applications requiring precise RPM monitoring.
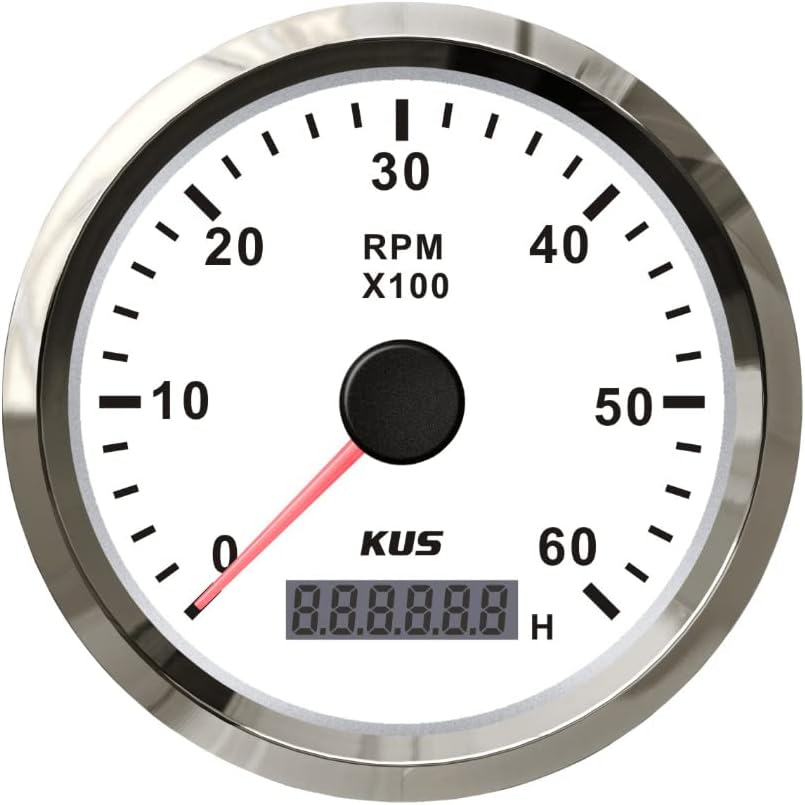
Immagine: Frontale view of the KUS Tachometer RPM Gauge, showing the 0-6000 RPM scale, digital hour meter, and KUS branding.
Configurazione e installazione
Proper installation is crucial for the accurate operation and longevity of your tachometer. Please follow these steps carefully.
Contenuto della confezione:
- 1x KUS Tachometer RPM Gauge
- 1x Multi-plug socket (wiring harness)
- 1x Installation Instruction Sheet

Image: The KUS Tachometer shown with its multi-plug wiring harness and a printed installation guide.
Istruzioni di montaggio:
- Cut a 85mm (3-3/8") diameter hole in your dashboard or an appropriate gauge holder. Ensure a minimum clearance of 55mm (2-3/16") depth behind the panel for the gauge body.
- Remove the fastening ring from the gauge.
- Insert the gauge into the prepared hole, adjust its position, and then secure it with the fastening ring.
- The installation uses a screw-mount style.

Immagine: Lato view of the KUS Tachometer, illustrating the threaded body and fastening nut for secure panel mounting.
Schema elettrico e collegamenti:
Connect the multi-plug socket according to the following diagram. The gauge operates on 12V/24V DC power.
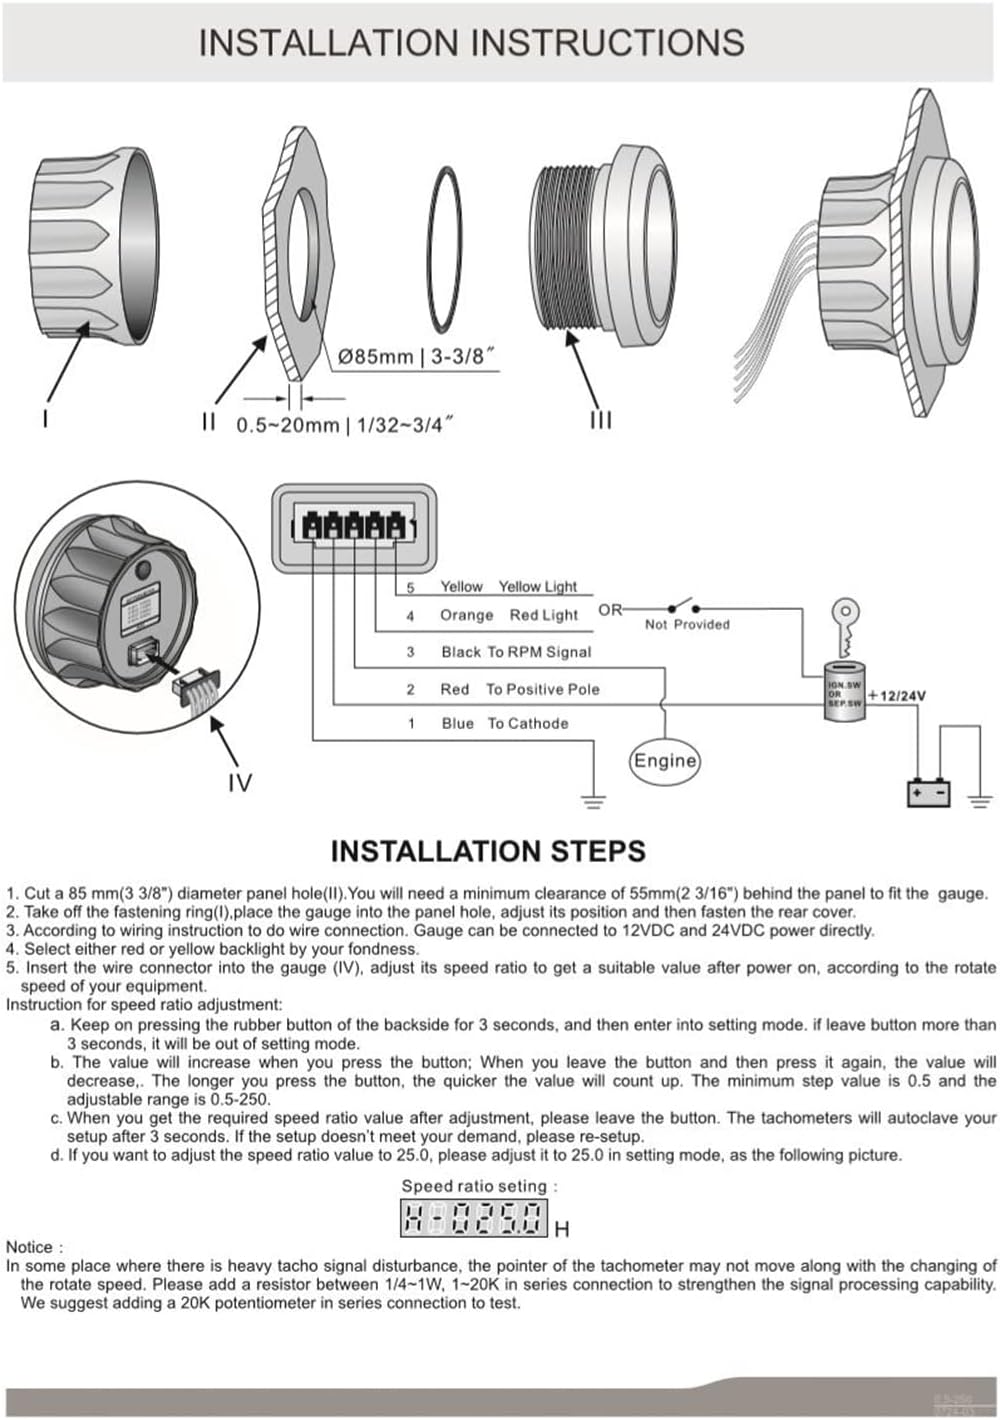
Image: Detailed installation instructions including a wiring diagram for the KUS Tachometer. It shows connections for power, ground, RPM signal, and backlight control.
- Pin 1 (Blue): Connect to Cathode (Ground).
- Pin 2 (Red): Connect to Positive Pole (12V/24V DC).
- Pin 3 (Black): Connect to RPM Signal. This signal can be sourced from the engine, crankshaft sensor, or a dedicated tacho sensor (sold separately). For diesel engines, an alternator 'W' terminal connection is often used. Compatibility with ignition coil signals may vary and should be verified for specific engine types.
- Pin 4 (Orange): Connect to Red Backlight (or not provided).
- Pin 5 (Yellow): Connect to Yellow Backlight (or not provided).
Assicurarsi che tutti i collegamenti siano sicuri e adeguatamente isolati per evitare cortocircuiti.
Istruzioni per l'uso
Accensione:
Once wired correctly, apply power (12V or 24V DC) to the gauge. The needle will perform a self-test, and the digital hour meter will display.
Visualizzazione del numero di giri:
The gauge indicates engine rotation speed from 0 to 6000 RPM. The needle moves based on the input RPM signal.
Contaore:
The integrated digital hour meter continuously tracks the total operating hours of the engine when the gauge is powered.
Selezione della retroilluminazione:
The gauge offers a choice between red and yellow backlighting. Connect the corresponding wire (Orange for Red, Yellow for Yellow) to a positive power source to activate the desired backlight color.

Image: KUS Tachometer displaying red backlighting.

Image: KUS Tachometer displaying yellow backlighting.
Speed Ratio Adjustment:
The speed ratio (pulse per revolution) needs to be adjusted to match your engine's signal output for accurate RPM readings. The adjustable range is 0.5-250.0.
- Press and hold the rubber button on the back of the gauge for 3 seconds to enter setting mode. If no button is pressed for 3 seconds, the gauge will exit setting mode.
- While in setting mode, press the button to increase the speed ratio value. The longer you press, the quicker the value will count up. The minimum step value is 0.5.
- To decrease the speed ratio, release the button and then press it again.
- Once the desired speed ratio value is set, release the button. The tachometer will save the setting after 3 seconds. If the setting is not satisfactory, repeat the process.
- Per esempioample, to set the speed ratio to 25.0, adjust it as shown in the installation image.
Typical idle speed for many engines is between 600-800 RPM. Consult your engine's manual for the correct speed ratio or pulse per revolution.
Manutenzione
The KUS Tachometer is designed for durability and requires minimal maintenance.
- Pulizia: Utilizzare un morbido, damp cloth to clean the gauge face. Avoid abrasive cleaners or solvents.
- Protezione ambientale: The gauge has an IP67 protection rating, meaning it is fully waterproof and dustproof, capable of operating up to 1 meter underwater.
- Temperatura di esercizio: Designed to operate in temperatures ranging from -40°C to +85°C.
- Anti-fogging: Features excellent anti-fogging functionality for clear visibility in varying conditions.
- Materiale: Constructed with a 316 stainless steel bezel for corrosion resistance.
Risoluzione dei problemi
Inaccurate or No RPM Reading:
- Controllare il cablaggio: Ensure all power, ground, and signal connections are secure and correctly wired according to the diagram.
- Sorgente del segnale: Verify that the RPM signal source is compatible with the tachometer. While the gauge can receive signals from various sources (engine, crankshaft sensor, tacho sensor), it is primarily designed for diesel engines with an alternator 'W' connection. Compatibility with ignition coil signals, especially for gasoline engines, may require specific configurations or may not be fully supported.
- Rapporto di velocità: Confirm that the speed ratio setting is correctly configured for your engine. An incorrect ratio will result in inaccurate readings.
Unstable or Erratic Pointer Movement:
- Signal Disturbance: In environments with heavy tacho signal disturbance, the pointer may not move smoothly with changes in engine speed.
- Soluzione consigliata: It is suggested to add a 20K potentiometer in series connection to the signal wire to help stabilize the signal and improve pointer response.
Specifiche
| Caratteristica | Specificazione |
|---|---|
| Numero di modello | EL0250 |
| Fixing Dimension | 85 mm (3-3/8") |
| Indicando la gamma | 0-6000 giri/min |
| Volume di lavorotage | 12V/24V DC (9-32VDC) |
| Temperatura di esercizio | da -40°C a +85°C |
| Grado di protezione | IP67 (impermeabile e antipolvere) |
| Opzioni di retroilluminazione | Rosso, Giallo |
| Modalità di funzionamento | LCD display, Stepper motor |
| Materiale della lunetta | Acciaio inossidabile 316 |
| Dimensioni articolo (L x P x A) | 3.35 x 3.35 x 2.17 pollici |
| Peso dell'articolo | 0.22 chilogrammi (7.7 once) |
| Codice UPC | 790996371849 |
Garanzia e supporto
Informazioni sulla garanzia:
Specific warranty details for this product are not provided in the available documentation. For warranty inquiries, please contact KUS customer support directly.
Assistenza clienti:
For technical assistance, troubleshooting, or any questions regarding your KUS Tachometer RPM Gauge, please contact KUS customer support. Refer to the product packaging or the official KUS websito per le informazioni di contatto.


