Introduzione
This manual provides comprehensive instructions for the Elitech BT-3 Digital Hygrometer Thermometer. This device is designed to accurately monitor both indoor and outdoor temperature, as well as indoor humidity levels, offering essential environmental data for various settings.
Caratteristiche del prodotto
- Termometro digitale: Monitors indoor and outdoor temperature in both Fahrenheit (℉) and Celsius (℃). The measuring range is -58℉ to +158℉.
- Humidity Monitor: Measures indoor relative humidity (RH) within a range of 20% to 99%RH.
- MAX & MIN Records: Automatically stores and displays the maximum and minimum recorded values for indoor/outdoor temperature and indoor humidity.
- Clock Function and Alarming Function: Features a switchable 12 or 24-hour clock display and a settable alarm time.
- Three Mounting Options: Designed for versatility with tabletop, wall-mountable, and magnet-mountable options, allowing convenient placement.
- Indicatore del comfort aereo: Displays the comfort level (DRY/COMFORT/WET) based on current indoor humidity, providing a quick assessment of air conditions.
Disposizione del dispositivo
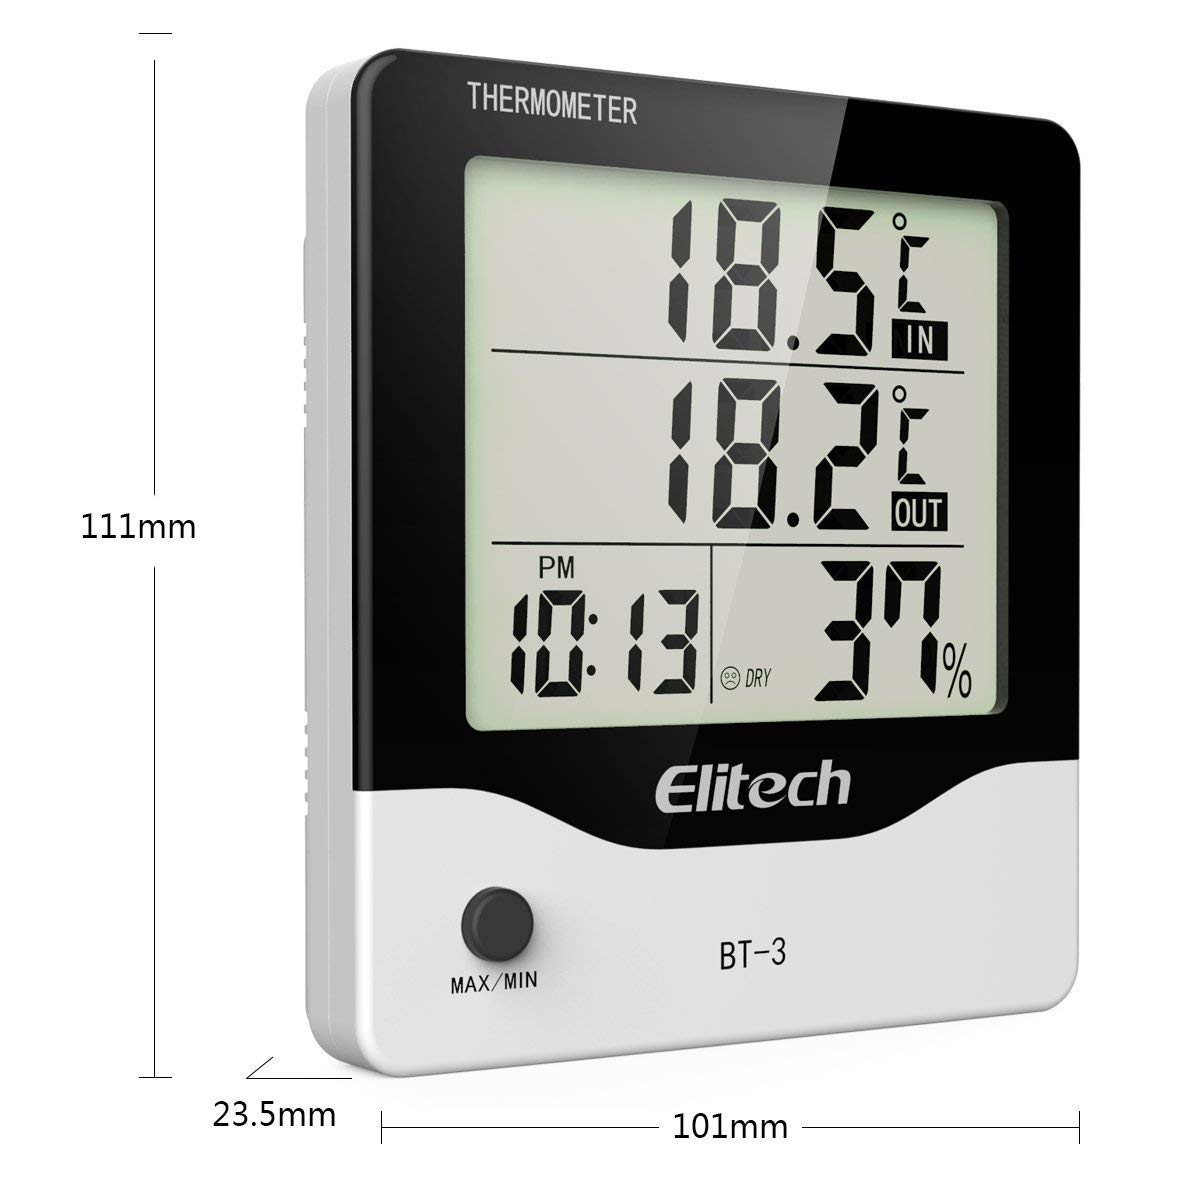
Figura 1: Davanti view of the Elitech BT-3 unit, showing the LCD display with indoor/outdoor temperature, time, and humidity readings. Dimensions are indicated as 111mm height, 101mm width, and 23.5mm depth. A "MAX/MIN" button is visible at the bottom.

Figura 2: Posteriore view of the Elitech BT-3 unit, showing the battery compartment cover and control buttons: MODE, ADJ, CLEAR, RESET, and a ℃/℉ switch. A keyhole slot for wall mounting is also visible.

Figura 3: Posteriore view of the Elitech BT-3 unit, illustrating the foldable kickstand for tabletop use and the attached outdoor temperature probe with its long cable.

Figura 4: Avvicinamento view of the open battery compartment on the back of the Elitech BT-3 unit, showing the slot for a AAA battery (not included).
Impostare
Installazione della batteria
- Individuare il coperchio del vano batteria sul retro dell'unità (fare riferimento alla Figura 2).
- Slide the cover off to open the compartment (refer to Figure 4).
- Insert one AAA battery, ensuring the correct polarity (+/-) is observed. Note: Battery is not included.
- Riposizionare il coperchio del vano batteria facendolo scorrere in posizione.
Posizionamento della sonda
The outdoor temperature probe is connected to the main unit via a long cable. For accurate outdoor temperature readings, place the probe outside in a location that is protected from direct sunlight, rain, and other extreme weather conditions. Ensure the cable is routed safely and does not interfere with windows or doors.
Opzioni di montaggio
The BT-3 offers flexible placement options:
- Da tavolo: Extend the foldable kickstand on the back of the unit (refer to Figure 3) to place it securely on any flat surface.
- Montabile a parete: Utilize the keyhole slot on the back of the unit (refer to Figure 2) to hang it on a screw or nail on a wall.
- Montabile tramite magnete: The unit features built-in magnets, allowing it to be conveniently attached to metallic surfaces such as refrigerators or metal cabinets.
Istruzioni per l'uso
Accensione/spegnimento
The unit powers on automatically once the battery is installed. There is no dedicated power button. To turn off, remove the battery.
Temperature Unit Selection (℃/℉)
On the back of the unit, locate the small switch labeled "℃/℉" (refer to Figure 2). Slide this switch to toggle between Celsius and Fahrenheit temperature displays.
Impostazione dell'ora
- Premere il tasto MODALITÀ button (on the back) to cycle through display modes until the current time is shown.
- Premere e tenere premuto il tasto MODALITÀ button until the hour digit begins to flash.
- Utilizzare il AGG. button (on the back) to adjust the hour.
- Premere MODALITÀ again to move to the minute digit, then use AGG. per regolare i minuti.
- Continua a premere MODALITÀ to set the 12-hour (AM/PM) or 24-hour format.
- Premere MODALITÀ one last time to confirm settings and exit time setting mode.
Impostazione allarme
- Premere il tasto MODALITÀ button until the alarm time is displayed (often indicated by an alarm clock icon).
- Premere e tenere premuto il tasto MODALITÀ button until the alarm hour digit flashes.
- Utilizzare il AGG. pulsante per regolare l'ora della sveglia.
- Premere MODALITÀ again to move to the alarm minute digit, then use AGG. per regolare i minuti.
- Premere MODALITÀ un'ultima volta per confermare e uscire dalla modalità di impostazione della sveglia.
- Per attivare o disattivare l'allarme, premere il tasto AGG. button when the alarm time is displayed. An alarm icon will appear or disappear on the screen to indicate its status.
Registrazioni di temperatura e umidità MAX/MIN
Premere il tasto Massimo/minimo button (on the front of the unit) to view the maximum and minimum recorded indoor/outdoor temperatures and indoor humidity values.
- Premere il tasto Massimo/minimo button repeatedly to cycle through the current readings, maximum readings, and minimum readings.
- Per cancellare i record MAX/MIN, tenere premuto il tasto CHIARO button (on the back of the unit) while the MAX/MIN readings are displayed.
Indicatore di comfort dell'aria
The display includes an indicator that categorizes the indoor air comfort level based on humidity:
- ASCIUTTO: Indicates that the indoor humidity level is low.
- COMFORT: Indicates that the indoor humidity level is within an optimal and comfortable range.
- BAGNATO: Indicates that the indoor humidity level is high.
Manutenzione
- Pulizia: Clean the unit with a soft, dry cloth. Do not use abrasive cleaners, solvents, or immerse the unit in water.
- Sostituzione della batteria: Replace the AAA battery when the low battery indicator appears on the display to ensure continuous and accurate operation.
- Cura della sonda: Keep the outdoor probe clean and free from dirt, dust, and debris.
- Condizioni ambientali: Avoid exposing the unit to extreme temperatures, direct sunlight, or excessively high humidity for prolonged periods, as this can affect accuracy and lifespan.
Risoluzione dei problemi
Letture imprecise
- Posizionamento della sonda: Ensure the outdoor probe is correctly positioned and not exposed to direct sunlight, heat sources, or moisture, which can skew readings.
- Tempo di stabilizzazione: Allow the unit sufficient time (up to 30 minutes) to stabilize and provide accurate readings after initial setup or if it has been moved to a new environment.
- Livello della batteria: Check the battery level and replace it with a fresh AAA battery if the indicator shows low power.
Il display non funziona
- Controllo della batteria: Verify that the battery is installed correctly with the proper polarity.
- Sostituzione della batteria: Sostituisci la batteria con una nuova batteria AAA.
- Ripristino di fabbrica: If the display remains unresponsive, perform a factory reset by pressing the RESET button on the back of the unit. This may require a small pointed object like a paperclip.
Specifiche
| Specificazione | Dettaglio |
|---|---|
| Numero di modello | BT-3 |
| Colore | Bianco |
| Marca | Tecnologia d'élite |
| Peso dell'articolo | 0.16 chilogrammi (5.6 once) |
| Tipo di batteria | 1 C battery required (Alkaline) |
| Valutazione della temperatura più bassa | 32 gradi Fahrenheit |
| Valutazione della temperatura superiore | 122 gradi Fahrenheit |
| Tipo di montaggio | Da tavolo, da parete |
| Voltage | 1.5 Volt |
| Precisione della temperatura | 0.1℃ |
| Dimensioni del prodotto | 4.25 x 5.82 x 1.1 pollici |
Garanzia e supporto
Elitech is committed to providing excellent customer service. The product comes with 24/7 US Technician Support available via email and phone.
For warranty claims, technical assistance, or any product-related inquiries, please contact Elitech customer service directly. Refer to the Elitech official websito o sulla confezione del prodotto per le informazioni di contatto più aggiornate.
Elitech Company Overview
Questo video fornisce una panoramica generaleview of Elitech Technology Inc., its vision, and its range of HVAC/R tools and manufacturing capabilities. It is not specific to the BT-3 product operation but offers insight into the brand's commitment to innovation.
1 video: Elitech AI HVAC/R Tools Create Green Future - An overview of Elitech's technology and manufacturing.


